
Spooktacularly Easy Monster Pudding Cups: Your Ultimate Halloween Treat!
Looking for an adorable and effortless Halloween treat? Fill a cup with vibrant green vanilla pudding, crown it with crushed cookies, add a whimsical monster face, and voilà – you have these irresistibly cute monster pudding cups!
As the leaves begin to turn and a crisp chill fills the air, excitement for Halloween builds. In our home, this festive season isn’t just about the trick-or-treating or the costumes; it truly centers around the food. Yes, you heard that right – not just the piles of candy, but the creative, delicious, and sometimes delightfully creepy culinary creations that make the holiday so special. Shocking, I know, but for us, a truly memorable Halloween experience starts in the kitchen!
This week, we’re diving headfirst into the spirit of the season with a special “Spooky Eats” series. Each day, I’ll be unveiling a simple, yet utterly delicious idea for some Halloween food fun that’s perfect for families. My kids have embraced their roles as chief R&D (research and development) officers with unmatched enthusiasm, sampling and perfecting every ghastly (and yummy) dish. Their dedication has been truly commendable, making this week an absolute joy for everyone involved.
And let me tell you, just wait until you see what we cooked up for Friday. Seriously. I still don’t know whether to gag or giggle just thinking about it (though my kids absolutely devoured them, so take that as you will!). But for now, let’s focus on today’s star attraction, a delightful project that is as fun to make as it is to eat: Monster Pudding Cups!
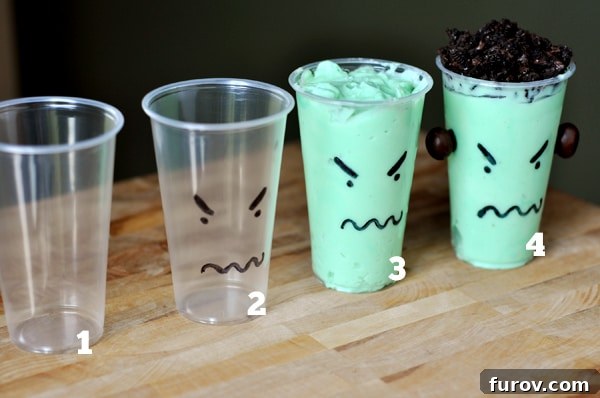
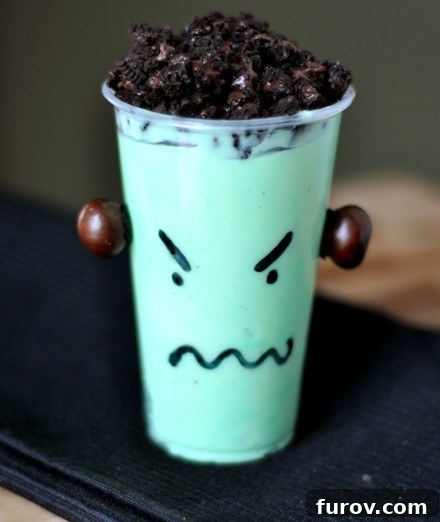
The concept behind these monster pudding cups is incredibly straightforward, yet the result is always super cute and festive. It begins with a clear plastic cup, which serves as your monster’s canvas. Using a black permanent marker, you draw a fun or spooky monster face directly onto the outside of the cup. Then, you fill the cup with luscious, green-tinted vanilla pudding, creating a vibrant base for your creature. Finally, a generous topping of crushed chocolate cookies adds the perfect “dirt” or “hair” effect, bringing your little monster to life.
For those looking to unleash their inner mad scientist, you can elevate your creations even further. Imagine attaching colorful M&M’s to the outside of the cup with a dab of frosting to create menacing “bolts” for a Frankenstein’s monster, or perhaps googly eyes for an extra dose of silliness. The beauty of these monster pudding cups lies in their versatility; let your imagination guide you in crafting the scariest, funniest, or most unique little monster pudding cup you can dream up!
Why These Monster Pudding Cups Are a Must-Make This Halloween
Halloween is all about fun, and these monster pudding cups deliver on every front. They’re not just desserts; they’re an activity, a decoration, and a delicious treat all rolled into one. Here’s why they should be at the top of your spooky season to-do list:
- Kid-Friendly Fun: This recipe is incredibly simple, making it perfect for involving children of all ages. From drawing the monster faces to crushing the cookies, every step offers an opportunity for little hands to participate and feel proud of their culinary creations.
- Effortless Preparation: Forget complicated baking or intricate decorating. With just a few basic ingredients and simple steps, you can whip up a batch of these spooky treats in no time, leaving more time for costumes and trick-or-treating.
- Customizable Creativity: The possibilities for monster designs are endless! Encourage kids to express their creativity by designing unique faces, adding different toppings, or experimenting with various food colorings.
- Perfect Party Food: Served in individual cups, these puddings are ideal for Halloween parties, school events, or even just a fun family dessert. They’re easy to grab, mess-free, and always a hit with both kids and adults.
- Deliciously Spooky: Beyond their adorable appearance, these cups are filled with creamy, homemade vanilla pudding and crunchy cookie crumbs, a combination that is undeniably delicious and satisfying.
Monster Pudding Cups
2 hours
2 hours
Pin
Ingredients
-
1 batch
homemade vanilla pudding,
tinted green with a few drops of food coloring when adding the vanilla extract -
Crushed Oreo or other chocolate cookies,
I used Trader Joe’s Jo-Jo’s for a great flavor -
See-through plastic cups,
8-12 ounce size works best for visibility -
Black permanent marker -
Large M&M’s,
like peanut M&M’s and black frosting (optional, for Frankenstein “bolts” or eyes)
Instructions
-
Prepare your homemade vanilla pudding according to your chosen recipe or package instructions if using a boxed mix. It’s crucial to let the pudding cool completely before assembling to ensure it holds its shape and doesn’t melt your decorations. While the pudding cools, use a black permanent marker to draw various monster faces on the outside of your clear plastic cups. Get creative with different eye shapes, smiles, frowns, and even scars!
-
Once the pudding is cool and set, fill each cup, leaving about 1/4-inch space from the top. This ensures there’s room for your spooky “dirt” topping. Generously top the green pudding with crushed chocolate cookies; these will look like soil or matted monster fur. If you’re creating Frankenstein’s monsters, dab a small amount of black frosting on each side of the cup and attach a large M&M (like a peanut M&M) to mimic bolts or ears. For best results and optimal chilling, refrigerate your monster pudding cups until you’re ready to serve them.
Notes
Cookie Choices: Oreo cookies are a classic choice for their dark color and distinct flavor, but feel free to use any chocolate sandwich cookie you prefer. Trader Joe’s Jo-Jo’s are a fantastic alternative and add a unique twist. You can also experiment with different types of crushed cookies for varying textures and flavors, though chocolate provides the best “dirt” effect.
Decorating Tips: When drawing the faces, allow the marker to dry briefly before handling the cups excessively to prevent smudging. For M&M eyes or bolts, use a small dot of black gel frosting or royal icing to secure them firmly to the cup or pudding. Edible googly eyes are another fantastic option for instant monster appeal!
Mel
Dessert
American
Stovetop
Recommended Products
Unleash Your Inner Mad Scientist: Creative Variations & Topping Ideas
While the basic monster pudding cup is fantastic on its own, here are a few ideas to spark your creativity and make each cup a unique masterpiece:
- Frankenstein’s Favorites: As mentioned, large M&M’s attached with a dab of black frosting make perfect neck bolts. For extra details, use edible marker pens to draw stitches on the green pudding itself.
- Googly Eye Galore: Edible googly eyes are an instant hit and transform any pudding cup into an adorable monster. Attach them directly to the pudding or the cup with a tiny bit of frosting.
- Vampire Vibes: Use red food coloring for a “bloody” pudding, topped with crushed red velvet cookies. Add two small marshmallow “fangs” poking out of the pudding for a vampiric touch.
- Mummy Madness: Create thin strips of white frosting (using a piping bag or a ziploc with a corner snipped) across the top of brown or grey pudding (chocolate or cookies and cream pudding works well). Add two candy eyes peeking through the “bandages.”
- Swamp Monster Surprise: Mix in a few drops of blue food coloring with the green to create a murky swamp-green pudding. Top with gummy worms or green sprinkles for extra texture.
- Witch’s Brew: Use purple food coloring for the pudding. Top with green sprinkles, a few candy corn “toes,” or even a small edible witch’s hat decoration.
- Beyond Cookies: While crushed chocolate cookies are classic, consider other toppings like chocolate shavings, mini chocolate chips, sprinkles, gummy candies (worms, eyes, teeth), or even whipped cream for a “brain” effect!
Tips for a Spooktacular Experience
To ensure your monster pudding cups are a howling success, keep these tips in mind:
- Chilling is Key: Pudding needs ample time to set. For homemade pudding, this means at least 2 hours, but preferably longer. Make sure it’s completely chilled before assembly to prevent a runny mess and ensure distinct layers.
- Permanent Marker Safety: When drawing on the cups, ensure the permanent marker ink is completely dry before handling or adding pudding, especially if children are helping. Consider using food-safe markers if you’re concerned about any contact with the food, though drawing on the outside of plastic cups generally poses no issue.
- Make Ahead Magic: These pudding cups are fantastic for preparing in advance. You can make the pudding a day or two before, store it in an airtight container, and then assemble the cups a few hours before your event. This reduces last-minute stress!
- Serving Suggestions: Arrange them on a platter with other Halloween treats, or let each child pick their monster creation from a spooky-themed display. They also make excellent treats for classroom parties or neighborhood potlucks.
- Storage: Keep assembled monster pudding cups refrigerated until ready to serve. They are best enjoyed within 2-3 days for optimal freshness and texture.
Frequently Asked Questions About Monster Pudding Cups
- Can I use store-bought pudding instead of homemade?
- Absolutely! While homemade pudding offers a superior taste and texture, store-bought vanilla pudding (either refrigerated or prepared from a mix) works perfectly. Just make sure to tint it green before filling the cups. Adjust the quantity of crushed cookies accordingly, as package sizes vary.
- What kind of food coloring should I use for the green pudding?
- Liquid or gel food coloring will both work. Gel food coloring often provides a more vibrant, concentrated color with fewer drops, so start with a small amount and add more until you reach your desired monster-green hue.
- How do I crush the cookies?
- The easiest way is to place the cookies in a zip-top bag, seal it, and crush them with a rolling pin or the bottom of a heavy glass. For finer crumbs, use a food processor.
- Can I make these pudding cups ahead of time?
- Yes, you can! Prepare the pudding and draw the faces on the cups. Store the pudding in an airtight container in the refrigerator for up to 2-3 days. Assemble the cups with the crushed cookies and any additional toppings a few hours before serving to keep the cookies from getting soggy.
- What other colors can I make the pudding?
- Don’t limit yourself to green! Orange pudding for pumpkins, purple for witches, or even a combination of colors (like swirling green and purple) can create different monster effects. Be creative with your palette!
Recipe Source: Pudding recipe lovingly crafted by Mel’s Kitchen Cafe, with the brilliant idea inspired by Pinterest.