
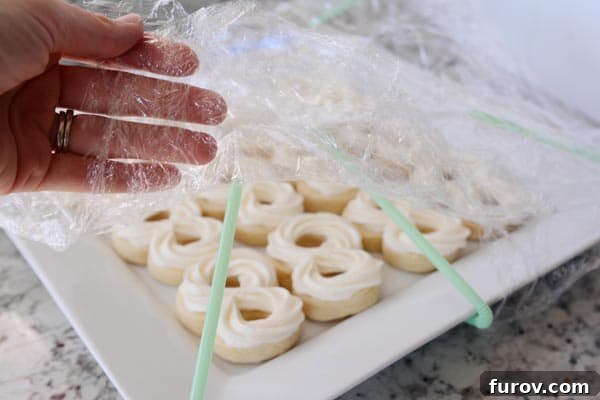
The Ultimate Kitchen Hack: How to Cover Decorated Cupcakes & Cookies Without Ruining the Frosting
Ever wondered how to cover platters of beautifully decorated cupcakes & cookies without messing them up? Here’s the simple, ingenious answer you’ve been searching for!
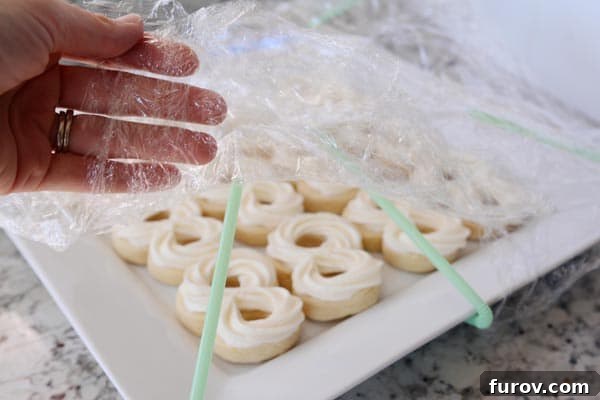
The Universal Baker’s Dilemma: Protecting Your Perfect Creations
For home bakers and professional confectioners alike, few things are as frustrating as watching your meticulously decorated treats get ruined by a common act: covering them. You’ve spent hours perfecting that swirl of buttercream on a cupcake, precisely piping royal icing designs onto sugar cookies, or delicately placing sprinkles on a batch of brownies. Your kitchen smells divine, and your platter looks like a work of art. But then comes the moment of truth – how do you protect these delicate masterpieces during storage or transport without smudging, flattening, or otherwise damaging your hard work?
This isn’t a daily conundrum for everyone, but when it strikes, it’s a significant headache. Imagine preparing a beautiful tray of custom-designed number 8 sugar cookies, each adorned with soft, creamy frosting. The last thing you want is for plastic wrap to press down, leaving unsightly marks and destroying the aesthetic. While some might suggest using a hard-set royal icing to avoid this, it’s not always the desired texture or flavor, and certainly not feasible for the luscious, soft frosting preferred on most cupcakes. The struggle is real, and for a long time, it seemed like an unavoidable compromise between protection and perfection.
Whether you need to store your baked goods overnight to maintain freshness, transport them to a party, a bake sale, or a family gathering, or simply shield them from curious toddler fingers, pesky insects, or airborne dust, proper covering is essential. The lack of an effective, non-destructive method can be incredibly disheartening, often leading to a sense of wasted effort and a less-than-perfect presentation. But what if there was a simple, ingenious solution lurking right in your kitchen?
A Spark of Ingenuity: The Straw Solution
The quest for a better way has led many of us down a rabbit hole of experimentation, often ending in disappointment. On one such occasion, faced with a beautifully frosted platter and the usual dilemma, inspiration struck from an unexpected source. After rummaging through every kitchen drawer, hoping for a flash of genius, a common household item caught my eye: ordinary drinking straws. In that moment, the pieces clicked into place, and a remarkably effective solution began to form.
The beauty of this method lies in its simplicity and the use of readily available materials. No special tools, no complex setups – just a few straws, some tape, and your trusty plastic wrap. It’s a testament to the idea that sometimes, the most brilliant solutions are found in the most unassuming objects.
Step-by-Step Guide: Crafting Your Frosting Protection Canopy
This clever hack creates a protective dome, or “canopy,” over your treats, ensuring that plastic wrap never makes contact with your delicate frosting. Here’s how to set it up:
1. Gather Your Simple Supplies:
- Drinking Straws: Standard plastic or reusable straws work best. Flexible straws are particularly adaptable.
- Tape: Regular Scotch tape is usually fine, but blue painter’s tape offers a more secure hold and guarantees no residue, especially on delicate ceramic or antique platters.
- Plastic Wrap: Your usual cling film.
- Your Decorated Platter: Full of those beautiful cupcakes or cookies!
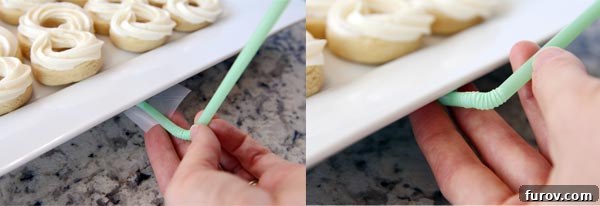
2. Preparing Your Straw Supports:
Begin by taking one straw. Place a piece of tape on the shorter side of the straw, near one end. Bend the longer side of the straw upwards at approximately a 90-degree angle, or slightly less, depending on the height you need for your treats. Now, press the taped end firmly to the underside of your platter. It’s crucial to mold the tape tightly around the sides of the straw to prevent it from wiggling or collapsing. This ensures a stable support structure for your canopy. If you’re using a ceramic platter, blue painter’s tape is a fantastic choice, as it peels off cleanly without leaving any sticky residue. For sturdier, less porous surfaces, regular clear tape often works perfectly and peels off easily after use.
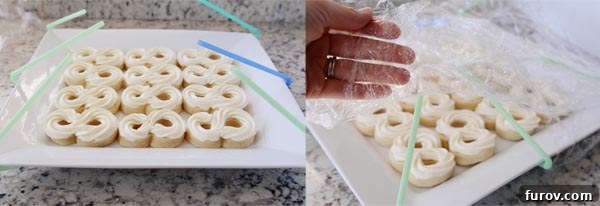
3. Building the Canopy Structure:
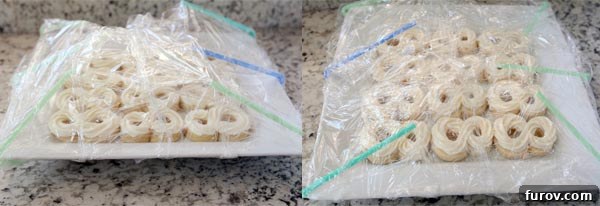
Repeat the previous step several times, strategically placing your straw supports around the perimeter of your platter. For a square platter, three straws on each side (six in total) often provide ample support. For round platters, distributing them evenly around the circumference works best. Once attached, gently bend the upright straws slightly inward, creating an arch-like structure. This inward bend helps to form a stable base for the plastic wrap, ensuring it rests on the tips of the straws without sagging or getting too close to your precious cookies or cupcakes. Adjust the height and angle of the straws to ensure they are taller than your tallest frosted item.
4. Laying the Protective Plastic Wrap:
Unroll a few pieces of plastic wrap on your counter, overlapping them slightly if your platter is particularly large. The goal is to create a sheet of plastic wrap that can completely cover your platter with some overhang. Carefully and gently lift the combined plastic wrap over the platter, guiding it to rest solely on the tips of your straw canopy. The straws will bear the weight of the plastic wrap, keeping it suspended safely above your delicate decorations. Take your time with this step to avoid accidental contact with the frosting.
5. Securing the Wrap for a Tight Seal:
Once the plastic wrap is draped over the straw canopy, carefully fold the edges of the plastic wrap underneath the tray. Pull it taut enough to create a secure seal, ensuring no gaps where air, dust, or curious fingers could penetrate. The tension of the wrap against the underside of the platter will help stabilize the entire structure. Voila! Crisis averted. Your beautiful creations are now encased in a protective dome, completely untouched by the plastic wrap.
Beyond the Basics: Why This Method Stands Out
This simple technique isn’t just about covering; it’s about preserving the integrity and beauty of your baked goods. Here’s why this straw canopy method is a game-changer:
- Unaltered Decorations: This is the paramount benefit. Your frosting swirls, intricate piping, and delicate toppings remain exactly as you intended, without a single smudge or flat spot.
- Remarkable Versatility: This hack works wonderfully for a variety of treats. For taller cupcakes, simply don’t bend the straws down quite as far, allowing for extra height. It’s equally effective for delicate tarts, meringues, or any other dessert where direct contact with a cover would be problematic.
- Cost-Effective and Accessible: You likely already have all the necessary supplies in your kitchen. There’s no need to invest in expensive, specialized containers or single-use domes.
- Effortless Removal and Cleanup: When it’s time to unveil your treats, gently lift off the plastic wrap. The straws can then be easily peeled from the underside of the platter, leaving no sticky residue if you opted for painter’s tape. They can often be reused for future culinary adventures or recycled.
- Enhanced Hygiene and Freshness: The tight seal created by the plastic wrap protects your desserts from airborne contaminants, dust, and insects, while also helping to maintain their freshness for longer periods, whether overnight or for a few hours.
- Stress Reduction: Say goodbye to the anxiety of transporting your masterpieces. With this method, you can confidently move your platters knowing your hard work is perfectly protected.
Pro Tips for Perfect Pastry Protection
To get the most out of this clever kitchen hack, consider these additional tips:
- Straw Selection: While standard plastic straws work well, consider wider “boba” straws for larger, heavier plastic wrap coverings, as they offer more robust support. Reusable metal or silicone straws can also be used if thoroughly cleaned afterward.
- Tape Tactics: For platters that are very important or have delicate finishes, blue painter’s tape is an absolute must. It adheres well but guarantees a clean, residue-free removal. For everyday use on robust surfaces, regular clear tape is often sufficient.
- Adapting to Platter Shapes: The number and placement of straws can be adjusted for any platter shape. For a long rectangular tray, you might place straws at regular intervals along both long sides. For very large or irregularly shaped platters, you might even consider a central straw support if the span is too wide for just perimeter straws.
- Height Customization: Remember to adjust the bend of the straws according to the height of your decorated items. Taller cupcakes require less bending, creating a higher dome. Shorter cookies can use more significantly bent straws for a lower, more compact canopy.
- Double Layer Security: For extremely large platters or very fragile items, you might use a double layer of plastic wrap for extra protection and structural integrity of the canopy.
Real-World Applications: Where This Hack Shines
This frosting protection canopy isn’t just a neat trick; it’s a practical solution for a multitude of scenarios:
- Parties & Potlucks: Transport your signature desserts to gatherings without a single dent or smear. Impress your friends with perfectly presented treats.
- Bake Sales & Farmers Markets: Display your beautifully crafted baked goods with confidence, knowing they are protected yet still visible and appealing to customers.
- Overnight Storage: Keep your cookies and cupcakes fresh and their decorations intact for next-day consumption or events.
- Picnics & Outdoor Events: Shield your desserts from breezes, falling leaves, and curious insects while enjoying the outdoors.
- Gift Giving: Present a platter of homemade goodies as a gift, knowing the recipient will receive them in pristine condition.
The Simple Joys of Smart Solutions
This kitchen tip isn’t rocket science, and it won’t change the world, but it will certainly change your baking life for the better. The satisfaction of putting so much effort into decorating and then finding such a simple, effective way to preserve that beauty is truly invaluable. It’s these small, clever solutions that make our daily lives easier and more enjoyable, allowing us to focus on the creative joy of baking rather than the logistical headaches of storage and transport.
So, the next time you find yourself with a platter of artfully decorated cupcakes or cookies, reach for those humble straws. You’ll be amazed at how this simple innovation protects your culinary creations, making you a happier, more confident baker. Ah, the simple things in life really do bring the greatest satisfaction!