
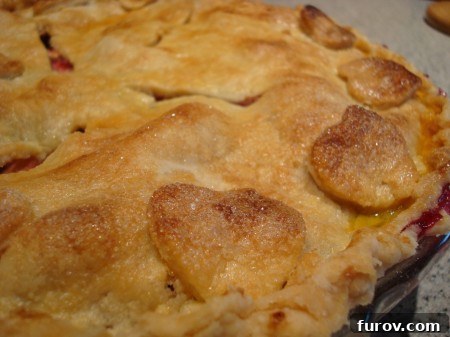
Recipe: Apple Raspberry Pie – A Symphony of Sweet & Tart Flavors
Apples and raspberries are truly a match made in heaven, coming together in this pie to create an unforgettable dessert that is both sweet and wonderfully tart.
There’s something uniquely comforting about a homemade pie, especially when it becomes a cherished tradition. For years now, this exquisite apple raspberry pie has graced our Christmas Eve dinner table, transforming from a simple dessert into an anticipated family ritual. My husband, in particular, has declared it an indispensable part of our holiday feast, its vibrant flavors a perfect counterpoint to the rich main course.
This pie truly hits all the right notes: it’s simultaneously sweet and tart, offering a refreshing finish that somehow manages to feel utterly satisfying without being overly heavy after a substantial meal. The combination of crisp apples and bright raspberries creates a dynamic flavor profile that delights the palate, making every bite a memorable experience.
The Eternal Quest for the Perfect Pie Crust
While the filling of this apple raspberry pie is undeniably stellar, I must confess that my journey with pie crusts has been a saga of highs and lows. Crafting the ideal pie crust often feels like a culinary Everest, and I’m still very much on my expedition to conquer it. For this particular pie, I ventured into new territory, experimenting with a simple, dairy-free crust recipe consisting of flour, salt, shortening (Crisco), and ice water.
My usual preference leans towards an all-butter crust for its unparalleled flavor and rich, golden hue. However, accommodating guests with dairy allergies during our Christmas Eve dinner prompted this shift. The results of the shortening crust were surprisingly good in terms of texture – it was delightfully flaky and tender. Yet, it lacked the depth of flavor that butter imparts, leaving me still searching for my holy grail of pie crusts. If you, dear reader, possess the secret to a consistently perfect pie crust, please, share your wisdom! Your suggestions are warmly welcomed.
Navigating Pie Crust Challenges
The path to a beautiful, sturdy pie crust is often fraught with peril. My beloved butter crust, while flavorful, is notoriously challenging to roll out. Many a baking session has been accompanied by a symphony of frustrated sighs (and perhaps a few choice words!). This recent shortening crust, while dairy-free, presented its own set of hurdles, primarily stubborn tearing issues. It seems some days the dough simply refuses to cooperate, leading to creative solutions like the cutout hearts delicately adorning the top of this pie.
Each charming heart, I must admit, cleverly conceals a significant imperfection in the crust below. They serve as a testament to the art of improvisation in the kitchen and highlight my ongoing need for extensive practice in the delicate craft of pie making. But here’s the wonderful truth about this apple raspberry pie: its extraordinary flavor transcends any crust imperfections. The luscious, fruit-packed filling is so undeniably delicious that it gracefully overshadows whatever might be lacking in the pastry – and that, my friends, is a truly beautiful thing.
Serving this pie warm, perhaps with a generous scoop of vanilla bean ice cream or a dollop of freshly whipped cream, elevates it to an ethereal experience. In fact, if I were to let my dessert-loving heart truly speak, I’d suggest it could almost constitute a complete meal in itself. (Just pretend you didn’t hear that – when it comes to dessert, my ethical compass tends to waver slightly!)
Looking to boost your pie-making confidence? Dive into my comprehensive Pie Boot Camp Series HERE! This invaluable series covers everything you need to know, including:
- All About Pie Making Equipment Essentials
- How to Make Pie Crust (Featuring a foolproof recipe, expert rolling techniques, perfect crimping, and a helpful video tutorial)
- All About Blind Baking + How to Do It and Why It Matters (Plus a bonus Chocolate Ganache Cream Pie Recipe!)
- Mastering Double Crust Pies and Creating an Easy Lattice Crust (Includes a printable reference guide to sum up the entire Pie Boot Camp!)
Apple Raspberry Pie
9
-inch pie
25
mins
1
hr
20
mins
1
hr
45
mins
Rate
Save
Ingredients
-
2 ¾
pounds assorted baking apples, such as Rome, Cortland or Golden Delicious, peeled, cored, and cut into 1/2-inch-thick slices -
12
ounces fresh or thawed frozen raspberries, well drained if frozen -
¾
cup granulated sugar -
¼
cup all-purpose flour, plus more for work surface -
1
tablespoon fresh lemon juice - Pinch of salt
-
2
tablespoons unsalted butter, cut into pieces -
1
large egg yolk -
1
tablespoon heavy cream - Sugar, for sprinkling
-
1
recipe
double crust pie dough
Instructions
-
Preheat your oven to 375°F (190°C). In a large mixing bowl, gently combine the sliced apples, fresh or well-drained raspberries, granulated sugar, flour, lemon juice, and a pinch of salt. Ensure all ingredients are evenly distributed, then set the mixture aside while you prepare your pie crust.
-
On a lightly floured work surface, take one disk of your prepared pie dough and roll it out evenly to an approximate 1/8-inch thickness. Using a circular template or freehand, cut the dough into a 12-inch round. Carefully transfer this round into a 9-inch pie plate, gently pressing it into the contours without stretching. Pour the apple and raspberry mixture into the prepared crust, spreading it evenly. Dot the top of the fruit filling with small pieces of unsalted butter for added richness.
-
Next, roll out the remaining disk of pie dough on a lightly floured surface to an even 1/8-inch thickness, similar to the first. Cut this into another 12-inch round. Carefully drape this second round of dough over the fruit filling in the pie plate. Trim any excess dough from the edges, leaving about a 1-inch overhang. Press the edges of the top and bottom crusts together to seal them. Fold the overhang under, then crimp the edges decoratively using your fingers or a fork to create a beautiful finish. Make five distinct 3-inch slits in the top crust to allow steam to escape during baking. Transfer the pie to the refrigerator and chill for 20 minutes; this helps the crust maintain its shape.
-
In a small bowl, whisk together the egg yolk and heavy cream to create an egg wash. Brush this mixture evenly over the top crust of the chilled pie, then sprinkle generously with sanding sugar for a beautiful, sparkling finish. Place the pie in your preheated oven. Bake for approximately 1 hour 10 minutes to 1 hour 20 minutes, or until the crust is a deep golden brown and the fruit juices are visibly bubbling through the slits. To prevent a messy oven, place a foil-lined baking sheet on the rack below the pie to catch any drips. If you notice the crust browning too quickly, loosely tent the pie with aluminum foil. Once baked, carefully transfer the pie to a wire rack and allow it to cool completely for at least 4 hours (or even overnight). This crucial cooling period allows the filling to set properly, ensuring perfect slices.
Mel
Recipe Source: adapted from Martha Stewart