
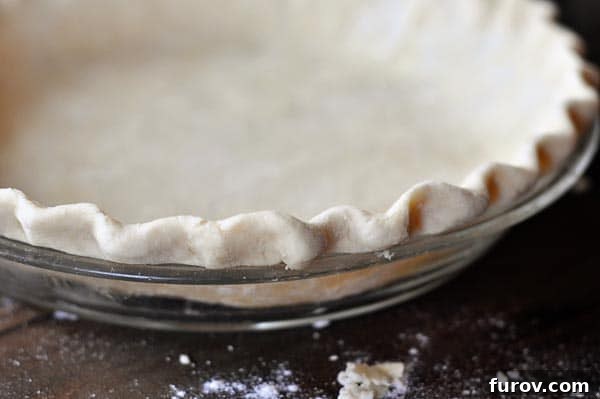
Master the art of pie making with this incredibly easy and reliable pie crust recipe! This comprehensive guide offers a step-by-step tutorial, ensuring you achieve perfect, flaky results every single time. Get ready to elevate your baking skills and impress everyone with your homemade pies!
For many home bakers, crafting a perfectly flaky pie crust can feel like the ultimate kitchen challenge. It’s often the one obstacle standing between them and “rockstar status” in the culinary world. If that sounds like you, then today is your lucky day! We’re about to unveil a game-changing recipe that will transform your pie-making experience forever.
We’ve meticulously perfected this recipe over several months, ensuring it’s not only simple to follow but also truly foolproof. Forget complicated gadgets; there’s no need for a food processor or any special tools here. Just a few basic ingredients and a straightforward method are all you need to create the best pie crust you’ve ever tasted.
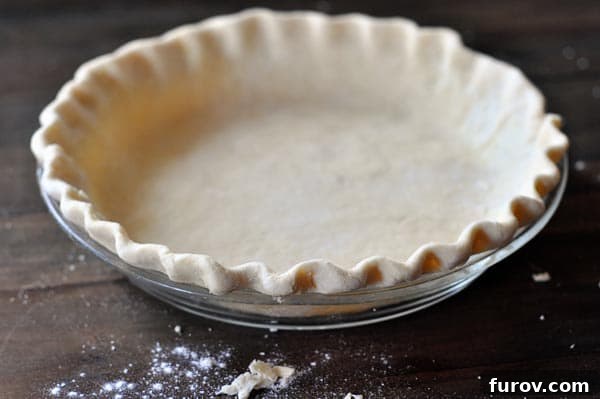
Having made this pie crust countless times, we can confidently say it consistently delivers outstanding results. We’re so convinced by its superiority that we truly believe you’ll never need another pie crust recipe again. Prepare for your baking life to be forever changed!
The Secret Ingredient for a Flaky Pie Crust
So, what’s the revolutionary secret behind this incredible pie crust? It’s time to let go of everything you thought you knew about traditional pie crusts. Instead of the classic ice water drizzle, this recipe calls for a surprising hero: sour cream.
Yes, you read that right – sour cream! While sour cream pie crusts aren’t a brand new concept, having been around for ages, their transformative power might be new to many home bakers. And while the precise culinary chemistry behind its magic remains a delightful mystery, its effectiveness is undeniable. Sour cream introduces a unique richness and tenderness to the dough that plain water simply cannot replicate. It contributes to a wonderfully soft dough that’s remarkably easy to handle, yet bakes up into an incredibly buttery and exquisitely flaky crust. Seriously, it’s arguably the best in the entire universe!
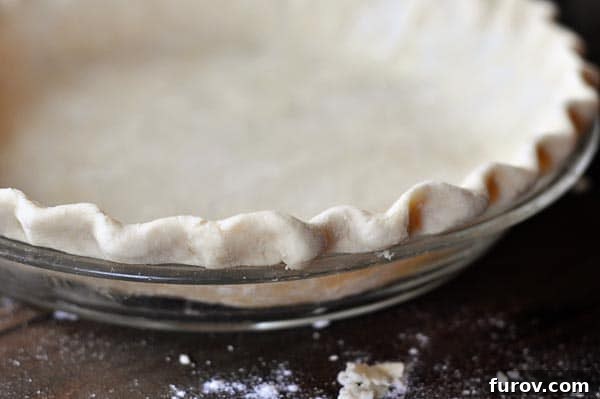
Your Comprehensive Guide to Pie Crust Perfection
To ensure your success, we’ve broken down the entire pie crust making process into a detailed, easy-to-follow tutorial. Each main section, from mixing the dough to blind baking, is designed to guide you through every step. Whether you’re a complete novice or an experienced baker looking to refine your technique, this guide has something for everyone.
Need a little refresher on just how to crimp those edges for a professional look? We’ve got you covered. Confident in your rolling skills but unsure how to gracefully transfer the dough into your pie plate? There’s a dedicated section for that. Even if you’re a pro at trimming but want a sneak peek into the nuances of blind baking, our detailed instructions will lead the way.
Our hope in sharing this no-fail recipe and comprehensive tutorial is to ignite a fervent passion for pie making within you. Once you experience how effortless and rewarding it can be, you might just find yourself, like us, becoming a “pie-making machine”! We now keep an unbaked, beautifully crimped pie crust ready in the refrigerator, just waiting for inspiration to strike. It’s always a good idea to have a homemade pie crust ready to go at a moment’s notice, especially with the holiday season approaching. With this recipe and tutorial under your belt, you’ll be prepared for any impromptu dessert needs or festive gatherings.
A Few Essential Tips for Success: Always remember to measure your flour with a light hand, using the “spoon-and-sweep” method rather than packing it down. If your dough seems too dry, add a small amount of sour cream gradually until it comes together. The ultimate key to a light, flaky crust (and avoiding a tough one) is minimal handling of the dough at every stage – from mixing to rolling. Overworking the dough breaks down the butter pieces, preventing them from creating those delightful pockets of steam during baking that are crucial for flakiness.
Recipe Inspiration: This recipe has been thoroughly tested and perfected by Mel, inspired by an original concept seen on The Kitchn.
Mixing the Pie Dough | Rolling Out the Pie Crust | Putting the Pie Crust in the Pie Plate | Trimming and Crimping the Edge of the Pie Crust | Baking and Blind Baking |
Mixing the Perfect Pie Dough
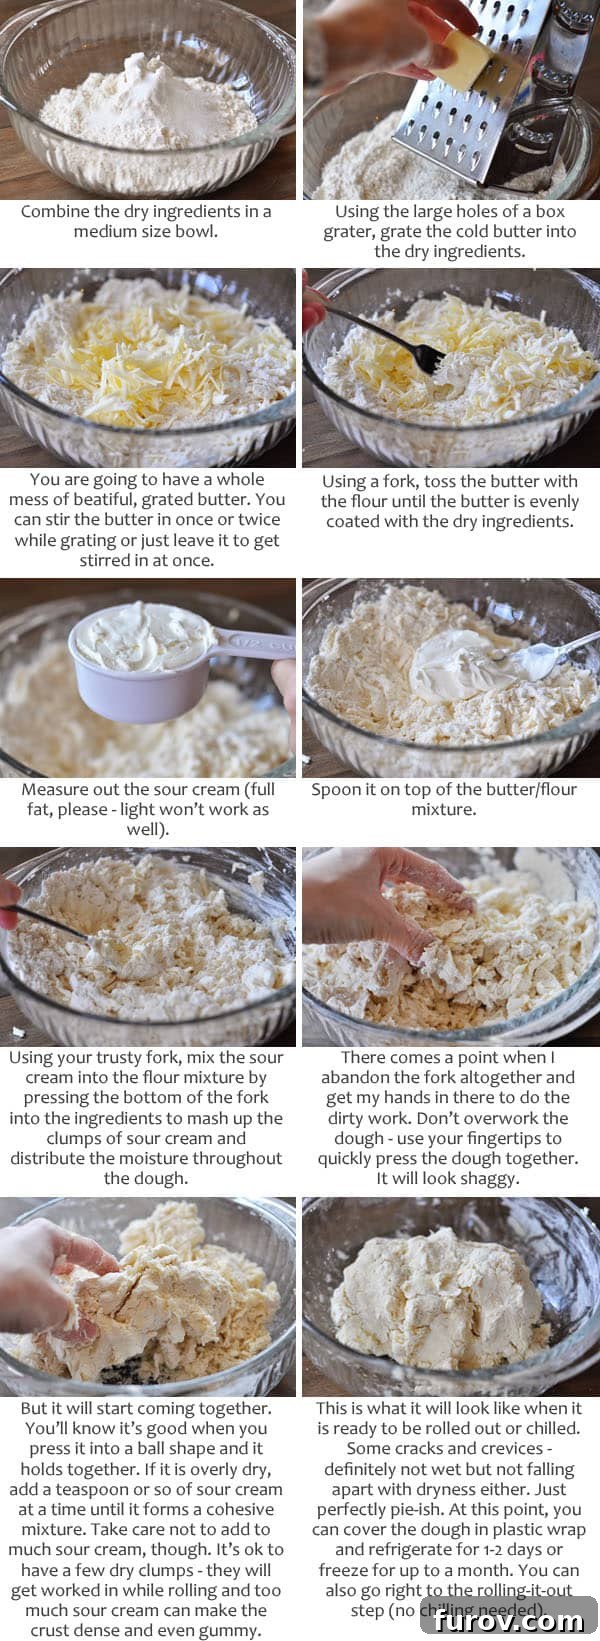
The foundation of any great pie begins with the dough, and this method simplifies the process dramatically. The key is in combining your dry and wet ingredients carefully, ensuring the butter remains in small, distinct pieces to create those coveted flaky layers. Grating your frozen butter directly into the flour mixture is a technique that distributes the butter evenly and efficiently, reducing the need for extensive handling and keeping the butter cold – both critical for a tender crust. When incorporating the sour cream, resist the urge to overmix; a shaggy, somewhat dry appearance is exactly what you’re aiming for at first. Trust the process, and gently bring the dough together with your hands, adding just a touch more sour cream if necessary until it forms a cohesive ball.
Mixing the Pie Dough | Rolling Out the Pie Crust | Putting the Pie Crust in the Pie Plate | Trimming and Crimping the Edge of the Pie Crust | Baking and Blind Baking |
Rolling Out the Pie Crust with Ease
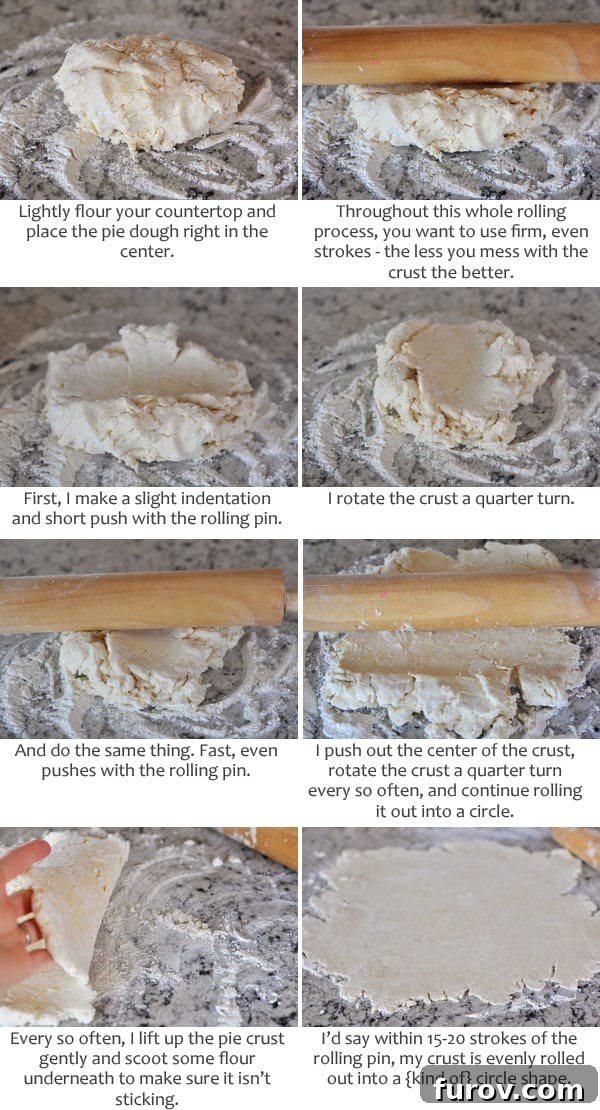
Rolling out pie dough can be intimidating, but with this sour cream recipe, it’s surprisingly manageable. The elasticity and pliability that sour cream lends to the dough make it less prone to tearing and cracking. Lightly flour your work surface and your rolling pin to prevent sticking, but avoid using excessive flour, which can dry out your dough. Start from the center and roll outwards, rotating the dough a quarter turn after every few strokes to maintain a circular shape and even thickness. The goal is to work quickly and efficiently, minimizing the time the dough spends at room temperature, which helps keep the butter cold and intact. Aim for a consistent, thin crust that’s large enough to fit your pie plate with a slight overhang.
Mixing the Pie Dough | Rolling Out the Pie Crust | Putting the Pie Crust in the Pie Plate | Trimming and Crimping the Edge of the Pie Crust | Baking and Blind Baking |
Putting the Pie Crust into the Pie Plate
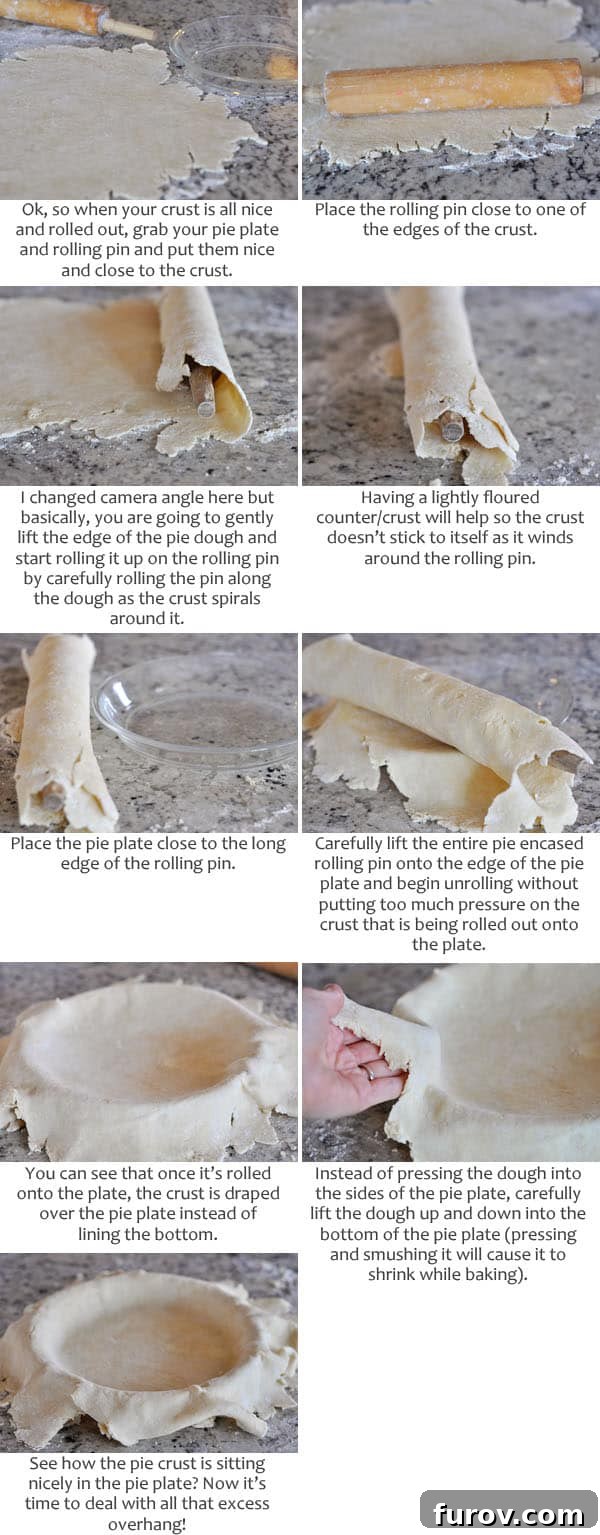
Transferring the rolled-out dough into the pie plate is a delicate step. The simplest and most effective method is to gently roll the dough over your rolling pin, then carefully unroll it over your pie plate. Once it’s draped over the plate, resist the urge to stretch or pull the dough. Instead, gently lift the edges and allow the dough to settle naturally into the contours of the plate. This ensures that the crust doesn’t shrink during baking. Pressing or stretching can activate the gluten too much, leading to a tough and shrunken crust. Take your time, letting gravity do most of the work, and you’ll achieve a beautifully fitted base for your pie.
Mixing the Pie Dough | Rolling Out the Pie Crust | Putting the Pie Crust in the Pie Plate | Trimming and Crimping the Edge of the Pie Crust | Baking and Blind Baking |
Trimming and Crimping the Edge of the Pie Crust
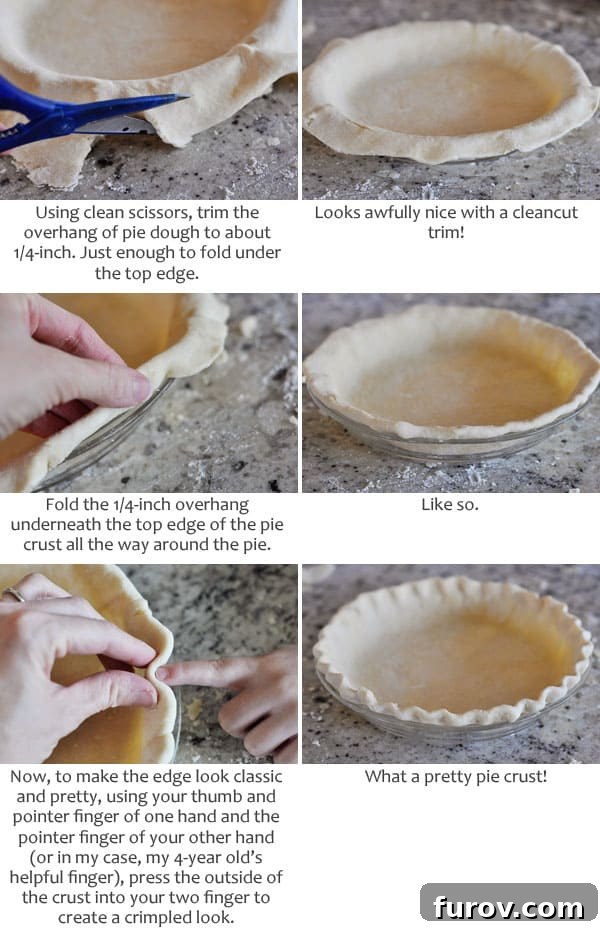
A beautifully crimped edge is the hallmark of a homemade pie. After settling the dough into the pie plate, trim any excess dough, leaving about a 1/4-inch overhang. This small amount is crucial for creating a substantial edge. Carefully fold this overhang underneath itself, aligning it with the top edge of the pie plate. This creates a thicker border that is less likely to burn or collapse. Now comes the fun part: crimping! There are many ways to crimp, but a simple and elegant method involves using your thumb and forefinger to pinch the dough outwards, while simultaneously pressing in with the index finger of your other hand. Practice makes perfect, and soon you’ll be creating stunning, stable crust edges that hold their shape beautifully through baking.
Mixing the Pie Dough | Rolling Out the Pie Crust | Putting the Pie Crust in the Pie Plate | Trimming and Crimping the Edge of the Pie Crust | Baking and Blind Baking |
Baking and Blind Baking Your Pie Crust
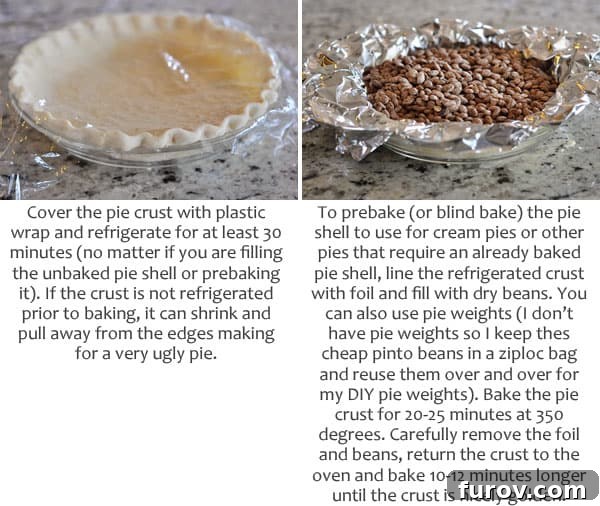
Whether you’re making a single-crust pie or a double-crust delight, understanding the baking process is essential. For pies with wet fillings that bake slowly, or for custard-based pies, blind baking (or prebaking) the crust is a critical step. This prevents the bottom crust from becoming soggy. After your pie crust has been chilled, line it with foil or parchment paper and fill it with pie weights, dry beans, or even rice. This helps to hold the crust’s shape and prevents it from bubbling up. Bake until the edges are lightly golden, then remove the weights and foil and return the crust to the oven to finish baking until it’s beautifully golden throughout. This extra step ensures a crisp, perfectly baked foundation for any pie filling, enhancing both texture and flavor.
Mixing the Pie Dough | Rolling Out the Pie Crust | Putting the Pie Crust in the Pie Plate | Trimming and Crimping the Edge of the Pie Crust | Baking and Blind Baking |
The Perfect Pie Crust
Pin Recipe
Ingredients
- 1 ½ cups (213 g) unbleached all-purpose flour (see note)
- ¼ teaspoon salt
- 2 teaspoons granulated sugar
- 10 tablespoons (142 g) salted butter, frozen
- ½ cup (113 g) sour cream, not lowfat or light, plus an additional tablespoon or three if needed
Instructions
- In a medium bowl, lightly whisk together the flour, salt, and sugar.
- Using the large holes of a box grater, grate the frozen butter into the dry ingredients.
- With a fork, gently toss the butter and flour mixture until all butter pieces are evenly coated with flour. Avoid breaking down the butter pieces too much; the goal is just to coat them.
- Spoon the sour cream into the bowl. Using the same fork, mix the sour cream into the butter/flour mixture by pressing the fork down to mash the large clumps of sour cream into the flour and butter. A pastry blender can also be helpful here. Note that the sour cream won’t mix in as smoothly as ice water in a traditional crust. Be careful not to overwork the dough trying to fully incorporate the sour cream; if the butter pieces become too small, the crust will be tough.
- After a few turns with the fork, it becomes easier to use your hands to bring the dough together. It will appear somewhat shaggy, but as you press it together quickly and firmly (to prevent the butter from melting), it should start to form a cohesive ball.
- If the dough still seems overly dry and crumbly, add a teaspoon of sour cream at a time until it comes together.
- It’s perfectly fine if there are still a few dry spots or small cracks in the dough. The mixture should not be overly wet or sticky, nor should it be falling apart. It should hold together when pressed. (Many bakers find they need to add a bit more sour cream, which is fine as long as the crust doesn’t become overly saturated, which would result in a dense, gummy texture. This often depends on how you measure flour; a light hand with flour measurement is key.)
- At this point, the dough can be rolled out immediately on a lightly floured counter, or it can be pressed into a flat disc, wrapped tightly in plastic, and refrigerated for 1-2 days, or frozen for up to a month.
- To roll out, lightly flour your countertop. Using firm, even strokes, roll the dough from the center outwards, turning the dough a quarter turn every few strokes. Minimize handling the dough and roll it out to a thin crust as quickly as possible.
- Carefully roll the dough over your rolling pin and unroll it onto the pie plate. Gently lift up the edges of the pie crust and allow it to settle into the bottom of the pie plate without pressing or stretching.
- Trim the edges to within 1/4-inch of the plate’s rim. Fold the short overhang underneath the top edge of the pie plate, then crimp all the way around for a decorative finish.
- Cover the prepared crust with plastic wrap and refrigerate for at least 30 minutes before using. To blind bake (prebake the pie crust), line the chilled crust with foil or parchment paper and fill with dry beans or pie weights. Bake at 350 degrees Fahrenheit (175 degrees Celsius) for 20-25 minutes. Gently remove the foil and weights, then return the crust to the oven to bake for another 10-12 minutes, or until it is nicely golden brown.
Notes
Doubling: This recipe can be easily doubled to create a double-crust pie.
Measuring the Flour: As mentioned, it’s crucial not to overmeasure the flour. We recommend the “spoon-and-sweep” method: spoon flour into your measuring cup until it overflows, then level it off with a straight edge without shaking or tapping the cup. This prevents over-packing, which can lead to a dry, tough dough. We aim to provide a more accurate weight measurement for flour in future updates.