

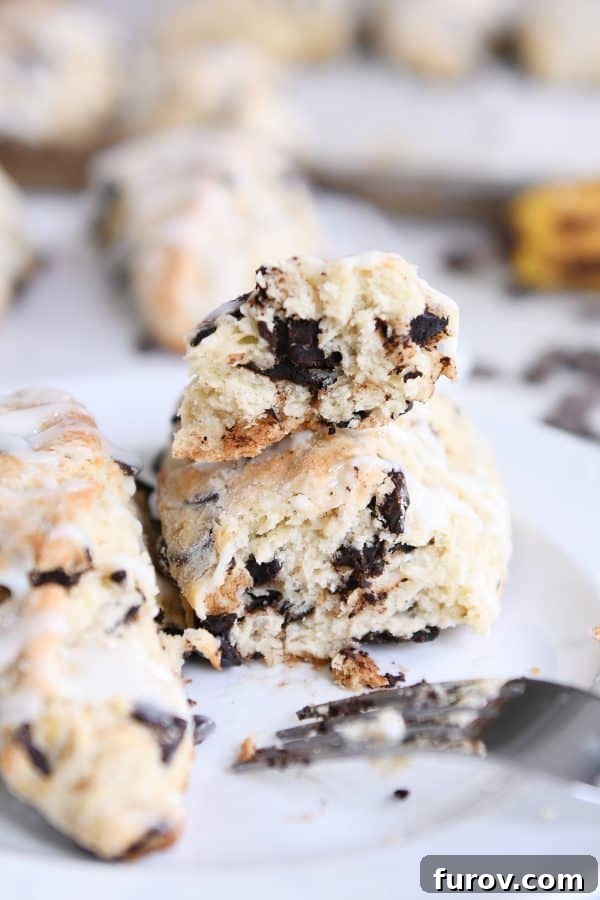
Indulge in the perfect blend of two beloved treats: Chocolate Chip Banana Bread Scones. This easy-to-follow recipe combines the comforting flavors of banana bread with the tender, flaky texture of a classic scone, creating a truly irresistible baked good. If you’re a fan of either banana bread or scones, prepare to fall in love with this delightful creation!
There’s a silent, nagging thought that often crosses my mind when I pull a batch of freshly baked scones from the oven: “Why don’t I bake scones more frequently?” It’s a question many home bakers can relate to, especially when the aroma of warm, buttery goodness fills the kitchen. Scones, in their simplest form, are an enchanting compromise between the crumbly charm of a biscuit and the moist sweetness of a muffin. They offer a unique texture – simultaneously sweet, flaky, soft, and tender – making them utterly delightful when executed correctly. The secret to achieving truly great scones right in your own home lies in starting with a reliable recipe, and this particular chocolate chip banana bread scone recipe is, without exaggeration, an exceptional one.

Discover the Magic of Chocolate Chip Banana Bread Scones
These aren’t just any scones; they are a revelation. With their incredibly soft crumb and delicate flakiness, these banana bread scones boast an ultra-moist interior that sets them apart. The natural sweetness and subtle aroma of ripe bananas shine through beautifully, providing that quintessential banana bread essence without ever becoming overwhelming. And let’s talk about the chocolate chips – they’re not merely an optional addition; they are an absolute necessity, providing pockets of molten delight that perfectly complement the banana flavor. Each bite offers a harmonious blend of tender scone, sweet banana, and rich chocolate, creating a breakfast or snack experience that is truly unforgettable.
Crafting Your Scone Dough: A Step-by-Step Guide
The foundation of these incredible scones begins with a relatively straightforward dough, similar to many classic scone recipes. The process starts by combining your dry ingredients: flour, sugar, baking powder, and a touch of salt. These are whisked together thoroughly to ensure even distribution, especially of the leavening agents.
Next comes the critical step of incorporating the butter. For optimal flakiness, cold butter is paramount. There are two primary methods you can employ:
- Cutting in the butter: Using a pastry blender or two forks, work the cold, cubed butter into the dry ingredients. Continue until the butter is broken down into small, pea-sized pieces. This method helps create layers of butter within the dough, which will melt during baking and create steam, resulting in those coveted flaky layers.
- Grating the butter: For an even easier approach, you can grate a stick of cold, whole butter directly into the flour mixture using a box grater. Once grated, gently toss the butter with the dry ingredients to combine. This ensures the butter remains very cold and distributed in tiny pieces, contributing to a wonderfully tender and flaky texture.
Regardless of the method you choose, the goal is to keep the butter as cold as possible and avoid overworking it, which could lead to a tougher scone.
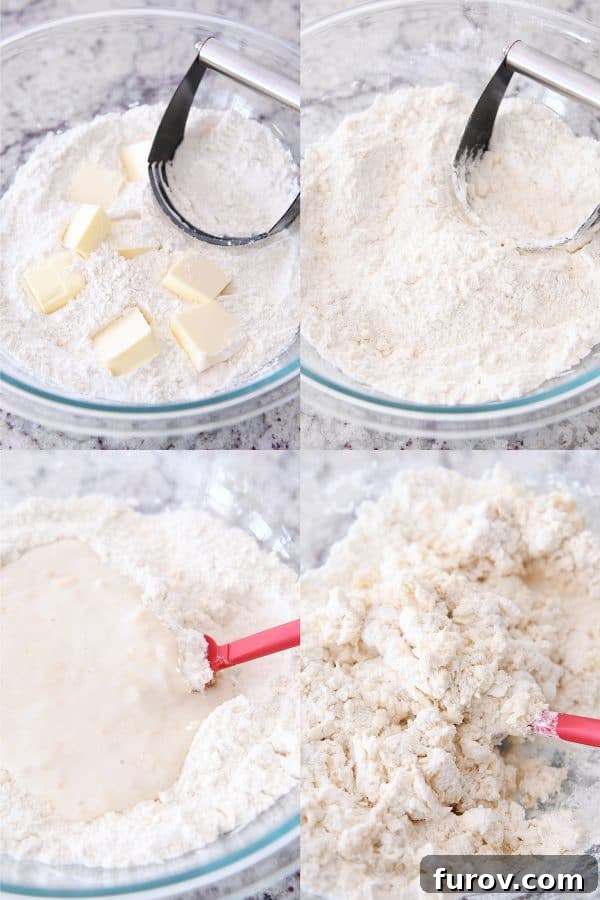
Once your butter is perfectly incorporated into pea-sized bits, it’s time to introduce the wet ingredients. In a separate bowl or measuring cup, whisk together:
- Cold heavy whipping cream or buttermilk (buttermilk will add a slight tang and extra tenderness, requiring a small adjustment to the baking powder/soda ratio).
- Mashed very ripe bananas – the riper, the sweeter and more flavorful they will be, infusing your scones with authentic banana bread taste.
- A splash of vanilla extract for a warm, aromatic depth.
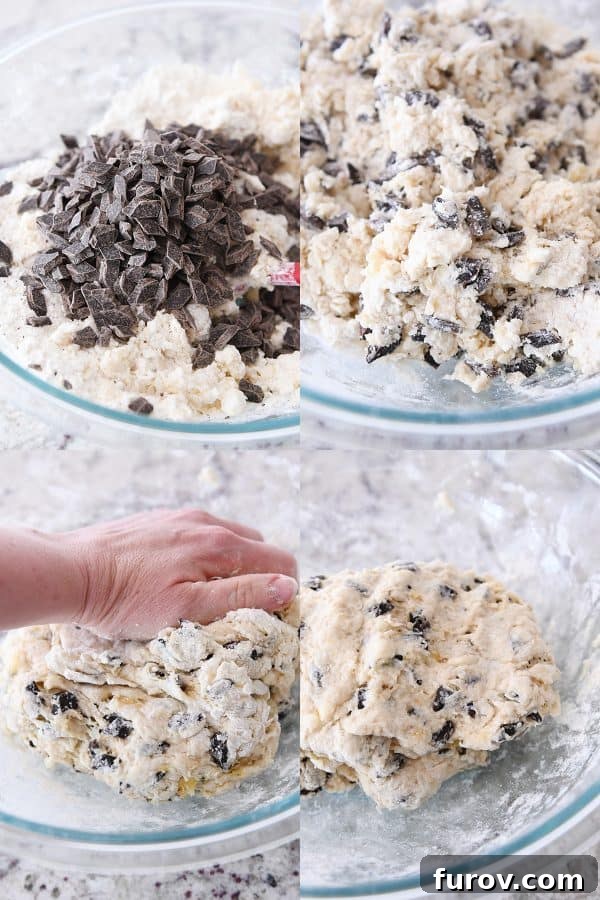
Pour the wet mixture into the dry ingredients and stir gently with a fork or spatula until the dough just begins to come together in large clumps. This is a crucial stage where you want to minimize mixing. Next, add your generous helping of chocolate chips or chunks. After the chocolate is added, I find it easiest and most effective to use my hands for the final stage of mixing and gentle kneading. This allows you to feel the dough’s consistency and ensures that all ingredients are just combined without overworking the gluten.
The Golden Rule for Perfect Scones: Don’t Overmix!
If there’s one secret to consistently baking light, flaky, and tender scones, it’s this simple mantra: **Do not overmix the dough!** This rule is as vital for scones as it is for muffins or biscuits. The science behind it is straightforward: overmixing scone dough rapidly develops the gluten in the flour. Overdeveloped gluten leads to a tough, dense, and dry scone – the exact opposite of what we’re aiming for.
Furthermore, excessive mixing can warm up the butter within the dough. Remember those cold, pea-sized butter pieces? They are designed to melt in the hot oven, releasing steam that creates airy pockets and distinct, flaky layers. If the butter melts prematurely during mixing, you lose this critical mechanism, resulting in a less flaky and more cake-like texture. So, mix just until the ingredients are combined and no dry streaks of flour remain, then stop.
Shaping and Cutting Your Scones
Once your dough is ready, turn it out onto a lightly floured surface. Gently pat the dough into your desired shape. I often opt for a long, skinny rectangle, which makes cutting neat triangles incredibly simple. However, feel free to get creative! You can pat the dough into a traditional circle and cut it into wedges, or create a larger rectangle for bigger scones. The beauty of homemade scones is their rustic charm, so don’t stress too much about perfection.
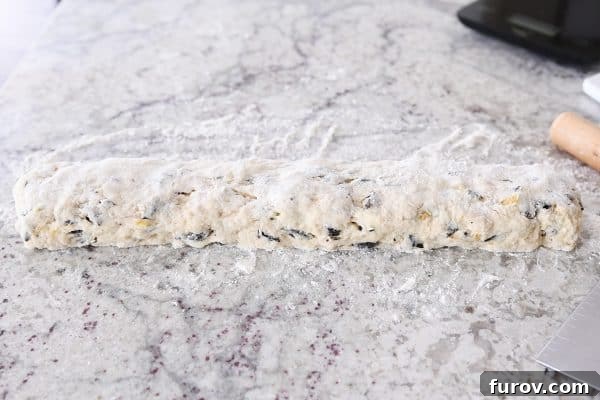
To cut the dough, a bench scraper or a sharp knife works best. The dough will likely be quite soft, so a helpful trick is to lightly dip the edge of your cutting tool into flour between each cut. This prevents sticking and helps create cleaner edges, contributing to a better rise.
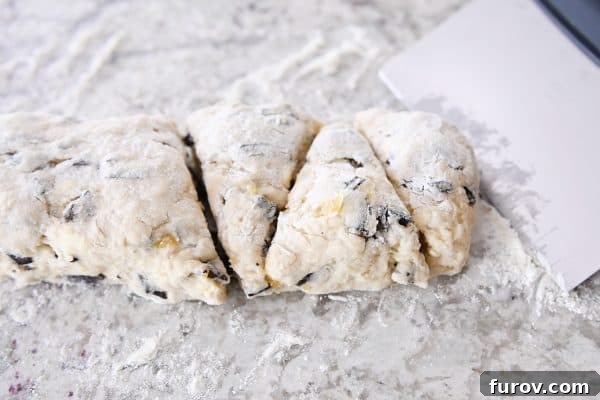
Arrange your freshly cut scones on a baking sheet lined with parchment paper, ensuring they are evenly spaced. At this point, you have a couple of options: you can bake them immediately (my preferred method for instant gratification!), or you can refrigerate the dough. Chilling the scones for at least an hour, or even up to 24 hours, can help the butter firm up, potentially leading to a slightly taller, more defined scone. Even if you bake them right away and they lose a bit of their crisp shape, rest assured, the flavor will still be absolutely fantastic.
Pro Tip: This versatile scone dough is also perfectly suited for baking in a scone pan! I’ve used this mini scone pan with excellent results, producing adorable, perfectly portioned scones every time.
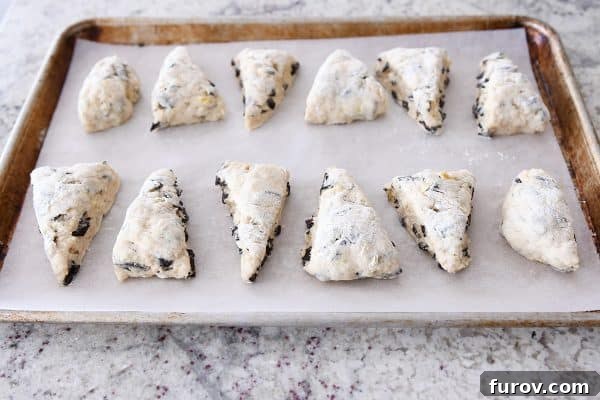
Bake these beautiful creations for 15-20 minutes, or until they achieve a delicate golden hue and are thoroughly baked through. Once out of the oven, allow them to cool slightly on the baking sheet before transferring them to a wire rack. While they cool, prepare the simple yet irresistible glaze. Drizzle this sweet and slightly tangy topping generously over the warm scones. The glaze adds an extra layer of sweetness and moisture, elevating the entire experience. Prepare for a chorus of “YUM!”
Troubleshooting: Why Do My Scones Sometimes Twist or Fall Over?
It’s a common query among scone bakers, and sometimes, even experienced bakers encounter a few scones that don’t quite maintain their perfect triangular form. The good news is that minor imperfections in shape rarely impact the incredible flavor! It’s a natural part of the baking process, but there are definitely steps you can take to encourage a more consistent rise and shape. Here are some helpful tips:
- **Precision in Cutting:** When cutting your dough, aim for straight, decisive cuts without twisting or turning the knife. A clean cut allows the scone to rise evenly.
- **Dough Consistency:** If your dough feels excessively soft or sticky, it might benefit from a tablespoon or two of additional flour. Too much moisture can cause the scones to spread rather than rise.
- **The Chill Factor:** As mentioned earlier, chilling the cut scones before baking is incredibly beneficial. The cold helps solidify the butter, preventing it from melting too quickly in the oven and allowing the scones to hold their shape better during the initial heat blast.
- **Strategic Placement:** Don’t be afraid to place your scones relatively close together on the baking sheet. This creates a supportive environment where they can lean on each other as they rise, encouraging an upward trajectory rather than spreading outwards.
- **Size Matters:** Experiment with cutting your scones into slightly smaller pieces. Smaller scones may hold their shape more readily.

Regardless of their final appearance straight out of the oven, the flavor of these chocolate chip banana bread scones is nothing short of heavenly. Who would have thought that the comforting essence of banana bread was truly destined to find its home in a flaky, tender scone? The mashed banana in the dough plays a crucial role not only in flavor but also in texture, helping these scones remain remarkably soft and moist for days after baking. The crumb has a unique tenderness, a subtle departure from a traditional scone that makes it absolutely perfect.
So, the next time you find yourself with a few overly ripe bananas on your counter, resist the urge to bake another loaf of banana bread (just this once!). Instead, transform them into these extraordinary scones. You absolutely will not regret it. They are a delightful twist on a classic, offering all the familiar warmth of banana bread in an unexpectedly elegant and utterly delicious form.

Explore More Delicious Recipes from Our Archives:
Tuna Quesadilla Melts {20-Minute Meal} (One Year Ago)
Grilled Chicken Cobb Salad (Two Years Ago)
Best Italian Pasta Salad {With Quick Homemade Italian Dressing} (Three Years Ago)
Double Chocolate Oatmeal Chocolate Chip Cookies (Four Years Ago)
Whole Grain Pumpkin Blueberry Muffins (Five Years Ago)
My Favorite Breakfast Smoothie (Six Years Ago)
Chipotle Chicken Skewers with Creamy Dipping Sauce (Seven Years Ago)
Blueberry Coconut Cake with Lemon Sauce (Eight Years Ago)

Chocolate Chip Banana Bread Scones
12
scones
25
20
45
★
★
★
★
📌Pin
⭐Rate
🤍Save
❤️Saved!
Ingredients
Scones:
-
2 ⅔ cups
(379 g)
all-purpose flour -
⅓ cup
(71 g)
granulated sugar -
1 tablespoon
baking powder -
½ teaspoon
salt -
½ cup
(113 g)
salted butter, cubed and cold -
⅔ cup
cold heavy whipping cream or buttermilk (see note for buttermilk) -
1 teaspoon
vanilla extract -
⅔ cup
(about 151 g)
mashed very ripe bananas (1-2 medium bananas) -
1 to 1 ½ cups
(170 to 255 g)
chocolate chips, mini or regular or chocolate chunks
Glaze:
-
½ cup
(57 g)
powdered sugar -
1 tablespoon
sour cream or buttermilk -
1 tablespoon
warm water -
Dash of vanilla extract
Instructions
-
Preheat the oven to 375 degrees F (190°C). Line a half sheet pan with parchment paper and set aside.
-
In a large bowl, whisk together the flour, granulated sugar, baking powder, and salt. If you are using buttermilk, please refer to the note below for adding baking soda. Add the cold, cubed butter. Using a pastry blender or two forks, cut the butter into the flour mixture until it resembles coarse crumbs and the butter pieces are about the size of small peas. Alternatively, you can grate a stick of cold butter directly into the flour using the large holes of a box grater, then toss to combine with the flour. This helps keep the butter cold and evenly distributed.
-
In a small bowl or liquid measuring cup, whisk together the cold heavy cream (or buttermilk), mashed ripe banana, and vanilla extract until well combined.
-
Add the wet ingredients to the flour mixture. Stir with a fork or rubber spatula until the dough just begins to come together and forms large clumps. Avoid overmixing. Gently fold in the chocolate chips or chocolate chunks.
-
Turn the dough out onto a lightly floured counter. Using your hands, gently knead the dough a few times until it forms a cohesive mass and most of the dry ingredients are incorporated. Be careful not to overwork the dough.
-
Pat the dough into a long, skinny rectangle, approximately 15 inches long by 2.5 inches wide. (You can adjust these dimensions to yield larger or smaller scones as desired.) Using a sharp knife or a bench scraper, cut the rectangle into 12 even wedges or triangles. For cleaner cuts, lightly dust your knife or scraper with flour between cuts if the dough is sticky.
-
Place the cut scones evenly spaced on the prepared baking sheet. At this stage, you have the option to cover and refrigerate the dough for at least an hour (or up to 24 hours) to firm it up, which can help them hold their shape better during baking. Alternatively, you can bake them immediately. If baking right away, the scones might spread slightly, but their delicious flavor will remain unaffected.
-
Bake for 15-20 minutes, or until the scones are lightly golden brown on top and baked through. Allow them to cool completely, or until just warm, before applying the glaze.
-
For the glaze, whisk together the powdered sugar, sour cream (or buttermilk), warm water, and a dash of vanilla extract in a small bowl until completely smooth. Adjust consistency by adding a little more water or milk if it’s too thick, or more powdered sugar if it’s too thin; it should be thick enough to cling to the scones but still pourable. Drizzle the glaze evenly over the cooled or warm scones. Serve immediately, or store any leftover scones in an airtight container at room temperature for 1-2 days to maintain freshness.
Notes
Scone Pan: This scone dough performs beautifully when baked in a mini scone pan, such as this one, yielding uniformly shaped and perfectly baked results.
Mel
Bread, Breakfast, Dessert
American
Bake
Serving:
1
Scone
,
Calories:
339
kcal
,
Carbohydrates:
44
g
,
Protein:
3
g
,
Fat:
17
g
,
Cholesterol:
43
mg
,
Sodium:
282
mg
,
Fiber:
1
g
,
Sugar:
20
g
Recommended Products
Recipe Source: Adapted from Bake from Scratch magazine.