
Master the art of roll shaping with this comprehensive, step-by-step tutorial. You’ll soon be crafting perfectly symmetrical, beautiful rolls that will make you feel like a seasoned professional baker!
Updated Content: For an even more detailed guide, explore our new and improved video tutorial on expertly shaping various types of dinner rolls, complete with specific techniques for crafting ideal hamburger and hot dog buns. Dive in and elevate your bread-making skills!
Following up on our previous deep dive into working with yeast, we’re thrilled to present the highly anticipated guide on how to shape truly perfect dinner rolls. While there are many ways to approach roll shaping, the method we’re about to unveil stands out for its consistent results and the sheer elegance it brings to your baked goods. Forget uneven, lopsided rolls; prepare to achieve uniform, visually stunning creations every single time you bake.
Throughout my baking journey, I’ve experimented with various roll shapes. Occasionally, for specific recipes such as the beloved Lion House rolls, a classic crescent shape adds a charming touch. However, for almost every other roll recipe, from rustic artisan rolls to fluffy brioche buns, I consistently rely on the technique detailed below. This method is a game-changer, ensuring each roll is perfectly round, smooth, and ready to bake into a golden, delectable masterpiece. The consistency achieved not only enhances their aesthetic appeal but also contributes to more even baking, preventing some rolls from being undercooked while others are overdone.
The Journey to Perfectly Shaped Rolls: A Step-by-Step Guide
The foundation of any great roll begins with a well-prepared dough. After your dough has successfully completed its first rise – often referred to as the bulk fermentation – it should be visibly expanded, light, and springy to the touch. This initial rise is crucial, as it allows the yeast to develop flavor and the gluten structure to relax, making the dough much easier to handle and shape effectively.

Step 1: Preparing Your Workspace and Dividing the Dough
Once your dough has completed its first rise, gently remove it from the bowl. I typically transfer it to a piece of greased plastic wrap, which helps prevent sticking and makes cleanup a breeze. Next, it’s time to divide the dough. This is where your handy-dandy bench scraper or dough cutter becomes an invaluable tool. Using swift, clean motions, slice off individual pieces of dough that will become your rolls. The goal here is to get pieces of roughly similar size, laying the groundwork for uniform rolls.

For those who value precision and consistent results, a kitchen scale is your best friend during this stage. While it might seem like an extra step, weighing each piece of dough ensures that every roll bakes evenly and presents a uniform appearance on your plate. For an average-sized dinner roll – ideal for accompanying a hearty meal or serving as a slider bun – I recommend portioning pieces of dough that weigh approximately 2 ounces (around 56-60 grams) each. This size yields a satisfying roll that is neither too small nor too overwhelming. If you don’t have a scale, don’t fret; with a bit of practice, you can learn to eyeball portions with surprising accuracy. Just aim for pieces that feel similar in your hand.

Step 2: The Art of Shaping – Creating Smooth, Round Rolls
Now, for the main event: shaping the dough into perfectly round, smooth balls. This technique is fundamental to achieving that professional finish and ensuring your rolls bake up beautifully without odd bulges or flat spots. The key is to create surface tension on the dough while neatly tucking in the edges. This process results in a tight, spherical shape that holds up well during proofing and baking.
Here’s a detailed breakdown of the shaping method:
- **Prepare Your Hands and Surface:** Ensure your work surface is clean and lightly floured, or even better, slightly damp but not sticky. Avoid excessive flour, as it can be incorporated into the dough, altering its texture.
- **Flatten Gently:** Take one piece of divided dough. Gently flatten it into a rough disc shape with your fingers, expelling any large air bubbles but being careful not to overwork it.
- **Gather the Edges:** Imagine the dough disc is a clock face. Start at the “12 o’clock” position and gently pull the edge of the dough towards the center. Pinch it slightly.
- **Continue Around:** Rotate the dough a bit (to “1 o’clock”) and repeat: pull the edge towards the center and pinch. Continue this process all the way around the dough, essentially gathering all the edges towards the bottom center of the dough ball. You’re creating a little pouch.
- **Seal the Seam:** Once you’ve gathered all the edges, firmly pinch the seams together at the bottom center of the dough to seal them completely. This creates a neat, tight bottom.
- **Create Surface Tension (The Cupping Method):** Flip the dough ball over so the smooth, sealed side is now facing down on your work surface. Cup your hand loosely over the dough ball, with your palm slightly curved and your fingers gently surrounding the base of the dough.
- **Circular Motion:** Apply gentle, even pressure with your cupped hand. Now, move your hand in a circular motion on the work surface. The dough should roll and spin under your hand. As it rolls, the friction with the surface and the pressure from your hand will stretch the top surface of the dough, creating a smooth, taut, perfectly rounded ball. The sealed seam will remain tucked neatly underneath.
- **Assess and Repeat:** Continue this circular motion for about 10-15 seconds, or until the dough ball looks perfectly round and smooth with a slight sheen on top, indicating good surface tension. If the dough resists or feels too tight, let it rest for a minute before continuing.
This method might take a few tries to master, but with practice, it becomes intuitive. The goal is a smooth, unbroken top surface, free from wrinkles or tears, with all the rough edges tucked neatly underneath. This surface tension is what gives your rolls their beautiful rise and texture in the oven. For a visual demonstration, the linked video above (or our updated tutorial) clearly illustrates this technique.
Step 3: Arranging and Proofing Your Shaped Rolls
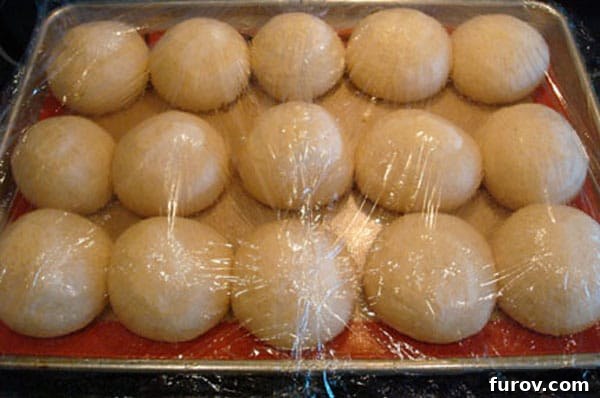
Once all your dough pieces have been expertly shaped into perfect, round rolls, it’s time to arrange them on your baking sheet. Space them appropriately, allowing room for expansion during the second rise and baking. A general rule of thumb is to leave about 1 to 2 inches between rolls, depending on how “pull-apart” you want them to be. For baking, I often use a Silpat silicone baking liner on my baking sheet. These liners are fantastic for non-stick properties and even heat distribution.
However, if you don’t have a Silpat or simply prefer not to use one, there’s no need for panic! Simply line your baking sheet with a sheet of parchment paper or lightly grease the sheet with butter or cooking spray to prevent sticking. This preparation is essential for easy removal of your beautiful, baked rolls.
After arranging, it’s crucial to cover the baking sheet loosely with greased plastic wrap or a clean kitchen towel. This step prevents the dough from drying out and forming a crust during the second rise, which would inhibit its ability to expand properly. The rolls now need to undergo their final proofing stage.
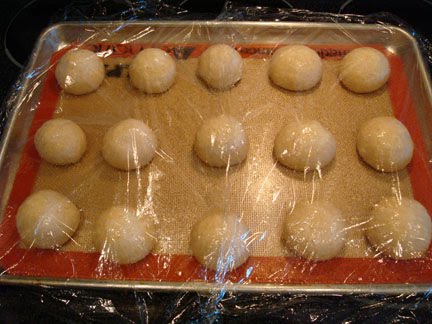
During this second rise, also known as proofing, the rolls will double in size and become wonderfully puffy and light. This is a critical stage where the yeast produces more gas, giving the rolls their characteristic airy texture. Find a warm, draft-free spot for them to rise – a slightly warmed oven (turned off, of course!) or a sunny spot on your counter often works well. The exact time for proofing varies depending on your environment’s temperature and humidity, but it typically ranges from 45 minutes to 1.5 hours. To test if they’re ready, gently poke a roll with a floured finger; if the indentation springs back slowly and partially, they’re perfectly proofed. If it springs back immediately, they need more time. If it collapses, they’re over-proofed. Once they’ve reached this beautifully puffed stage, they are officially ready to be transferred to a hot oven for baking.

Step 4: Baking and Enjoying Your Perfect Rolls
With proper shaping and proofing complete, your rolls are now poised for their transformation in the oven. Preheat your oven to the temperature specified in your recipe, typically between 375°F and 400°F (190°C to 200°C). For an extra golden crust and a touch of shine, you might consider brushing the tops of the rolls with an egg wash (one egg beaten with a tablespoon of water or milk) just before baking. Alternatively, a simple brush of melted butter after baking can achieve a similar effect and add rich flavor.
Bake the rolls for approximately 12-20 minutes, depending on their size and your oven’s calibration. Keep a close eye on them; they are done when they turn a beautiful, deep golden brown on top and sound hollow when tapped on the bottom. An internal temperature of around 200-210°F (93-99°C) is also a good indicator of doneness. Remove them from the oven and, if desired, brush with melted butter for a soft, irresistible crust. Allow them to cool slightly on a wire rack before serving. This cooling period is important as it allows the internal structure of the bread to set and prevents the rolls from becoming gummy.
Here is the truly satisfying finished product: a batch of perfectly golden, uniformly shaped, and utterly delightful rolls, ready to be devoured by eager hands. Whether served as a side to a holiday feast, alongside a comforting weeknight dinner, or simply enjoyed on their own with a spread of butter, these homemade rolls will undoubtedly impress. Their consistent shape ensures every bite is as good as the last, delivering a soft interior and a delicately crisp crust that only homemade bread can offer.

Tips for Success and Troubleshooting Common Issues
- **Sticky Dough:** If your dough is excessively sticky during shaping, lightly flour your hands or work surface. However, use flour sparingly to avoid toughening the dough. A light coating of oil on your hands can also help.
- **Uneven Shapes:** Don’t get discouraged if your first few attempts aren’t perfectly round. Practice makes perfect! Focus on creating good surface tension and sealing the seam tightly.
- **Dense Rolls:** Dense rolls are often a sign of under-proofing. Ensure your rolls have doubled in size and pass the poke test before baking.
- **Too Flat:** Rolls that spread out instead of rising upwards might be over-proofed, lacking enough surface tension during shaping, or have an issue with the yeast.
- **Flavor Enhancement:** Consider adding herbs, cheese, or garlic to your dough for flavored rolls, or brush with a mixture of melted butter and garlic powder before baking for an extra savory kick.
Crafting perfect homemade dinner rolls is one of the most rewarding experiences in baking. This detailed method for shaping ensures that your efforts result in not just delicious bread, but also visually stunning rolls that rival those from any bakery. Embrace the process, enjoy the aromas filling your kitchen, and take pride in presenting these beautiful, fluffy creations to your family and friends. Happy baking!