Welcome to the definitive guide for making extraordinary homemade Naan, the beloved Indian flatbread. This from-scratch recipe promises a tender, light, and buttery Naan that’s perfect for scooping up rich sauces and fragrant rice, elevating any meal—Indian or otherwise—into a culinary delight. Forget bland, store-bought alternatives; once you experience the warmth and softness of freshly baked Naan, there’s no turning back.
Imagine savoring a delectable plate of butter chicken, a vibrant bean curry, or any of your favorite coconut-based curries with a generous piece of fluffy Naan by your side. This traditional Indian flatbread isn’t just a side dish; it’s an essential component that complements and enhances the entire dining experience, making every bite memorable. Its versatility extends far beyond Indian cuisine, serving as a fantastic accompaniment to Mediterranean dishes, grilled meats, or even as a base for quick pizzas.

Why Homemade Naan is a Game-Changer
While there are many Naan recipes out there, this particular one stands out. After countless tests and refinements, we’ve perfected a method that yields Naan so tender, so light, and so irresistibly buttery, it truly blows other recipes out of the water. We’ve made this specific version dozens of times in recent months, and it has consistently delivered outstanding results. The secret lies in a balanced approach to ingredients and a keen understanding of yeast—don’t worry, we’ll guide you through it!
Demystifying Yeast: Your Journey to Perfect Flatbreads
If the thought of working with yeast fills you with dread, let this be the recipe that changes your mind. Naan, along with other simple flatbreads, is an ideal starting point for yeast novices. It’s forgiving, and the process is incredibly rewarding. There’s a certain magic in watching dough rise and transform into something so delicious, and we believe everyone can master it.
To help you conquer any apprehension, we recommend checking out this comprehensive tutorial on working with yeast. It provides invaluable tips and tricks that will build your confidence. Additionally, the detailed instructions below cover everything you need to know, whether you’re using active dry or instant yeast. And remember, you can always reach out with any questions—our lifelong goal is to help you become a bread, yeast, and dough expert!

Understanding the Key Ingredients for Perfect Naan
Each ingredient in this Naan recipe plays a crucial role in achieving its signature texture and flavor:
- All-Purpose Flour: Provides the structure for the dough. The amount can vary based on humidity and other factors, so always pay attention to the dough’s consistency.
- Salt: Essential for flavor and helps control yeast activity.
- Yeast (Active Dry or Instant): The leavening agent that gives Naan its airy, soft texture and characteristic puff. We provide instructions for both types.
- Milk: Contributes to the richness and tenderness of the dough, resulting in a softer crumb than water alone.
- Sugar: Feeds the yeast, helping it activate and rise, and also contributes to browning and a subtle sweetness.
- Melted Butter: Infuses the Naan with a delightful richness and keeps it moist. It’s also used for brushing the finished flatbreads, adding a glossy finish and extra flavor.
Frequently Asked Questions for Naan Indian Flatbread
Absolutely! A hot cast iron skillet or griddle works wonderfully for cooking Naan. You’ll achieve beautiful charring and a lovely puff. Just adjust cooking times as needed.
Yes, Naan freezes exceptionally well. I frequently make a large batch and freeze them for later. Simply wrap them tightly once cooled, and they’ll maintain their freshness for weeks.
No pizza stone? No problem! You can turn a heavy-duty cookie sheet upside down on the bottom rack of your oven and preheat it, or as mentioned, cook the Naan in a frying pan on the stovetop. Experiment with cooking times to get that perfect texture and color.
Yes, this recipe doubles with great success! It’s perfect for feeding a crowd or for stocking your freezer with homemade Naan.
For those interested in exploring more culinary adventures:
One Year Ago: Citrus Water Punch
Two Years Ago: Perfect Lemon Cake
Three Years Ago: Chocolate Mint Brownies

Naan – Indian Flatbread Recipe
12
pieces of naan
2 hours
45 minutes
5 minutes
2 hours
50 minutes
Pin
Ingredients
-
3-4 cups
(426 to 568 g)
all-purpose flour -
1 teaspoon
salt -
½ teaspoon
active dry or instant yeast -
1 ½ cups
milk -
1 teaspoon
sugar -
3-4
tablespoons, melted butter
Instructions
-
1. Activate Yeast (if active dry): Pour the milk into a liquid measuring cup and heat in the microwave until it’s warm to the touch (around 110 degrees F on an instant-read thermometer). If you are using active dry yeast, stir in the sugar and yeast into the warm milk. Let this mixture sit for 4-5 minutes until it becomes foamy, indicating the yeast has activated. Once foamy, pour the mixture into a large bowl or the bowl of a stand mixer. Add the salt and 2 1/2 cups of the all-purpose flour.
Alternatively (if instant yeast): If you are using instant yeast, simply pour the warm milk into a large bowl or the bowl of an electric stand mixer. Add the sugar, instant yeast, salt, and 2 1/2 cups of the flour. Proceed with the next step.
-
2. Form and Knead the Dough: Mix the ingredients well to combine. Gradually add the remaining flour in small amounts, mixing after each addition, until a soft dough forms that pulls away cleanly from the sides of the bowl. The dough should be slightly tacky but not sticky. Knead the dough until it is smooth and elastic; this will take approximately 3-5 minutes using a stand mixer with a dough hook, or about 10 minutes if kneading by hand on a lightly floured surface. Proper kneading is key for developing the gluten and achieving that wonderfully chewy texture.
-
3. First Rise (Proofing): Transfer the kneaded dough to a lightly greased bowl, turning it once to coat. Cover the bowl lightly with greased plastic wrap or a clean kitchen towel. Allow the dough to rest and rise at room temperature for about 2 hours, or until it has roughly doubled in size. This slow rise develops flavor and texture.
-
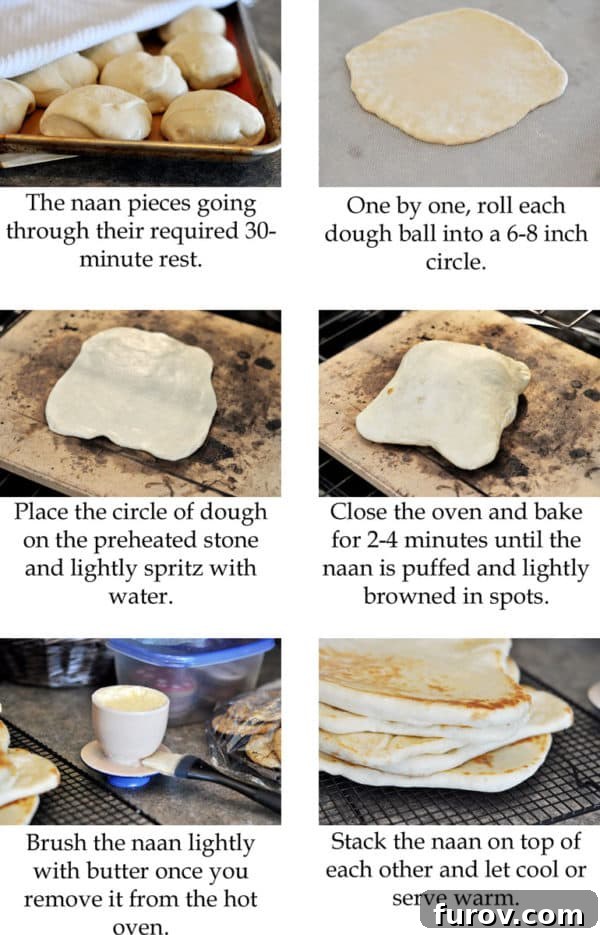
4. Prepare for Baking: After the dough has completed its first rise, gently turn it out onto a lightly floured surface (a silicone baking mat or roul’pat works great for this). Divide the dough into 12 equal pieces. Round each piece into a smooth ball shape. Cover these dough balls with a towel and let them rest for another 30 minutes. During this resting period, preheat your oven to 500 degrees F (260 degrees C) and place a pizza stone on the bottom rack of the oven. If you don’t have a pizza stone, a heavy-duty, upside-down cookie sheet can work as a substitute, or consider grilling the dough on a lightly oiled outdoor grill or using a hot griddle on your stovetop (you’ll need to experiment with cooking times for these alternative methods).
-
5. Roll and Cook the Naan: Once the dough balls have rested for 30 minutes, one by one, roll each piece into a circular or oval shape, about 6-8 inches wide. The thickness depends on your preference for thin or thick Naan. Carefully lay one circle of dough onto the preheated pizza stone in the oven. Lightly spritz the surface of the dough with water before closing the oven door. Bake the Naan for 2-4 minutes. Keep a close eye on it; it will puff up beautifully (some pieces will puff more dramatically than others) and brown spots will begin to appear on the top. Remove the Naan from the baking stone and immediately place it on a cooling rack. While still hot, brush it lightly with melted butter. As you cook each piece, stack the hot Naan on top of each other and cover the stack with a clean kitchen towel. This helps keep them warm and soft. Serve warm, or let them cool completely for later use.
Notes
Serving Suggestions: Serve this delicious homemade Naan warm with your favorite curries, stews, grilled meats, or use it to scoop up hummus and other dips. Leftover Naan makes an excellent base for quick mini-pizzas or wraps.
Storage & Freezing: Store cooled Naan in an airtight container at room temperature for 1-2 days, or refrigerate for up to 4 days. For longer storage, freeze individual pieces by wrapping them tightly in plastic wrap and then placing them in a freezer bag. They can be frozen for up to 1 month. Reheat in a warm oven or a dry skillet until soft and pliable.
Mel
Bread
American, Indian
Bake
Nutrition
Recommended Products
Recipe Source: Adapted slightly from Evil Shenanigans