
Mastering Yeast Baking: Your Ultimate Guide to Perfect Homemade Breads and Rolls
There’s a unique satisfaction that comes with pulling a warm, golden loaf of bread or a batch of fluffy rolls straight from your own oven. Not only does your home fill with an irresistible aroma, but you also gain the immense pleasure of knowing you’ve created something truly wonderful from scratch. For many, baking with yeast can seem intimidating, a culinary challenge reserved for seasoned bakers. However, I’m here to tell you that it’s an incredibly rewarding and achievable skill that can revolutionize your kitchen. As someone who bakes yeast breads and rolls several times a week, I’ve refined my approach and am excited to share my foolproof methods with you. Imagine whipping up dinner rolls that taste infinitely better than store-bought, all while spending just a fraction of the cost.
This comprehensive guide will demystify the art of yeast baking, covering everything from understanding different yeast types to mastering the kneading process and achieving the perfect rise. By the end, you’ll feel confident tackling any yeasted recipe. Let’s embark on this delicious journey together!
Understanding Yeast: Active Dry vs. Instant
At the heart of every great yeast recipe lies, well, yeast! Yeast is a living microorganism that, through a process called fermentation, produces carbon dioxide gas, which makes bread rise and gives it its characteristic airy texture. But not all yeast is created equal. The two primary forms you’ll encounter in most bread and roll recipes are Active Dry Yeast and Instant Yeast. Knowing the difference and how to properly use each is fundamental to your baking success.
Active Dry Yeast: The Traditionalist’s Choice
Active dry yeast is a dormant form of yeast, meaning it’s essentially asleep until it’s “woken up” or rehydrated. This crucial preparatory step, known as proofing, ensures the yeast is alive and active before it’s incorporated into your dough. To proof active dry yeast, you’ll typically dissolve it in warm water (around 105-115°F or 40-46°C). It’s important that the water isn’t too hot (which can kill the yeast) or too cold (which won’t activate it). A pinch of sugar often accompanies the water, acting as a food source to help the yeast activate more quickly and vigorously. You’ll let this mixture sit undisturbed for 5-10 minutes. During this time, the yeast granules will dissolve, and the mixture will become visibly foamy and bubbly. This foam is your visual cue that the yeast is alive, thriving, and ready to perform its magic in your dough.
Instant Yeast: The Modern Baker’s Convenience
Instant yeast, as its name suggests, offers a more direct and time-saving approach to baking. Unlike active dry yeast, it does not require prior rehydration or proofing. The granules of instant yeast are smaller and more porous, allowing them to absorb liquid quickly and become active directly within your dough mixture. This means you can simply add instant yeast straight into your mixing bowl along with your other dry ingredients, eliminating an entire step and expediting your baking process. Many home bakers, myself included, have converted to using instant yeast almost exclusively due to its unparalleled convenience and consistent reliability. It’s especially useful for faster-rising recipes.
Visualizing Yeast Activation: A Critical Step
Seeing is believing, especially when it comes to yeast! Here’s a visual illustration of what properly proofed yeast looks like, a vital indicator of its viability:
When active dry yeast is first added to warm water and sugar, it may still appear as distinct granules or a slightly cloudy mixture, with some particles floating on top. This is the “before” picture, showcasing dormant yeast.
After approximately 5-10 minutes, a healthy, active yeast mixture will undergo a remarkable transformation. It will be noticeably foamy, bubbly, and often emit a subtly yeasty, pleasant aroma, resembling the head on a freshly poured beer. This effervescent transformation is the main indicator that your yeast has successfully proofed and is ready to leaven your dough, promising a light and airy texture in your finished bread.
Troubleshooting: What if your yeast doesn’t proof? If, after 10 minutes, your active dry yeast mixture shows no signs of foam or bubbles, it likely means your yeast is no longer active or viable. This unfortunate outcome could be due to several factors: the yeast itself might be old or expired, the water used might have been too hot (killing the delicate yeast organisms), or too cold (preventing their activation). In this scenario, it’s best to discard the mixture and start again with fresh yeast and properly tempered water. Don’t waste your valuable ingredients on inactive yeast.
Storing Your Yeast for Optimal Freshness and Potency
Proper storage is paramount to maintaining the viability and potency of your yeast. Just like any living organism, yeast degrades over time, and improper storage (exposure to heat, air, and moisture) can significantly shorten its shelf life and diminish its effectiveness. I often buy my yeast in bulk, usually from warehouse clubs or when I find a great sale at the grocery store. Bulk purchasing is incredibly cost-effective for frequent bakers, but it makes proper storage even more critical.
The Freezer: The Best Home for Opened Yeast
Once you open a package of yeast, exposure to air and moisture can quickly diminish its activity. My go-to method for storing opened yeast is to pour it into an airtight container, such as a quart-sized glass jar, and store it securely in the freezer. The consistently cold temperature halts the yeast’s metabolic activity, effectively preserving its freshness for months, even up to a year or more past its printed expiration date. Crucially, there’s no need to bring it to room temperature before using; you can simply measure it directly from the freezer and add it to your ingredients. This method ensures your yeast is always ready to go and highly effective, preventing waste and ensuring consistent results.
The Pantry: For Unopened Packages
Unopened packages of yeast can typically be stored in a cool, dry, dark place like your pantry until their expiration date. However, for maximum longevity, especially if you won’t be using them for an extended period, even unopened packages can benefit from refrigeration or freezing. Always check the expiration date on your yeast packaging, and if you’re ever in doubt about the freshness of older active dry yeast, performing a quick proofing test (as described above) is always a wise precaution before committing it to a full recipe.
Achieving the Perfect Dough Consistency: The Baker’s Touch
The texture of your finished bread or rolls largely depends on the consistency of your dough. The golden rule in yeast baking is this: the softer and more pliable the dough, the more tender, airy, and delicious the resulting baked goods will be. However, “soft” doesn’t mean runny or liquidy like a cake batter. We’re aiming for a delicate and specific balance.
An ideally consistent yeast dough should have a slight tackiness to it. It should feel moist and responsive to the touch, but not overtly sticky to the point where it adheres stubbornly to your hands or the mixing bowl. It should be smooth, elastic, and easily workable, a living entity under your hands. This perfect balance is achieved through careful hydration and proper kneading, which allows the flour to fully absorb the liquid and the crucial gluten proteins to develop adequately. Over-flouring at the initial stage can lead to a dry, dense, and crumbly product, while too little flour will result in a weak, overly sticky dough that’s difficult to manage and won’t hold its shape or rise properly.
The Art of Kneading: Building Strength and Structure
Kneading is a fundamental and transformative step in yeast bread making, absolutely essential for developing the gluten structure within the dough. Gluten, formed when flour proteins (glutenin and gliadin) are hydrated and agitated through kneading, gives bread its elasticity, strength, and characteristic chew. Proper kneading ensures your bread will have a good rise, a tender, open crumb, and a satisfying texture that holds together beautifully.
Kneading with an Electric Mixer: Efficiency and Ease
My trusted Bosch mixer is my primary workhorse for making breads and rolls, and I honestly admit I wouldn’t bake yeasted goods nearly as often without it! While electric mixers certainly expedite the process and reduce physical effort, it’s important to remember that excellent bread can absolutely be made by hand. I’ve done it countless times. However, for the sake of demonstration in the following images, you’ll see my beloved mixer in action. Electric mixers, especially stand mixers equipped with a dough hook, efficiently develop gluten, saving you significant time and effort, making baking more accessible for busy schedules.
When I first combine all the ingredients and add what I believe to be the initial right amount of flour, the dough often appears somewhat shaggy and sticky, barely coherent, as shown here. This is perfectly normal and expected at this initial stage of incorporation.
I view the flour quantity specified in recipes as a flexible guideline, not a strict rule to be followed rigidly. Factors like ambient humidity, how you measure flour (scoop and sweep vs. spoon and level), and even the specific brand of flour can significantly impact the final dough consistency. Therefore, I rely more on the visual and tactile feel of the dough than on precise measurements alone. I typically add enough flour until the dough just begins to pull away cleanly from the sides of the mixing bowl. Then, I let the mixer run for a few minutes, carefully observing how the dough behaves. It’s also incredibly helpful to occasionally stop the mixer and feel a piece of dough between your fingers to assess its tackiness, elasticity, and overall development. This allows me to determine if more flour is needed incrementally. Remember, you can always add a little more flour if the dough is too wet, but you can’t easily take it away if it’s too dry!
As the dough continues to knead, you’ll notice a remarkable transformation. After about 2-3 minutes of consistent mixing in an electric mixer (which equates to roughly 5-7 minutes of diligent hand kneading), the dough will start to look much smoother, less shaggy, and more cohesive, indicating that the gluten is beginning to develop and strengthen.
Finally, after approximately 8 minutes of consistent kneading in an electric mixer, the dough should be beautifully smooth, elastic, and ready for its first rise. It’s often said that it’s nearly impossible to over-knead a dough by hand, and it’s quite challenging even with a home stand mixer to truly “ruin” it. The greater concern, especially for novice bakers, is under-kneading, which can result in insufficient gluten development. This leads to a dense, tough bread that doesn’t rise properly because it lacks the necessary strong, elastic structure to hold the gas produced by the yeast during fermentation.
Notice in the image above that even after optimal kneading, the dough still exhibits a slight tackiness and pulls on the dough hook. This is exactly what you want! A perfectly kneaded dough will be soft, pliable, and just a little sticky—a testament to its ideal hydration and well-developed gluten structure.
The “Dough Ball” Test for Perfect Consistency
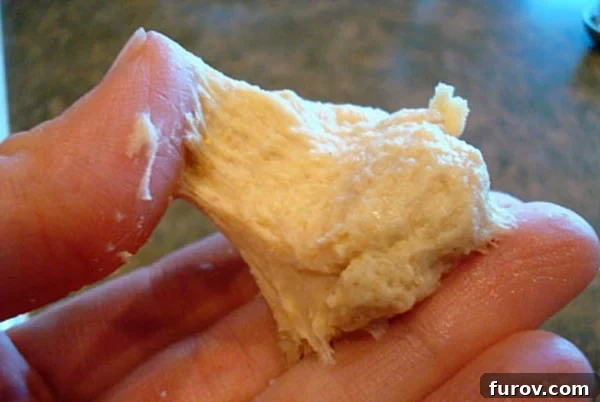
To further assess the dough’s consistency during or after kneading, try this simple, tactile test: pinch off a small piece of dough (as shown below, this was taken midway through kneading). It will likely stick to your fingers initially, leaving a slight residue.
However, after quickly rolling it into a smooth ball in the palm of your hand for just a moment, it should transform. If it forms a coherent, smooth ball that holds its shape and doesn’t leave excessive, sticky residue on your hand, your dough is perfectly floured and kneaded, despite its initial stickiness. This indicates the gluten is developed enough to create structure.
Kneading by Hand: A Meditative and Rewarding Process
If you’re kneading by hand, the initial goal is to incorporate enough flour so that the dough forms a shaggy ball. It will still be quite sticky, but don’t be tempted to add too much flour right away. The physical act of kneading itself helps the flour absorb more liquid, gradually transforming a sticky mass into a smooth, elastic dough. Use a rhythmic push-fold-turn technique, continuously working the dough to develop the gluten. You can always sprinkle in more flour as needed throughout the kneading process, a tablespoon at a time, until it reaches the desired smooth, pliable, slightly tacky consistency. Hand kneading is not just a technique; it’s a meditative and sensory experience that connects you deeply to the baking process, fostering a true feel for your dough.
The First Rise: Bulk Fermentation for Flavor and Volume
Once your dough is perfectly kneaded, it’s time for the first rise, often called bulk fermentation. This is a crucial phase where the yeast gets to work, consuming sugars and producing carbon dioxide, which causes the dough to expand, develop its characteristic airy structure, and build complex flavors and aromas.
Preparing for the Rise: Creating the Ideal Environment
First, gently transfer your perfectly kneaded dough into a large, lightly greased bowl. Greasing the bowl (with a little oil or cooking spray) prevents the dough from sticking as it rises and expands, making it much easier to remove later without deflating it.
Cover the bowl securely with greased plastic wrap (greasing the side that touches the dough prevents it from sticking to the rising dough) or a clean, damp kitchen towel. This covering is essential to prevent a dry crust from forming on the dough’s surface, which could inhibit its rise and create a tough exterior.
Finding the Ideal Rising Spot: Temperature Matters
A warm, draft-free environment is paramount for a successful rise. The ideal temperature for dough to rise properly is generally around 70-80°F (21-27°C). If your kitchen is a bit cooler, don’t worry; the dough will simply take longer to rise. A slower, cooler rise can actually contribute to deeper, more complex flavor development in your bread. However, if your home is unusually cool (e.g., 66°F or lower), you might need to create a warmer environment.
One common and effective trick is to turn your oven on to its lowest setting (or about 350°F / 175°C for just a few minutes, then turn it completely off) and let the dough rise on top of the warmed oven. If you have a ceramic top stove, the residual heat from the oven can provide a perfect warm spot. Other excellent options include placing the bowl in a warm (but turned off) microwave, a dedicated proofing box, or near a sunny window (ensuring it doesn’t overheat). Avoid direct, harsh heat which can “kill” the yeast.
Judging the Rise: Size Over Time is Key
Recipes often provide time estimates for rising, such as “let dough rise for 45 minutes or until doubled.” While these are helpful guidelines, it’s crucial to remember that temperature variations in every kitchen and different yeast content in recipes mean that time is less important than visual cues. Always judge your dough’s readiness based on its size, not the clock.
The dough is ready for the next step when it has visibly doubled in size. It will look noticeably puffy, soft, and somewhat springy when lightly touched. This particular batch, thanks to a fast-rising roll recipe (often due to a higher yeast content or specific flour blend), doubled in about 30 minutes, indicating its readiness to be shaped into beautiful rolls or a hearty loaf of bread.
To further test if it’s sufficiently risen, gently poke two fingers into the dough about half an inch deep. If the indentations remain, the dough is ready. If they spring back quickly, it needs more time to fully relax and expand. This is often called the “poke test.”
Your Journey to Homemade Bread Begins Now!
There you have it – a foundational guide to the initial and often most intimidating phases of working with yeasted dough. From selecting and properly storing your yeast to mastering the perfect kneading technique and achieving an optimal first rise, you now possess the essential knowledge to confidently tackle any bread or roll recipe. This first step, often perceived as complex, is now within your grasp, simplified and clearly explained.
Next week, we’ll continue this exciting baking adventure with a detailed tutorial on shaping this beautifully risen dough into perfectly round, delectable dinner rolls, including my nifty technique for achieving that professional, uniform finish. Get ready to impress your family and friends with your newfound baking prowess and the irresistible taste of homemade bread!
Do you have any questions about this comprehensive tutorial? Please don’t hesitate to leave your questions in the comments section below or reach out via email at mykitchencafe at gmail dot com. Your success in the kitchen is my greatest reward, and I’m always happy to help!
Now, go forth and make some amazing bread!