
Mastering Bakery-Style Cupcakes: Easy Decorating & Frosting Techniques for Home Bakers
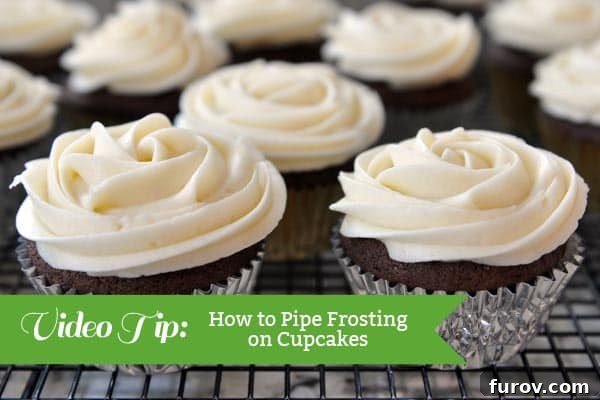
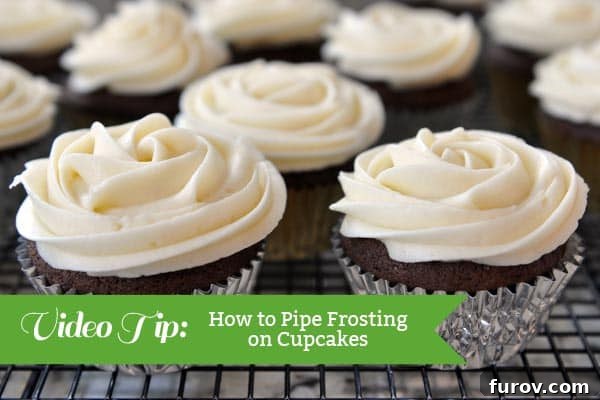
Dreaming of beautifully decorated cupcakes that look like they came straight from a gourmet bakery, but without the gourmet price tag? You’ve come to the right place! In this comprehensive guide, complemented by a quick and simple video tutorial, we’ll walk you through two essential ways to decorate and frost cupcakes, ensuring a gorgeous, professional finish every time.
Unlock Your Inner Pastry Chef: Decorating Cupcakes at Home
Forget the long queues and hefty prices at the fancy bakeries. Today’s video tip and accompanying article are dedicated to empowering every home baker to create stunning, Instagram-worthy cupcakes. It’s about bringing that professional touch right into your kitchen, making it accessible, enjoyable, and incredibly satisfying. Imagine the look on your family’s and friends’ faces when they see – and taste – your exquisite creations!
The journey to bakery-style cupcakes begins with a good foundation: a delicious cupcake recipe and a perfectly whipped frosting. Once you have those ready, just a few minutes with our video and a little practice are all it takes to transform simple cupcakes into works of art. You’ll not only save money but also gain immense satisfaction from crafting these beautiful treats yourself. Get ready to feel like a rock star when your cupcakes are good enough to sell – though we highly recommend keeping them all to yourself to enjoy!
The Foundation of Fabulous Frosting: Choosing the Right Type
The secret to beautifully piped cupcakes lies significantly in the frosting itself. It needs to be delicious, of course, but equally important is its ability to hold shape, ensuring those intricate swirls and designs stay intact. While many types of frosting exist, not all are suitable for piping elegant designs.
Recommended Frostings for Perfect Piping:
- Quick Vanilla Buttercream: This is a fantastic, versatile choice, and it’s the frosting I’m using in the tutorial. Its smooth texture and stability make it ideal for various piping techniques, from simple swirls to more elaborate designs. You can find my recipe for Quick Vanilla Buttercream here.
- Magical Frosting: As its name suggests, this frosting works wonders. It’s another excellent option known for its fantastic consistency and ability to hold its shape beautifully, making your piped decorations look sharp and defined. Discover the magic with my favorite Magical Frosting recipe.
- Whipped Chocolate Buttercream: For chocolate lovers, a good chocolate buttercream is indispensable. The chocolate frosting from Friday’s post is another stable and delicious option that pipes wonderfully. Its rich flavor pairs perfectly with a variety of cupcake bases.
The key takeaway is to select a frosting that is stable enough to maintain its structure once piped. Avoid frostings that are too soft or runny, as they will quickly lose their shape, resulting in a less refined finish.
Essential Tools for Immaculate Cupcake Decorating
While the video focuses on the technique, having the right tools makes all the difference. You don’t need a professional pastry kitchen, but a few key items will elevate your decorating game significantly.
Piping Tips: Your Design Superpowers
During the video, I specifically mention using a Wilton 1M star tip. This is a universally beloved tip for a reason! Its open star shape creates beautiful, defined swirls and rosettes with ease, making it perfect for beginners and seasoned decorators alike. However, don’t limit yourself to just one tip. Other versatile tips to consider include:
- Round Tips (e.g., Wilton 1A, 12): Great for smooth domes, writing, or creating dots and pearls.
- Petal Tips (e.g., Wilton 104): Ideal for delicate ruffles, flowers, and intricate designs.
- French Star Tips (e.g., Wilton 21): Creates a different texture of star, often with more ridges.
Piping Bags: The Delivery System
When it comes to piping bags, convenience and hygiene are paramount. I typically use 12-inch or 16-inch disposable piping bags. Disposable bags mean no messy cleanup and less worry about cross-contamination between colors or flavors. While some decorators use couplers to switch tips easily, I often skip them for simplicity. Just snip off the very tip of the bag, slide your chosen piping tip in, and you’re ready to go! Ensure the tip fits snugly to prevent frosting from leaking out.
Other Useful Accessories:
- Offset Spatula: While not strictly for piping, an offset spatula is invaluable for smoothing out frosting on cakes or applying a thin base layer to cupcakes before piping.
- Food Coloring: High-quality gel food coloring (like Wilton or AmeriColor) allows you to achieve vibrant hues without thinning your frosting.
- Sprinkles and Toppers: These are the finishing touches that transform a frosted cupcake into a festive masterpiece. Have a variety on hand for different occasions.
Step-by-Step Guide: Mastering Two Easy Decorating Techniques
The video demonstrates two quick and effective ways to frost your cupcakes for that professional look. Here’s a detailed breakdown to complement the visual guide:
Technique 1: The Classic Swirl
This is arguably the most popular and versatile cupcake frosting technique. It creates a beautiful, elegant peak that’s both appealing and easy to achieve.
- Prepare Your Bag: Insert your Wilton 1M tip into a disposable piping bag (or a reusable one). Fill the bag about two-thirds full with your chosen frosting. Twist the top of the bag to seal it, preventing frosting from oozing out the top.
- Positioning: Hold the piping bag perpendicular to the cupcake, directly over the center. Apply steady, even pressure.
- Start Piping: Begin by piping a small dot of frosting in the very center of the cupcake. This forms the anchor.
- Create the Base Ring: Move outwards from the center dot, piping a circle around the outer edge of the cupcake, ensuring the frosting touches the edge.
- Build the Swirl: Now, pipe a second circle directly on top of the first, slightly inward. Continue piping in concentric circles, moving inward and upward, gradually reducing the pressure as you reach the top.
- Finish with a Peak: Once you reach the center again, release pressure as you pull the bag straight up, creating a neat peak.
Technique 2: The Rosette (or Mini Swirl)
This method creates a beautiful, floral-like design that’s perfect for a more intricate, yet still simple, look.
- Prepare Your Bag: Use the same setup as with the classic swirl (Wilton 1M tip).
- Start in the Center: Hold the piping bag perpendicular to the cupcake, directly over the center.
- Pipe a Spiral: Start by piping a small dot in the center. Then, without lifting the bag, begin piping in a tight spiral motion, moving outwards from the center.
- Cover the Surface: Continue the spiral until you cover the entire top surface of the cupcake, reaching the outer edge. Maintain steady, even pressure throughout.
- Finish Seamlessly: Stop piping when you reach the edge, gently lifting the bag away to create a smooth, continuous finish.
Any questions on these techniques or anything else? Feel free to leave them in the comments section of this post. We love hearing from you!
Beyond the Basics: Tips for Cupcake Decorating Success
Achieving truly bakery-style cupcakes goes beyond just piping. Here are some essential tips to ensure your decorating process is smooth and your results are spectacular:
- Cool Cupcakes are Crucial: Never attempt to frost warm cupcakes. The heat will melt your beautiful frosting, causing it to slide right off. Always ensure your cupcakes are completely cooled, ideally at room temperature, before you begin.
- Frosting Consistency is Key: Your frosting should be pliable but firm. If it’s too soft, chill it in the refrigerator for 10-15 minutes, then re-whip it briefly. If it’s too stiff, add a tiny amount of milk or cream (half a teaspoon at a time) and mix until it reaches the desired consistency.
- Don’t Overfill the Bag: A piping bag that’s too full is difficult to control. Fill it no more than two-thirds full to maintain good grip and pressure.
- Consistent Pressure: Maintaining steady and even pressure on the piping bag is essential for smooth, uniform lines and swirls. Practice on a plate first if you’re new to piping.
- Get Creative with Toppings: Once frosted, cupcakes become a canvas for creativity! Add sprinkles, edible glitter, mini chocolate chips, fruit, or small candy decorations. These finishing touches truly elevate the look.
- Storage Matters: Frosted cupcakes generally keep well at room temperature for a day or two, especially if covered. For longer storage or if your frosting is cream cheese-based, refrigerate them in an airtight container.
My Kitchen Philosophy: Real Life, Real Baking
A quick little note: I want you to know that these video tips and all the content here are simply a way to help you conquer life in the kitchen – from one friend to another. You won’t find a fancy studio here, nor will you see perfectly spotless counters (or perfectly shut cabinet doors, for that matter!). I don’t aspire to be on television, set up extra lighting, or meticulously stage every shot.
It’s just me and my video camera, capturing one little tip at a time, often trying to get the shooting done during a short nap time (not mine, but my little one, Cam’s!). Think of it like we’re hanging out at my house, sharing tips and tricks in a pretty down-to-earth and casual way. If you’re looking for studio lights, makeup artists, and a real, live wardrobe consultant, well, I’m probably not your girl. My goal is simply to make baking accessible and fun, reflecting the reality of a busy home kitchen. Peace out.
Remember, all of our helpful video tips, covering a wide range of culinary topics, can be found on the main Video Tips page. You can also subscribe and follow along on our dedicated Mel’s Kitchen Cafe YouTube channel for more baking inspiration and practical kitchen advice!