
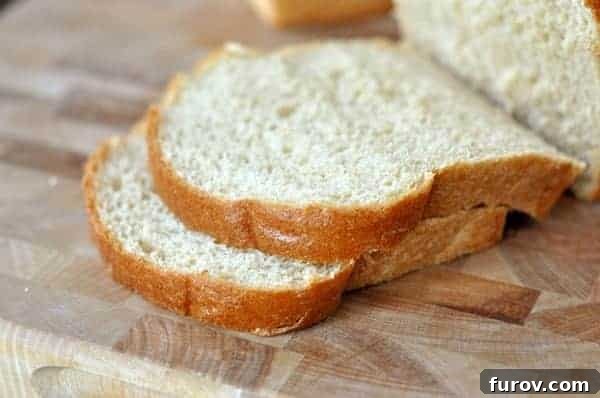
Mastering Homemade Whole Wheat Bread: A Comprehensive Step-by-Step Tutorial
Embark on a culinary journey to become a master bread maker right in your own kitchen with this detailed, step-by-step visual tutorial on crafting simple yet exquisite whole wheat bread.
The art of baking bread, especially with yeast, often appears daunting to many. Questions abound: When is the right time to stop adding flour? How long should one knead the dough? What type of yeast yields the best results? These are common inquiries, particularly for those just beginning their bread-making adventure.
While I’ve previously shared a comprehensive tutorial on working with yeast, which addresses many fundamental queries, I’ve long wanted to provide a truly visual, step-by-step guide focused on simple bread making. Today, that wish becomes a reality!
Why Bake Your Own Whole Wheat Bread?
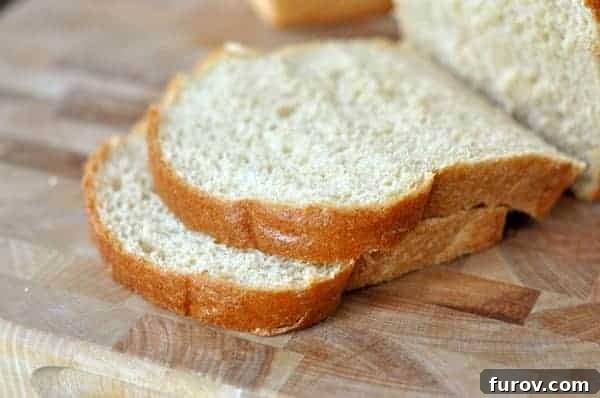
For many years, our family has exclusively enjoyed homemade bread. The transition wasn’t just about saving money, though that’s certainly a significant benefit. More importantly, we’ve come to overwhelmingly prefer the unparalleled taste and texture of bread baked from scratch over anything available in stores. There’s a distinct difference in freshness, flavor, and the wholesome feeling it brings.
Even if committing to baking all your bread seems like a big leap, mastering a single loaf for special occasions or an occasional treat is incredibly rewarding. I promise, the process is far less intimidating than it appears. In a world where carbohydrates are celebrated, there’s truly nothing more delightful than a warm slice of homemade bread, fresh from the oven, generously slathered with butter. It’s a simple pleasure that elevates any meal.
Essential Tips Before You Begin Your Bread-Making Journey
Before diving into the recipe, a few considerations can significantly enhance your bread-baking experience and ensure success. Understanding these foundational elements will empower you to adapt and troubleshoot effectively.
Understanding Your Ingredients: Yeast, Flour, and More
- The Recipe Base: For this detailed, step-by-step guide, we are primarily following Darcy’s Whole Wheat Bread recipe. While that post offers a couple of excellent options, Darcy’s recipe is my go-to choice due to its consistent results and delicious flavor.
- Yeast Essentials: Yeast is a living organism, crucial for the rise and texture of your bread. If you have questions about different types of yeast (active dry vs. instant) or how to properly activate it, I highly recommend reviewing my tutorial on working with yeast. It covers common pitfalls and ensures your yeast is ready to perform its magic.
- Choosing and Using Whole Wheat Flour:
- I often grind my own wheat flour using a Wolfgang Grain Mill for superior freshness and flavor. However, using high-quality store-bought whole wheat flour is perfectly acceptable.
- For optimal flavor and a delicate texture, I prefer hard white wheat over hard red wheat, but either variety will work beautifully in this recipe.
- For more in-depth knowledge on wheat, including different varieties, where to purchase, and what to make, check out my informative posts on wheat types and sourcing, and for those interested in grinding their own, an extensive guide on wheat grinders and reviews.
- **A critical note on flour amount:** Freshly ground wheat flour tends to be more aerated and fluffy than flour that has settled in a bag, meaning you might need to add more cups of freshly ground flour to achieve the desired consistency. However, this is a minor detail because the golden rule for yeast doughs is always to use the recipe’s flour amount as a guideline only. The true test lies in the look and feel of the dough itself. It should be soft, pliable, and just slightly sticky.
Equipment Considerations for Seamless Baking
- Stand Mixer vs. Hand Mixing: I use a Bosch mixer, which is featured in the instructional photos below, for all my bread and roll baking. While a powerful stand mixer can simplify the kneading process, don’t be discouraged if you don’t own one. You can absolutely achieve excellent results by hand-kneading. If using a different stand mixer, you might need to adjust the recipe slightly to suit your mixer’s capacity or motor strength. The visual guidelines below are adaptable to whatever equipment you have.
- Recommended Bakeware: I consistently use these sturdy bread pans. For convenient storage once the bread has cooled completely, I package loaves in these bread bags, securing them with plastic clips (often found at IKEA), and then freeze them until we’re ready to enjoy.
As always, please don’t hesitate to reach out with any questions you may have. My goal is for this tutorial to be an invaluable resource for anyone aspiring to conquer the delightful art of homemade bread making.
For your convenience, a printable PDF version of this detailed picture tutorial is available. Click here to download.
Step-by-Step Whole Wheat Bread Tutorial
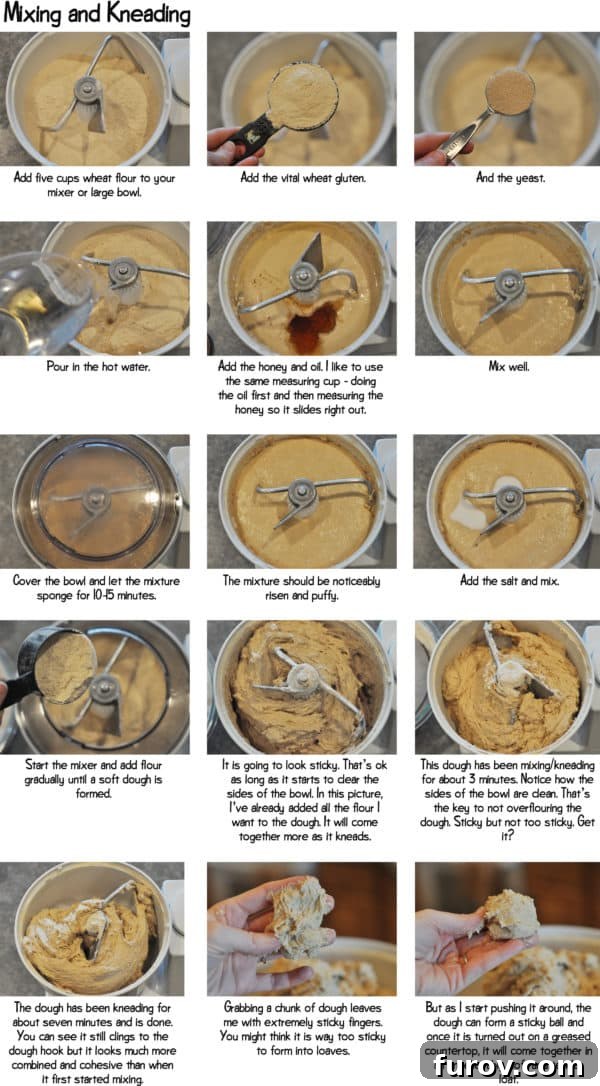
Let’s dive into the practical steps of creating your perfect loaf of whole wheat bread. Follow these visual cues and instructions closely, and you’ll be enjoying warm, homemade goodness in no time.
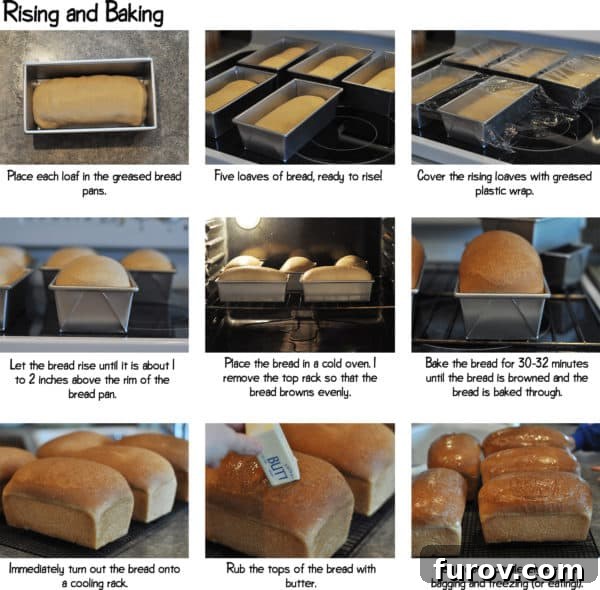
Refining Your Technique: Shaping for Success
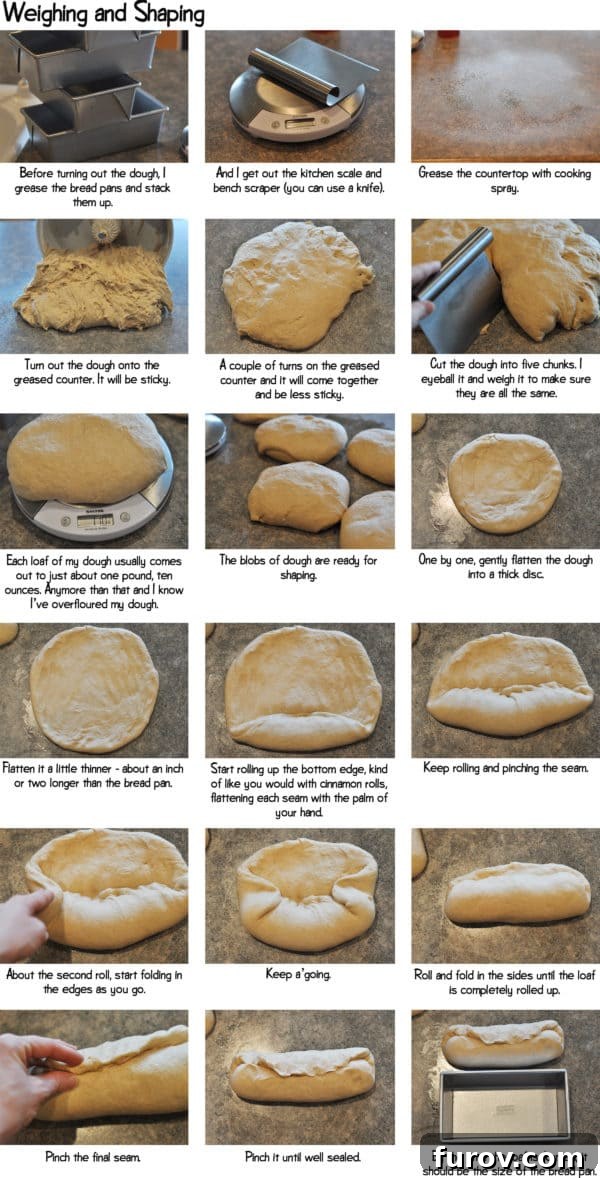
Update (April 2015): Over time, I’ve discovered a refined dough shaping technique that significantly improves loaf structure and prevents deflating in the oven. If you’ve experienced your bread rising beautifully in the pans only to fall slightly during baking, you might consider adjusting how you shape your dough. While the pictures above illustrate a method that works for many, I’ve found that a tighter loaf yields better results for my bread in recent months.
I’ve simplified my shaping process, essentially pressing the dough in my hands to create a much firmer, more compact loaf. Many of you requested a visual demonstration of this updated method, so I recorded a quick, two-minute tutorial while in the middle of baking. Please excuse the casual editing and my little helper in the background – it was a spontaneous capture to share this valuable tip with you!
LuAnn’s Whole Wheat Bread {With My Adaptations}
4
loaves
2
hrs
30
mins
38
mins
3
hrs
8
mins
Pin
Ingredients
-
5 ½
cups
warm water -
½
cup
sugar -
½
cup
oil -
2
tablespoons
instant yeast -
2
tablespoons
salt -
2
tablespoons
vital wheat gluten -
2
tablespoons
nonfat dry milk -
2
cups
(284 g)
white flour -
8-10
cups
(1136 to 1420 g)
whole wheat flour
Instructions
-
Lightly spray your bread pans with cooking spray and set them aside.
-
In the bowl of an electric mixer (or a large bowl for hand mixing), combine the warm water, sugar, oil, instant yeast, salt, vital wheat gluten, and nonfat dry milk. Mix these ingredients thoroughly. Next, add the white flour and continue mixing until well combined.
-
Gradually add the whole wheat flour, cup by cup, until the dough begins to pull away cleanly from the sides of the bowl. The dough should feel soft and slightly tacky, but not overly sticky. Remember, the exact amount of flour can vary based on humidity and flour type, so rely on the dough’s consistency.
-
Knead the dough for approximately 10 minutes (with a stand mixer) or 15-20 minutes by hand, until it transforms into a soft, smooth, and elastic ball. Lightly grease your hands and countertops with oil or cooking spray, then divide the dough and shape it into 4 uniform loaves.
-
Carefully place each shaped loaf into its prepared bread pan. Cover the pans loosely with lightly greased plastic wrap. Allow the dough to rise in a warm, draft-free place until it has visibly risen about 1 ½ inches above the top edge of the bread pan. This is typically the first rise.
-
Once risen, carefully place the bread pans into a cold oven. Then, set the oven temperature to 350 degrees Fahrenheit (175°C) and bake for 38 minutes. Baking from a cold oven allows the bread to get an initial gentle rise before the crust sets.
-
As soon as the baking time is complete, remove the bread from the oven and immediately turn the loaves out onto a wire cooling rack. It is crucial to let the bread cool completely on the rack before attempting to slice or package it. Once fully cooled, you can place the loaves into bread bags and freeze them for later enjoyment.
Notes
Mel
Bread
American
Bake
Troubleshooting Common Whole Wheat Bread Issues
Even with a clear guide, baking can sometimes present unexpected challenges. Here are a few common issues you might encounter and how to address them:
- Bread Deflates in the Oven: As mentioned in the update section, this is often due to loose shaping. Ensure your loaves are formed tightly. Another reason could be over-proofing (allowing the dough to rise too much before baking), which exhausts the yeast.
- Dense or Heavy Bread: This usually points to insufficient kneading or not enough liquid. Kneading develops gluten, which gives bread its structure and airy texture. Ensure your dough passes the “windowpane test” – you should be able to stretch a small piece thinly enough to see light through it.
- Bread Doesn’t Rise: The culprit is almost always inactive yeast. Check the expiration date of your yeast. Ensure your water temperature is correct (around 105-115°F or 40-46°C for active dry yeast; instant yeast can often be added directly to dry ingredients but still prefers warmth).
- Crumbly Texture: This can be a sign of too much flour. Remember, the feel of the dough is more important than the exact measurement. Whole wheat flour also absorbs more liquid than white flour, so ensuring adequate hydration is key.
Beyond the Basics: Elevate Your Homemade Whole Wheat Bread
Once you’ve mastered the foundational whole wheat loaf, don’t hesitate to experiment! Bread baking is a journey of creativity and taste. Here are a few ideas to inspire you:
- Add Seeds and Grains: Incorporate sunflower seeds, flaxseeds, sesame seeds, or even a small amount of cooked quinoa into your dough for added texture, flavor, and nutritional boost.
- Herb Infusion: Fresh or dried herbs like rosemary, thyme, or oregano can transform your bread into a savory delight, perfect with soups or stews.
- Sweet Variations: A touch of cinnamon, raisins, or dried cranberries can turn your whole wheat bread into a wonderful breakfast or snack bread.
- Explore Different Flours: While this recipe focuses on whole wheat, consider adding a small percentage of other whole grain flours like rye or spelt for nuanced flavors and textures.
- Brush with Toppings: Before baking, brush the top of your loaves with an egg wash for a shiny, golden crust, or sprinkle with oats or seeds for a rustic finish.
Other Delicious Bread Recipes to Explore
Explore More Bread Recipes:
Baking homemade whole wheat bread is a truly satisfying endeavor that fills your home with an inviting aroma and your table with wholesome goodness. With this detailed guide, you have all the tools and knowledge to bake perfect loaves consistently. Enjoy the process, savor the results, and don’t hesitate to reach out with any further questions as you continue your bread-baking journey!