
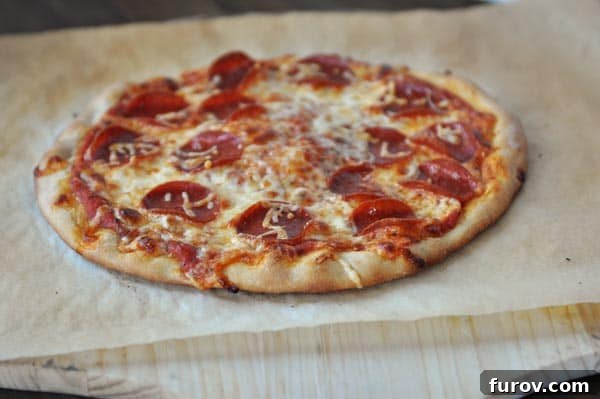
Discover the secrets to baking the perfect homemade pizza with these three tried-and-true methods, complete with practical tips and techniques for home cooks – no fancy tools required! Whether you have a pizza stone or not, achieve a restaurant-quality crust every time.
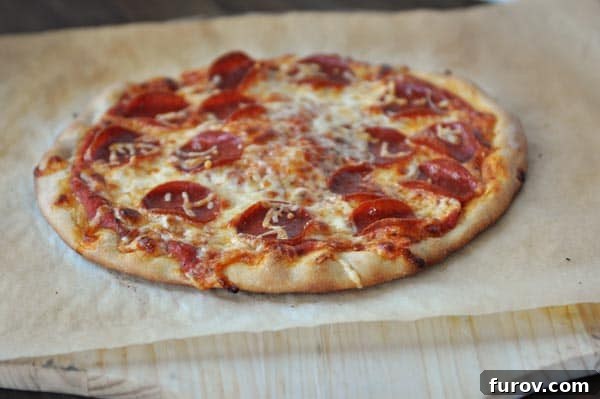
Baking truly perfect homemade pizza might seem daunting at first, but it doesn’t have to be. Many home cooks, myself included, started out baking pizza on a lightly greased sheet at a moderate oven temperature, say 350°F, for what felt like an eternity. The results were often edible, yes, but rarely remarkable. The crust frequently turned out tough, sometimes even disappointingly soggy, lacking that desirable crispness and rich flavor characteristic of a well-made pizza.
My entire approach to pizza-making transformed when I embraced a crucial, yet surprisingly simple, technique: significantly increasing the oven temperature. It might feel counterintuitive, perhaps even a little intimidating, to crank your oven up to 475°F or even 500°F. Many fear burning the pizza or, worse, causing a kitchen mishap. However, this high heat is the single most important factor in achieving that coveted crispy, golden, and airy crust that sets exceptional homemade pizza apart. Trust me on this: gathering the courage to set your oven to its maximum temperature will make an unparalleled difference in your pizza-baking journey.
In this comprehensive guide, I’m excited to share three highly effective methods for baking perfect homemade pizza, each incredibly accessible for any home cook. We’ll explore techniques that deliver outstanding results, even if you don’t own specialized equipment. One method, in particular, is specifically designed for those without a pizza stone, ensuring everyone can enjoy a slice of homemade perfection.
Choosing Your Pizza Stone: An Essential Tool for Crispy Crusts
For those serious about achieving professional-level results, a high-quality pizza stone is an invaluable investment. I personally rely on the large rectangular pizza stone from King Arthur Flour. I’ve owned this particular stone for many years, and given that homemade pizza is a weekly ritual in my household, its durability and performance have more than justified the initial cost.
In the past, I used a circular pizza stone, which eventually met an untimely end on a tile floor (thanks to a certain unnamed individual!). Switching to a large rectangular stone was a revelation. Its generous size is undoubtedly its greatest advantage. When we prepare individual pizzas, allowing everyone to craft their own unique masterpiece, this stone can comfortably accommodate two, sometimes even three, smaller pizzas simultaneously. This significantly accelerates the baking process, making family pizza night much more efficient and enjoyable. The superior heat retention and distribution of a good pizza stone are fundamental to developing a perfectly crisp and evenly baked crust, making it a cornerstone for serious homemade pizza enthusiasts.
A Quick Note on Grilling Pizza: An Alternative High-Heat Method
Before we dive into the oven-baking methods, it’s worth noting that this post will not extensively cover grilling pizza. The sole reason for this is that I’ve already provided a dedicated, in-depth tutorial on grilled pizza. Grilling is an excellent alternative, especially during warmer months, as it keeps your kitchen cool and offers a distinct smoky flavor profile that many adore. We typically switch to grilling our pizzas during the summer, which, where I live, feels like a fleeting three months of warmth! For the majority of the year, the oven remains our go-to method for preparing delicious homemade pizza.
A small but significant addendum to my existing grilled pizza tutorial: if you own a pizza stone, placing it directly onto the grill grates before preheating can elevate your grilled pizza experience even further. The stone provides an incredibly hot, even surface, mimicking a traditional pizza oven and making the transfer process smoother and more foolproof.
Now, let’s get down to business and explore the best ways to bake your pizza right in your own oven!
Method #1: The Traditional Pizza Stone and Pizza Peel Approach
This method is considered the gold standard for achieving that classic, pizzeria-style crispy crust. It leverages the intense, even heat of a preheated pizza stone for rapid cooking.
Supplies needed: A sturdy pizza stone, a pizza paddle/peel (while highly recommended, see Method #3 for alternatives if you don’t have one), parchment paper or cornmeal, and nonstick cooking spray (if using parchment paper).
When to use this method: This is my preferred technique for family pizza nights when we desire truly exceptional pizza. Nothing quite replicates the traditional pizza stone method for supreme crispness, though the other methods come commendably close. It’s particularly ideal for individual pizzas, allowing everyone to personalize their creation, as I can bake multiple smaller pizzas simultaneously. However, it can be less efficient when entertaining a larger group, as cooking one or two pizzas at a time can make for a longer wait. I did consider purchasing a second stone for the lower part of my oven, but decided against having two heavy stones. Instead, for larger gatherings, I often combine this method with an overturned baking sheet (Method #3) in a different oven cavity to maximize baking capacity.
{Update: I’ve finally invested in a second one of my favorite rectangular pizza stones! This has made preparing homemade pizza for guests even faster and more convenient, truly enhancing the efficiency of this method.}
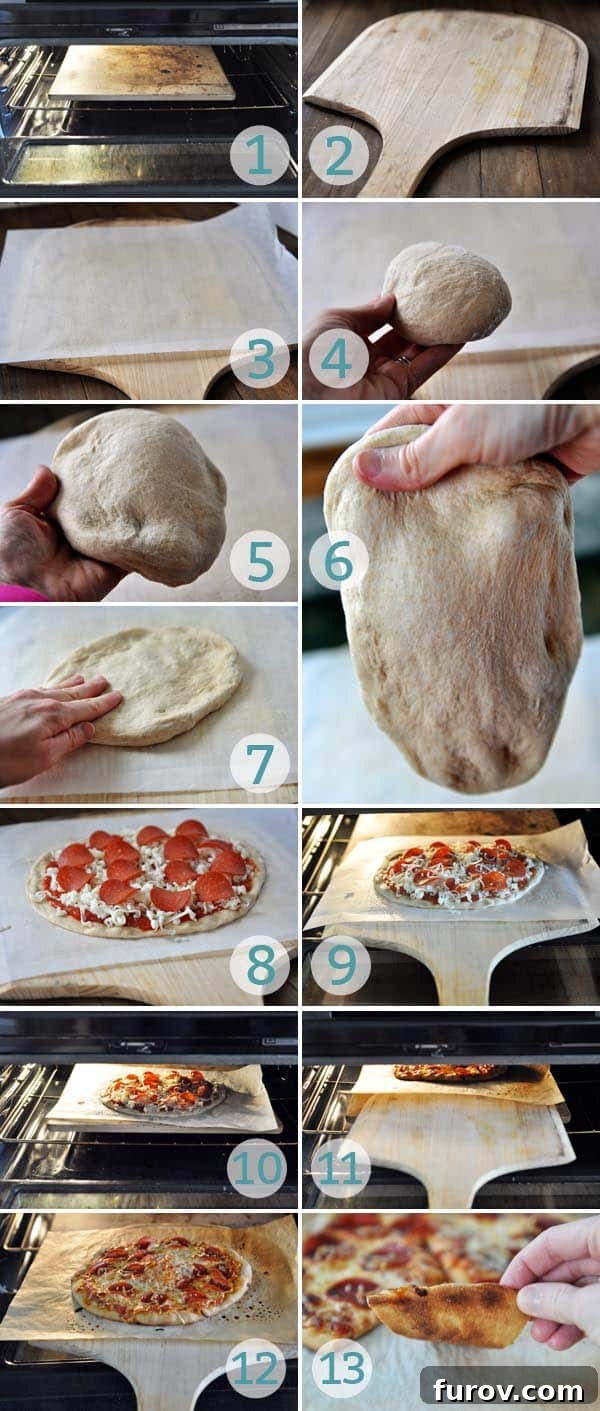
- Preheat the Stone: Approximately one hour before you plan to bake, place your pizza stone on a rack in the lowest position of your oven. Preheat the oven to its highest setting, ideally 475°F or 500°F (some ovens may max out at 475°F). Allow the stone to get thoroughly piping hot. This intense heat is crucial for shocking the dough and creating a blistered, crispy crust. Do not be intimidated by the high temperature; it’s the secret to unlocking incredible pizza!
- Prepare the Dough: Have your pizza paddle ready. If you’re using a refrigerated dough, such as the overnight whole wheat pizza dough, ensure it has been brought to room temperature for at least 2-3 hours prior to baking. Cold dough is much harder to stretch and will not achieve the desired texture.
- Choose Your Transfer Method: You have a couple of excellent options here. I often prefer to place a piece of parchment paper directly onto the pizza paddle. Alternatively, you can forgo the parchment and generously sprinkle the paddle with cornmeal or semolina flour. Parchment paper simplifies cleanup immensely, both on your countertop and inside the oven (cornmeal has a tendency to spread). While cornmeal is more traditional and economical, use whichever method you find most comfortable. A quick note of caution: some individuals report parchment paper burning at extremely high temperatures; however, in my many years of using this method, I’ve never encountered this issue. If using parchment, a light spritz of nonstick cooking spray helps the dough spread more easily.
- Portion the Dough: Grab an appropriate amount of pizza dough. The exact quantity will depend on the desired size of your pizza and the dimensions of your pizza stone. Aim for a manageable portion that will fit comfortably without overcrowding.
- Begin Stretching the Dough: Start by gently stretching the dough between your fingers, working from the center outwards. The goal is to achieve an even thickness across the entire base, avoiding any excessively thin, transparent spots that could tear or become overly crispy.
- Embrace Natural Shape: As you stretch, the dough should feel elastic and pliable. If you let it hang slightly and gently rotate it, it will naturally begin to take on an oblong or somewhat irregular shape. Don’t strive for perfect circles; rustic charm is part of homemade pizza’s appeal.
- Final Shaping on Surface: Once the dough starts to take shape but isn’t yet at its final desired thinness, carefully transfer it to the parchment paper (or cornmeal-dusted paddle). Gently press and stretch it into your desired shape and thickness directly on the prepared surface. Uniform thickness is more critical than a perfectly round shape for even baking.
- Top as Desired: Now for the fun part! Spread your favorite pizza sauce, sprinkle with cheese, and add your choice of toppings. (Keep an eye out for a future post with more detailed topping ideas!). Be mindful not to overload the pizza, as too many toppings can make the crust soggy.
- Prepare for Transfer: Carefully carry the loaded pizza paddle to your preheated oven. Open the oven door, and get ready for the swift transfer.
- Slide onto Stone: With a confident and steady motion, position the front edge of the pizza paddle about halfway onto the hot pizza stone. With a slight forward nudge and a gentle pull back of the paddle, the pizza (parchment and all, if using) will smoothly slide off onto the scorching hot stone. Close the oven door quickly to retain heat. Bake for approximately 7-10 minutes, or until the crust is golden brown and the cheese is bubbly and lightly browned.
- Remove from Oven: To retrieve your masterpiece, use the paddle again. Gently slide it underneath the parchment paper (or directly under the crust if using cornmeal). Sometimes, a gentle tug on a corner of the parchment can help guide it back onto the paddle, but often it slides easily.
- Admire Your Creation: Pull that perfect homemade pizza out of the oven! The aroma alone is usually enough to signal success.
- Behold the Crust: Take a moment to appreciate that beautifully blistered, golden-brown crust. If that sight and smell don’t make your heart sing, you might need to check your pulse!
Method #2: Baking Sheet on a Pizza Stone – The “Smart Slacker” Approach
This method is a fantastic hybrid that combines the advantages of high heat from a pizza stone with the convenience of a baking sheet, making it ideal for those times you want minimal fuss with maximum flavor.
Supplies needed: A pizza stone, nonstick cooking spray (if using parchment paper), and one or more large, rimmed aluminum baking sheets.
When to use this method: This is my go-to when I’m feeling a bit “lazy” but still want to produce a substantial amount of delicious pizza with a perfectly golden-brown crust. It’s particularly effective when I’m using a quick and easy pizza dough, as it simplifies the transfer process significantly. While the pictures below might show smaller pizzas, I often utilize this method to fill an entire baking sheet with dough, maximizing the pizza output in a single baking session. This approach is also an excellent alternative if you don’t own a pizza paddle, as the baking sheet itself acts as a stable base for the pizza.
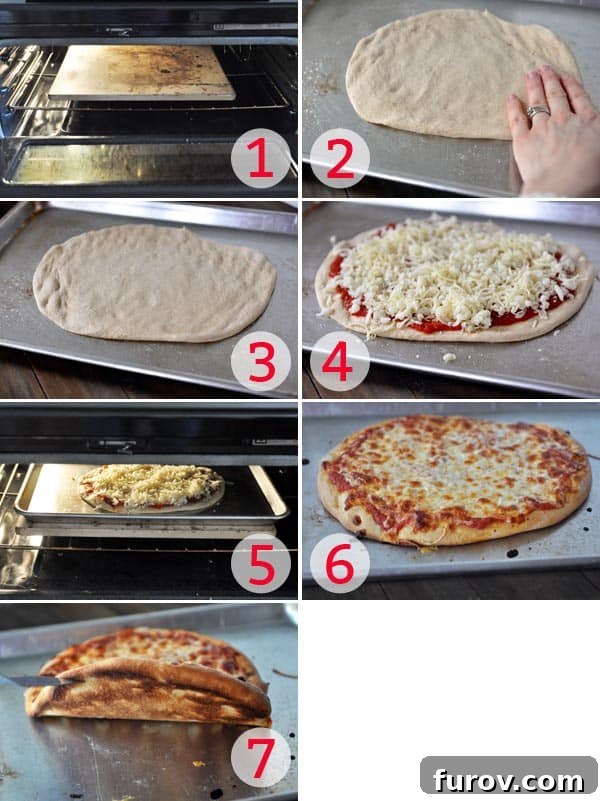
- Preheat Stone and Oven: Just as with Method #1, ensure your pizza stone is placed in the oven and preheated to 475°F or 500°F for approximately one hour. While an hour is ideal for maximum heat saturation, I confess that sometimes I only manage a 30-minute preheat, and the results are still quite good. The longer the stone heats, the better the crust.
- Prepare Baking Sheet and Dough: Lightly grease a large aluminum baking sheet. Crucially, avoid using nonstick baking sheets here, as they can cause the bottom of your pizza to brown excessively or even burn due to their heat retention properties. Using the instructions from Method #1, gently stretch your pizza dough to the desired size and shape directly onto the greased baking sheet. Then, carefully press it to fill the pan evenly.
- Maximize Pizza Size: Although the accompanying image might depict smaller pizzas, my usual practice with this method is to stretch the dough to cover the entire baking sheet. This allows you to bake a much larger pizza in one go, which is incredibly efficient for feeding a family or a small crowd.
- Top Your Pizza: Generously add your favorite sauce, cheese, and an array of toppings. Feel free to get creative with your flavor combinations!
- Bake on the Stone: Carefully place the baking sheet, with your prepared pizza, directly onto the scorching hot pizza stone in the oven. Close the oven door swiftly to maintain the high temperature. Allow it to bake for about 9-10 minutes. The high heat from the stone will penetrate the baking sheet, creating a wonderfully crisp bottom crust, while the oven’s ambient heat cooks the toppings.
- A Feast for the Eyes: Once baked, that perfect homemade pizza will emerge, looking absolutely stunning with its vibrant toppings and inviting crust.
- Admire the Crust: You’ll be pleasantly surprised by the quality of the crust achieved with this method. It won’t be quite as blistered as a direct-stone bake, but it will be wonderfully golden-brown and delightfully crisp, certainly not “shabby” for a baking sheet pizza!
Method #3: The Mock Pizza Stone – Using an Overturned Baking Sheet
This ingenious method is perfect for anyone who doesn’t own a pizza stone or needs an extra “baking surface” to cook multiple pizzas simultaneously. It truly demonstrates that you don’t need specialized equipment to achieve fantastic homemade pizza results.
Supplies needed: One or two rimmed aluminum baking sheets (one to act as your “stone,” another if you need a “peel”), parchment paper or cornmeal, and nonstick cooking spray (if using parchment paper).
When to use this method: This technique shines when you have company over and require additional baking capacity beyond your single pizza stone. It effectively creates a second or third hot surface for cooking more pizzas at once. Crucially, it’s also your ideal solution if you don’t possess a pizza stone at all. And, as you’ll discover, you can even get by without a dedicated pizza paddle!
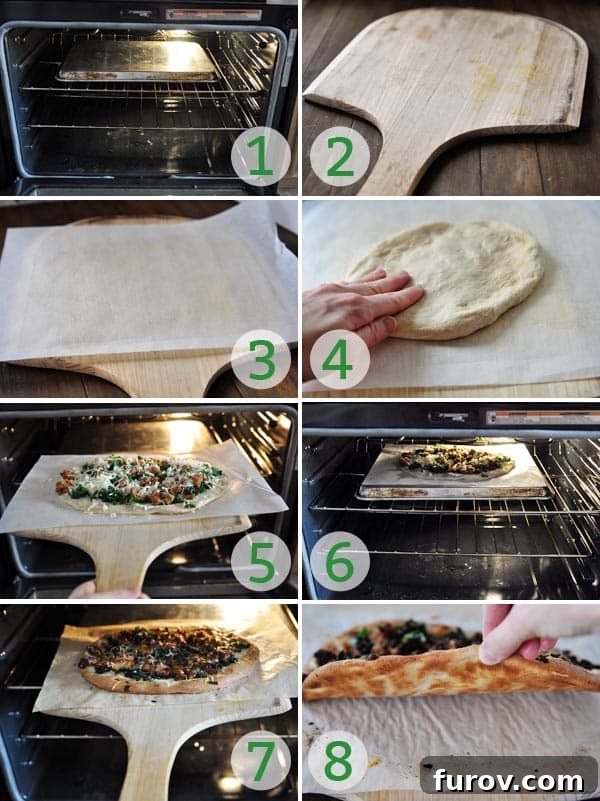
- Prepare Your “Mock Stone”: Instead of a traditional pizza stone, flip a rimmed aluminum baking sheet upside down. This creates a flat, hot surface analogous to a stone. Place this overturned baking sheet in your oven and preheat it to 475°F for about 30 minutes before you plan to bake. This preheating period is essential to get the sheet hot enough to properly cook the crust.
- Ready Your “Pizza Paddle” (or Alternative): Have your actual pizza paddle ready. If you don’t own one, don’t worry! Simply grab another baking sheet (if it’s rimmed, flip it upside down; if it’s a flat cookie sheet, it’s perfect as is) and use it as your improvised paddle. This ensures a stable surface for assembling and transferring your pizza.
- Prepare the Transfer Surface: Lightly grease a piece of parchment paper (or generously dust with cornmeal, as detailed in Method #1). Place this prepared parchment onto your pizza paddle or your makeshift “baking sheet paddle.” This crucial step prevents the dough from sticking during transfer.
- Shape and Top the Dough: Shape your pizza dough onto the prepared parchment paper, referring to Method #1 for detailed instructions on stretching and forming an even crust. Once shaped, lavishly top it with your favorite sauce, cheese, and any other delicious ingredients.
- Slide onto Hot Surface: Carefully slide your beautifully topped pizza onto the hot, overturned baking sheet in the oven. If you’re using a baking sheet as your “paddle,” you’ll need a bit more force and a steady hand to gently “scoot” the pizza into place. Exercise extreme caution to avoid burning your fingers on the hot baking sheet or oven interior!
- Center for Even Baking: Try your best to center the pizza right in the middle of the overturned baking sheet. This helps ensure even heat distribution and uniform baking across the entire crust.
- Bake and Remove: Allow the pizza to bake for approximately 7-10 minutes, or until the crust is golden brown and the cheese is bubbly. To remove, use your pizza paddle to gently slide it underneath the parchment paper and pizza. If you used a baking sheet to slide it in, the removal is slightly trickier: place a cool baking sheet directly in front of the hot one in the oven, then carefully grasp the two front corners of the parchment paper (a helper can be invaluable here!) and gently slide the pizza onto the cool baking sheet to remove it from the oven.
- Enjoy Your “Stone-less” Perfection: And there you have it! A beautifully browned, crispy crust on a perfect homemade pizza, achieved without the need for an official pizza stone. This method proves that ingenuity and high heat are the true keys to success.
So there you have it! Three fantastic and versatile methods for baking amazing homemade pizza right in your own oven. Whether you’re a seasoned pizza maker or just starting, these techniques will help you achieve a crispy, delicious crust and perfectly cooked toppings every time. Don’t be afraid to experiment and find the method that works best for your kitchen and your taste preferences. Happy pizza making!