
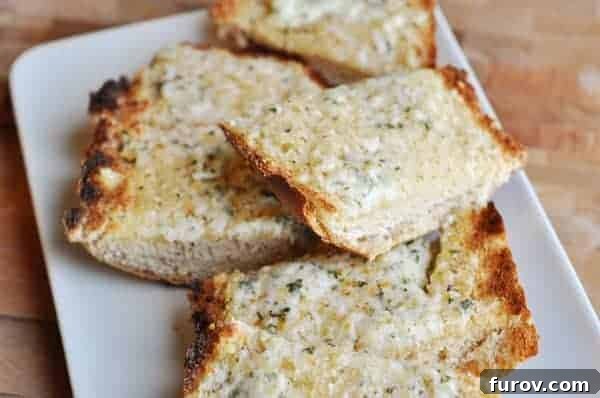
The Ultimate Homemade Cheesy Garlic Bread: A Recipe That Steals the Show
Prepare to elevate your dinner experience with this incredible homemade cheesy garlic bread. So profoundly buttery, richly garlicky, and perfectly cheesy, it just might outshine even the most exquisite main course, like a classic lasagna! This isn’t just a side dish; it’s a culinary revelation that promises to be a new family favorite.
At first glance, this bread may appear humble and straightforward, but its profound deliciousness should never be underestimated. Forget everything you thought you knew about store-bought alternatives or recipes relying on garlic powder; this recipe introduces a flavor profile that stands in a league of its own, guaranteed to impress with every savory bite.
Why This Cheesy Garlic Bread Recipe Stands Apart
The secret to the unparalleled flavor that distinguishes this recipe from ordinary garlic breads lies in one crucial ingredient: **fresh garlic**. We’re talking about five generous cloves of meticulously minced fresh garlic, gently steeped in real butter. This process allows the garlic’s sweet, pungent notes to infuse the butter completely, creating a spread that is incredibly aromatic and deeply flavorful.
Unlike garlic salt or powder, which often deliver a sharp, sometimes artificial, garlic punch, fresh garlic cooked slowly in butter develops a complex, mellow, and irresistible taste. This golden, fragrant butter is then generously slathered onto a crusty French bread or baguette, ensuring every cellular structure of the bread is saturated with pure, unadulterated garlic goodness. This initial step is fundamental, laying down the rich foundation for a truly exceptional garlic bread experience that store-bought versions simply cannot replicate.
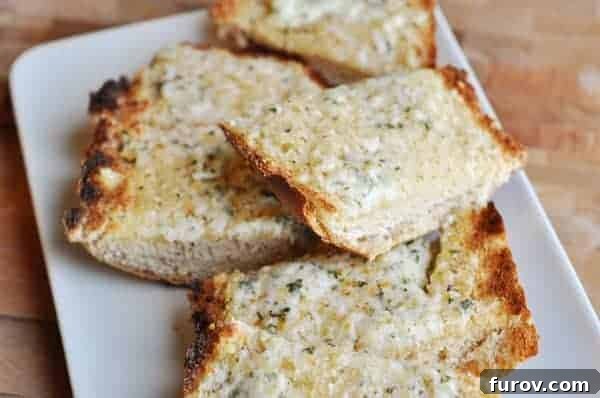
The baking method employed here also plays a pivotal role in achieving perfection. The bread is initially baked securely wrapped in aluminum foil. This clever technique creates a moist, steamy environment inside the foil packet, which allows the aromatic garlic butter to thoroughly penetrate and “overwhelm” the basic French bread with its rich flavor. This ensures the bread remains beautifully tender and moist on the inside while absorbing all the magnificent buttery-garlic essence, preventing it from drying out during the baking process.
And just when you think it couldn’t get any better, we introduce the crowning glory: a generous layer of freshly grated cheese. After its initial foil-wrapped bake, the bread is unveiled and lavishly topped with your favorite melting cheese, then briefly transferred back to the oven to broil. This final, quick touch transforms the bread, creating a bubbling, golden-brown crust of savory cheese that is wonderfully crispy at the edges and irresistibly gooey in the middle. The harmonious combination of the deeply flavored bread with the perfectly melted, golden cheese is nothing short of spectacular, delivering an explosion of texture and taste.
A Personal Testament to Its Irresistible Charm
I vividly recall the first time I served this particular garlic bread recipe alongside a classic Italian lasagna (a recipe, by the way, also generously shared by my amazing Aunt Marilyn, whose culinary wisdom guarantees unforgettable dishes). Even after indulging in more servings of lasagna than I care to admit, I simply could not stop reaching for slice after slice of this incredible bread. It was so captivating, so utterly delicious, that I actually forewent dessert in its favor. Yes, you read that right – I sacrificed sweet calories for more savory, garlicky, cheesy bliss. That’s how truly special and addictive this homemade garlic bread is; it’s a commitment to pure comfort food joy that you’ll want to experience again and again.
The Cheesy Garlic Bread Recipe: Your New Favorite Side Dish
Cheesy Garlic Bread
8
Servings
10
mins
30
mins
40
mins
Pin
Ingredients
-
5
garlic cloves, finely minced (approximately 2-3 tablespoons)**Tip:** For the most robust flavor, use a garlic press or finely mince by hand. The fresher the garlic, the more aromatic your bread will be. Avoid pre-minced garlic for best results.
-
8 tablespoons
unsalted butter, softened to room temperature (equivalent to 1 stick or ½ cup)**Tip:** Softened butter is crucial for creating a smooth, spreadable mixture and ensuring even absorption into the bread. If your butter is too cold, microwave it for a few seconds until just pliable.
-
½ teaspoon
water**Tip:** A small amount of water helps to create a gentle steaming effect when cooking the garlic, preventing it from burning and turning bitter, while allowing its flavor to mellow.
-
¼ teaspoon
salt**Tip:** Adjust the amount of salt to your personal preference, especially if you opt to use salted butter (though unsalted is preferred for better control over seasoning).
-
¼ teaspoon
freshly ground black pepper**Tip:** Freshly ground black pepper offers a superior aroma and a subtle, piquant kick compared to pre-ground pepper.
-
1 (18-20 inch)
baguette or loaf of French bread, sliced in half horizontally**Tip:** A good quality, crusty loaf will hold up well to the butter and cheese. A day-old bread can sometimes work even better, as it tends to absorb the garlic butter more effectively without becoming soggy.
-
1 ½ cup
shredded cheese (see notes below for recommendations on cheese types)**Tip:** For the absolute best melt and flavor, we strongly recommend grating your own cheese from a block. Pre-shredded cheeses often contain anti-caking agents that can interfere with smooth, even melting.
Instructions
-
**Step 1: Preheat Oven and Position Rack.** Begin by adjusting your oven rack to the lower-middle position. This placement is ideal for ensuring even baking without excessively browning or burning the top of the bread later on. Preheat your oven to 400°F (200°C). Allowing the oven to fully reach the correct temperature before you introduce the bread is key for consistent results.
-
**Step 2: Gently Cook the Garlic Butter Base.** In a small, nonstick skillet, combine the finely minced garlic, 1 tablespoon of the softened butter, and the ½ teaspoon of water. Cook this mixture over very low heat, stirring occasionally, for 7 to 10 minutes. The objective here is for the garlic to become beautifully straw-colored and incredibly fragrant, releasing its sweet, mellow notes. It is critically important to maintain a low heat throughout this process; high heat will cause the garlic to burn quickly, resulting in an unpleasant bitter taste that will compromise the entire bread. You are aiming for a sweet, nutty garlic essence, not acrid char.
-
**Step 3: Prepare the Ultimate Garlic Butter Spread.** In a separate small bowl, place the remaining 7 tablespoons of softened butter. Add the measured salt and black pepper. Carefully pour in the hot, intensely aromatic garlic mixture from the skillet and stir everything together vigorously until it’s thoroughly combined and boasts a smooth, uniform consistency. The residual heat from the cooked garlic mixture will assist in fully incorporating it with the softened butter, creating a luxurious spread. Using a rubber spatula or knife, generously spread this rich garlic butter mixture evenly over the cut sides of your French bread or baguette. Ensure every nook, cranny, and porous surface is coated for maximum flavor penetration. Once both halves are coated, press the two bread pieces back together, reforming the loaf, and wrap it tightly in aluminum foil.
-
**Step 4: Initial Bake (Foil-Wrapped for Flavor Infusion).** Place the tightly foil-wrapped loaf directly onto a baking sheet. Transfer the baking sheet to the preheated 400°F (200°C) oven and bake for 15 minutes. This crucial step allows the bread to essentially steam in its own garlicky, buttery goodness, creating an incredibly moist and flavorful interior while giving ample time for all the delicious flavors to meld together perfectly within the bread.
-
**Step 5: Transition to Broil Setting.** Carefully remove the bread from the oven (keeping it on the baking sheet) and unwrap the aluminum foil, exposing the buttered bread. Turn off the conventional bake setting on your oven and switch it to the broil setting. Be prepared for the next step, as broiling happens very quickly and requires your full attention.
-
**Step 6: Add Cheese and Broil to Golden Perfection.** Evenly sprinkle the shredded cheese generously over the open-faced bread halves. Return the baking sheet with the cheese-topped bread to the oven, placing it directly under the broiler. Broil for just 1 to 2 minutes, or until the cheese is beautifully melted, bubbling vigorously, and lightly golden brown, and the bread edges have become wonderfully crisp. **Crucial Tip from Aunt Marilyn:** Do not, under any circumstances, step away from the oven during this final stage! Broilers are intense and highly efficient; the bread can go from perfectly golden to burnt in a mere matter of seconds. Keep a vigilant eye on the bread through the oven door to ensure optimal results.
-
**Step 7: Serve Immediately and Enjoy!** Once broiled to perfection, carefully transfer the hot bread to a cutting board. For easier slicing and to prevent the melted cheese from sticking to your board, you might find it helpful to place the cheesy side facing down. Using a sharp serrated knife, cut the loaf into angled slices of your desired thickness. Serve immediately and revel in the irresistible aroma and taste. While it’s incredibly tempting to keep this entire glorious loaf to yourself, remember Aunt Marilyn’s enduring wisdom: try your best to exert some self-control and graciously share this incredible bounty with your eager dining companions!
Notes & Tips for the Best Cheesy Garlic Bread
**Cheese Selection:** For optimal flavor and melt, I highly recommend grating your own cheese from a block. Pre-shredded cheeses often contain anti-caking agents (like cellulose) that can hinder smooth melting and sometimes impart a slightly floury texture. My personal favorite blend uses a combination of freshly grated Parmesan and mozzarella, offering both sharp, salty notes from the Parmesan and a creamy, stretchy texture from the mozzarella. Aunt Marilyn, a connoisseur of simple perfection, often prefers just Parmesan, which gives a very robust, nutty garlic-Parmesan profile. Feel free to tailor this to your personal preference and what you have on hand; a mix of good quality white cheeses generally works best, such as Monterey Jack, Provolone, or even a mild white cheddar for a slightly different take.
**Bread Choice:** While a classic French baguette or a wider loaf of French bread is traditional and highly recommended, you can certainly experiment with other sturdy loaves. Ciabatta bread, Italian bread, or even sourdough can make excellent bases for this recipe. Just ensure the bread has a good crust and a relatively firm crumb to hold up to the butter and cheese. A slightly stale loaf (day-old bread) often yields superior results as it tends to absorb the garlic butter more effectively without becoming overly soft or soggy.
**Fresh Herb Addition:** For an extra layer of freshness, vibrancy, and a beautiful visual appeal, consider stirring in 1-2 tablespoons of fresh minced parsley or a pinch of dried oregano or Italian seasoning into your garlic butter mixture before spreading it on the bread. Alternatively, you can sprinkle fresh parsley over the cheese after broiling for a burst of color and a fresh finish.
**Spice It Up:** If you enjoy a little heat in your savory dishes, a tiny pinch (¼ to ½ teaspoon) of red pepper flakes can be added to the garlic butter mixture. This will introduce a subtle warmth that complements the garlic and cheese wonderfully.
**Make-Ahead Option:** This recipe is wonderfully adaptable for making ahead. You can prepare the garlic butter spread completely and store it in an airtight container in the refrigerator for up to a week. When you’re ready to bake, simply let the butter mixture soften slightly at room temperature before spreading it on the bread. You can also assemble the bread with the garlic butter and wrap it tightly in foil, storing it in the refrigerator for up to a day before its initial bake. This makes entertaining a breeze!
Mel
Bread, Appetizer, Side Dish
Italian-American, American
Bake, Broil
Nutrition Information (per serving)
Serving: 1 Serving
,
Calories: 267kcal
,
Carbohydrates: 16g
,
Protein: 8g
,
Fat: 19g
,
Saturated Fat: 12g
,
Cholesterol: 49mg
,
Sodium: 478mg
,
Fiber: 1g
,
Sugar: 1g
Recommended Products & Equipment for Easy Garlic Bread Making
**Recipe Source:** This incredible recipe comes from the cherished culinary wisdom of my amazing Aunt Marilyn, whose dishes are always a guaranteed success and frequently become family legends.
Serving Suggestions for Your Irresistible Cheesy Garlic Bread
While this cheesy garlic bread is undoubtedly a star in its own right, it truly shines as an exceptional companion to a wide variety of meals. Naturally, it’s the quintessential partner for any Italian-themed dinner, perfectly complementing rich sauces and hearty dishes. However, its rich flavors are incredibly versatile, making it an excellent addition to lighter fare or even as a standalone appetizer.
- **Classic Italian Pairing:** This bread is the ultimate accompaniment to any pasta dish. Imagine dipping a slice into a hearty lasagna, swirling it through a classic spaghetti with meatballs, or soaking up the last drops of a vibrant pasta primavera or a creamy Alfredo sauce.
- **Comforting Soups:** Elevate your soup experience by pairing it with warm, cheesy garlic bread. It’s perfect for dipping into a comforting bowl of minestrone, a rich tomato soup, or a savory French onion soup, where it can even replace traditional croutons.
- **Fresh Salads:** Add a delightful crunchy and savory contrast to fresh greens. It’s a fantastic addition alongside a crisp Caesar salad or a simple garden salad dressed with a tangy vinaigrette.
- **Hearty Main Courses:** Beyond Italian, this bread makes a wonderful side for grilled steak, roasted chicken, pork tenderloin, or any seafood dish that benefits from a buttery, garlicky accent.
- **Effortless Appetizer:** Cut into smaller, bite-sized pieces and arrange them on a platter for an impressive and easy-to-devour appetizer at your next gathering or potluck. It’s always the first to disappear!
Essential Tips for Perfect Cheesy Garlic Bread Every Time
Achieving garlic bread perfection is simpler than you might think, especially with a few expert tips to guide you. Follow these pointers to ensure your homemade cheesy garlic bread is consistently amazing:
- **Don’t Rush the Garlic Steeping:** The low-and-slow cooking of the fresh garlic in butter is arguably the most critical step. This process gently coaxes out the garlic’s deepest, sweetest flavors without any harshness. Resist the urge to crank up the heat; patience here truly pays off with superior flavor.
- **Use Room Temperature Butter:** Starting with softened, room temperature butter is paramount. It ensures that the garlic mixture can be smoothly and evenly incorporated, creating a consistent spread that coats every inch of your bread. Cold butter will be lumpy and difficult to work with, leading to uneven flavor distribution.
- **Always Use Freshly Grated Cheese:** For the best melt, stretch, and flavor, always opt for block cheese that you grate yourself just before using. Pre-shredded varieties often contain starches and anti-caking agents that can prevent them from melting smoothly and can leave a slightly gritty texture.
- **Watch the Broiler Closely – No Exceptions!** Broilers are powerful and can be unpredictable. The difference between perfectly golden, bubbly cheese and burnt, bitter cheese is often a matter of mere seconds. Stay vigilant during the final broiling step; keep your eye on the bread through the oven door, and remove it as soon as the cheese is melted and lightly browned to your liking.
- **Serve It Warm and Fresh:** Cheesy garlic bread is, without a doubt, best served immediately, straight out of the oven. This is when the cheese is at its gooey, bubbly peak, and the bread’s crust is wonderfully crisp and aromatic. While leftovers are still good, the experience of fresh-baked is unbeatable.
Storage and Reheating for Leftover Garlic Bread
If by some miracle you happen to have any leftovers of this delectable cheesy garlic bread (a truly rare occurrence in most households!), proper storage and reheating techniques can help preserve its deliciousness for a later indulgence.
- **Storage:** To store leftover garlic bread, allow it to cool completely to room temperature first. Then, wrap individual slices or the entire leftover loaf tightly in aluminum foil. For extra protection against freezer burn or refrigerator odors, you can then place the foil-wrapped bread into an airtight container or a freezer-safe bag. It can be stored in the refrigerator for up to 3-4 days, or frozen for up to 1 month.
- **Reheating (Oven or Toaster Oven Recommended):** For the best possible results and to revive that crispy crust and gooey cheese, reheating in an oven or toaster oven is highly recommended. Preheat your oven or toaster oven to 350°F (175°C). Place the foil-wrapped (or unwrapped, if you want a crispier finish) garlic bread directly on the rack and heat for about 10-15 minutes, or until it is thoroughly warmed through and the cheese is re-melted and bubbly. If reheating from frozen, it may require an additional 5-10 minutes. Avoid using a microwave for reheating, as it tends to make the bread soft, chewy, and even soggy, losing its desirable texture.
Other Delectable Bread Recipes You’ll Love
Explore More Delicious Breads & Related Favorites:
Past Favorites from the Archives:
Asian Lettuce Wraps (A popular recipe from a previous year)
My Favorite Cheesecake…Ever (An all-time dessert classic from years past)