
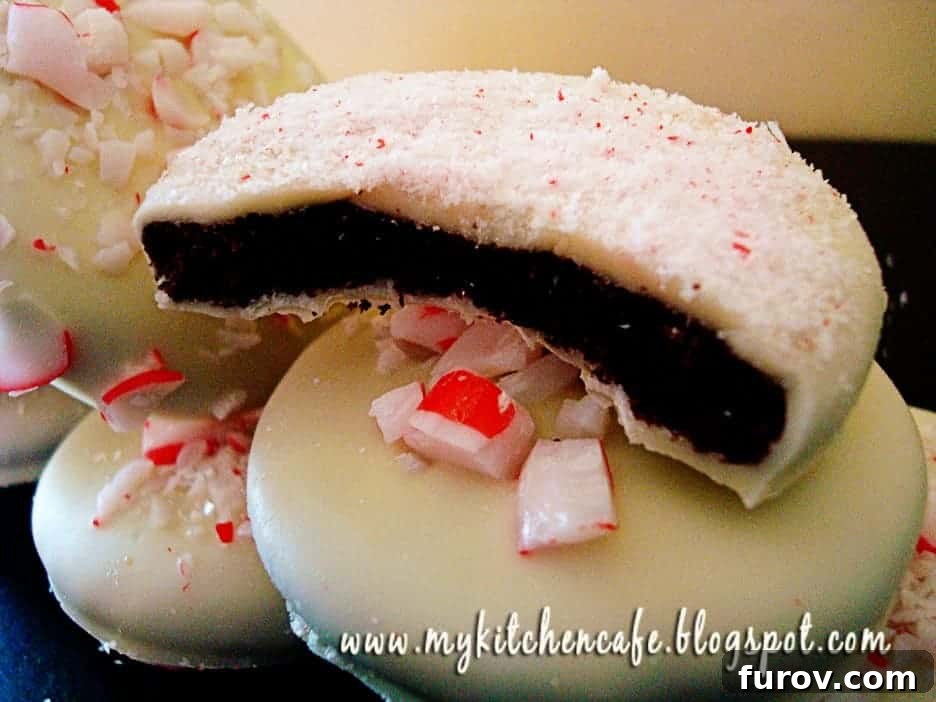
Irresistible Chocolate Peppermint Cookies: Your Ultimate Holiday Treat
A perfect, delicious, and stunning holiday cookie, these chocolate peppermint cookies are sure to wow family and friends!

The holiday season calls for something truly special, a treat that not only tastes incredible but also captures the festive spirit in every bite. Look no further than these utterly irresistible Chocolate Peppermint Cookies. Inspired by a timeless classic and designed to impress, these cookies bring together the rich, deep flavor of chocolate with the refreshing zest of peppermint, all coated in a crisp shell of white chocolate and crunchy candy cane pieces. They are more than just a dessert; they are an experience, perfect for sharing with loved ones or enjoying by a cozy fire.
My journey to creating these delightful cookies began with a glance through a December issue of Martha Stewart Living. The pictures alone were enough to convince me that these were a must-bake. Beyond their undeniable visual appeal, I harbored a long-standing affection for Girl Scout Thin Mint cookies, and the idea of crafting a homemade version with a festive twist was simply too appealing to pass up. Little did I know, this venture would quickly become a beloved family tradition.
I must admit, the thought of dipping each baked cookie into melted chocolate initially filled me with a touch of trepidation. Visions of messy kitchens and chocolate-coated fingers danced in my head. However, to my pleasant surprise, the dipping process turned out to be the easiest and arguably the most fun part of the entire baking adventure! It was a moment of pure joy, transforming simple cookies into elegant holiday masterpieces.
Even my energetic young boys found a role in this festive project. Crushing the peppermint candies became a satisfying way for them to expend some energy, turning a simple baking task into a lively family activity. Their enthusiasm, combined with the anticipation of tasting the final product, made the whole experience even more memorable. It was a wonderful reminder that some of the best holiday memories are made in the kitchen, surrounded by the scent of baking and the laughter of family.
Why These Chocolate Peppermint Cookies Are a Must-Bake
Beyond their stunning appearance, these cookies are a true revelation in flavor. The deep chocolate base, perfectly complemented by the bright mint, creates a harmonious balance that is both comforting and invigorating. My husband, initially skeptical that they were “all about the looks,” was utterly astounded by their phenomenal taste. In fact, they were so popular that I barely managed to get any out the door to share with friends, a testament to their addictive deliciousness!
While some Martha Stewart recipes can be a bit more involved, requiring specific techniques and chilling times for the dough, every step in this recipe is unequivocally worth the effort. The precise chilling helps create a perfectly tender yet firm cookie that holds its shape beautifully and provides the ideal canvas for the decadent chocolate coating. This attention to detail elevates them from good cookies to truly exceptional ones.
For me, these are the quintessential holiday cookie. They embody everything I love about festive baking: beautiful presentation, incredible flavor, and the joy of sharing. I’m already planning my next batch, contemplating dipping at least half of them in dark chocolate to explore another dimension of flavor. I have a strong suspicion that if the dark chocolate version is even half as good as I imagine, absolutely none of them will make it out of the house!

Chocolate Peppermint Cookies
These rich chocolate cookies are infused with refreshing peppermint extract, then dipped in luscious white chocolate and topped with crushed candy canes, making them the ultimate festive treat for any holiday occasion.
Pin Recipe
Ingredients
- 1 cup (142 g) all-purpose flour, plus more for dusting
- ½ cup (43 g) unsweetened Dutch-process cocoa powder
- ½ teaspoon baking soda
- ½ teaspoon baking powder
- ½ teaspoon salt
- 5 tablespoons (70 g) unsalted butter, softened
- ¾ cup (159 g) granulated sugar
- 1 large egg
- 1 large egg yolk
- ¾ teaspoon pure peppermint extract
- 8 large candy canes or 30 peppermint candies, finely crushed
- 2 pounds white chocolate (or a combination of white chocolate and white almond bark), coarsely chopped
Instructions
-
Preheat your oven to 325 degrees Fahrenheit (160°C). In a medium bowl, whisk together the flour, cocoa powder, baking soda, baking powder, and salt. Set aside. In a separate large bowl, using an electric mixer, beat the softened butter and granulated sugar on medium-high speed for about 1 minute until light and fluffy. Reduce the mixer speed to medium-low, then add the large egg, beating well until fully incorporated. Next, add the egg yolk and beat again until smooth. Finally, beat in the pure peppermint extract. Gradually add the dry flour mixture to the wet ingredients, beating on low speed until just incorporated. Be careful not to overmix. Divide the dough into two equal disks. Wrap each disk tightly in plastic wrap and refrigerate for at least 1 hour, or up to 2 days, until firm. This chilling step is crucial for easy handling and preventing the cookies from spreading too much during baking.
-
Once the dough is firm, lightly flour a clean surface. Take one disk of dough and roll it out evenly to an 1/8-inch thickness. For best results and easier cutting, freeze the rolled-out dough until it is firm, which usually takes about 15 minutes. Using a 2-inch round cookie cutter, cut out circles from the dough. Carefully transfer the cut cookies to parchment-lined baking sheets, spacing them about 1 inch apart. Gather the dough scraps, gently re-roll them once, and cut out additional cookies. Freeze these cut cookies again for about 15 minutes until firm. Repeat the entire process with the second disk of dough.
-
Bake the chilled cookies in the preheated oven for approximately 12 minutes, or until the edges are set and the cookies feel dry to the touch. Baking time may vary slightly depending on your oven. Do not overbake, as this can make the cookies dry. Once baked, carefully transfer the parchment paper with the cookies onto wire racks to cool completely. Allowing them to cool fully before decorating is essential. Undecorated cookies can be stored in an airtight container at room temperature for up to 3 days.
-
Prepare your crushed candy canes. Sift the crushed candy to separate the larger pieces from the finer dust, reserving both separately. In a heatproof bowl, melt the white chocolate (and/or white almond bark) in the microwave. Heat in 30-second intervals, stirring well after each, until smooth and fully melted. Be careful not to overheat the chocolate, as it can seize. Once melted, dunk each cooled cookie into the chocolate. Use a fork to gently press the cookie until it is completely submerged. Lift the cookie with the fork, allowing any excess chocolate to drip off. Gently scrape the bottom of the cookie against the edge of the bowl to remove any remaining drips. Place the dipped cookie on a fresh parchment-lined baking sheet. Immediately sprinkle about 1/4 teaspoon of either the larger candy pieces or the finer dust on top. Repeat this process for all cookies, sprinkling half with candy pieces and the remaining half with the dust for varied textures and appearances. Refrigerate the decorated cookies until the chocolate has completely set, which typically takes up to 3 hours. Store finished cookies in an airtight container in a cool, dry place.
Notes
Chocolate Choice: For the white chocolate coating, I found that a combination of about 8 ounces of white chocolate and the rest white almond bark works wonderfully, especially if you have it on hand. The almond bark helps achieve a smooth, easy-to-work-with consistency that sets beautifully.
Yield Adjustment: The original recipe suggested a yield of 6 dozen, but in my experience, I consistently get closer to 2 to 3 dozen cookies. This might be due to variations in cookie cutter size or dough thickness. Plan accordingly!
Expert Tips for Perfect Chocolate Peppermint Cookies
Achieving the Perfect Dough Consistency
- Butter Temperature: Ensure your butter is truly softened, not melted. It should give slightly when pressed, but still hold its shape. This is key for incorporating air and creating a tender crumb.
- Don’t Overmix: After adding the dry ingredients, mix only until just combined. Overmixing develops the gluten in the flour, leading to tough cookies. A few streaks of flour are fine; they’ll disappear during baking.
- Thorough Chilling: The chilling steps are non-negotiable for these cookies. They prevent spreading in the oven, make the dough easier to handle, and contribute to a richer flavor. Don’t rush this process!
Mastering the Dipping Process
- Quality Chocolate Matters: For the best results, use high-quality white chocolate or white almond bark. Compound chocolate (often labeled as “candy melts”) is also an option if you’re looking for an easier melting process.
- Preventing Seized Chocolate: When melting chocolate in the microwave, heat it in short bursts (30 seconds) and stir thoroughly between each. The residual heat will continue to melt the chocolate. Overheating can cause it to seize and become unusable.
- Cool Cookies are Key: Ensure your cookies are completely cool before dipping. Warm cookies will melt the chocolate, creating a messy finish.
- Work Efficiently: Once the chocolate is melted, work quickly. If the chocolate starts to thicken, you can gently reheat it for a few seconds. Have your crushed peppermint ready to go!
Storage and Freshness
- Airtight Containers: Store these cookies in an airtight container at room temperature for up to 5 days, or in the refrigerator for up to a week.
- Freezing Dough: You can prepare the cookie dough disks and freeze them for up to a month. Thaw in the refrigerator overnight before rolling and baking.
- Freezing Baked Cookies: Undipped, baked cookies freeze beautifully for up to 3 months. Thaw at room temperature before dipping and decorating. Dipped cookies can also be frozen, but be aware that the crushed candy canes might soften slightly upon thawing.
Creative Variations to Try
- Dark Chocolate Delight: For a more intense flavor, try dipping half of your cookies in dark chocolate instead of white. The contrast between the rich dark chocolate and the vibrant peppermint is truly divine.
- Nutty Crunch: Add finely chopped toasted nuts (like pecans or walnuts) to the cookie dough for an extra layer of texture and flavor.
- Espresso Boost: A touch of espresso powder in the chocolate dough can deepen the cocoa flavor without making the cookies taste like coffee.
- Holiday Sprinkles: Instead of or in addition to peppermint, sprinkle festive holiday sprinkles on the wet chocolate for an extra pop of color.
- Different Extracts: Experiment with other extracts! Orange extract for a chocolate-orange twist, or even a hint of almond for a unique flavor profile.
Perfect Serving Suggestions
These Chocolate Peppermint Cookies are perfect on their own with a cup of hot cocoa or coffee. They also make a stunning addition to any holiday dessert platter or cookie exchange. Package them in decorative boxes or bags for thoughtful homemade gifts that friends, neighbors, and teachers will adore. For a truly decadent experience, serve them alongside a scoop of vanilla bean ice cream, allowing the rich chocolate and refreshing mint to shine.
Frequently Asked Questions About Chocolate Peppermint Cookies
- Can I use regular cocoa powder instead of Dutch-process?
- While you can use regular unsweetened cocoa powder, Dutch-process cocoa powder creates a darker, richer chocolate flavor and a slightly less bitter cookie. It’s recommended for the best results in this recipe, but regular cocoa will work in a pinch.
- My cookies spread too much. What went wrong?
- Several factors can cause cookies to spread. Ensure your butter wasn’t too soft or melted. Most importantly, ensure the dough was thoroughly chilled for the recommended time, and even frozen after rolling and cutting, as this helps maintain their shape during baking. Also, make sure your oven temperature is accurate.
- How do I prevent the crushed candy canes from melting or getting sticky?
- The best way to prevent candy canes from melting or becoming sticky is to store the finished cookies in an airtight container in a cool, dry place. If humidity is an issue, refrigerating them can help, but bring them to room temperature for the best texture before serving. Ensure the chocolate coating is fully set before storing.
- Can I make these cookies gluten-free?
- Yes, you can often substitute all-purpose flour with a 1:1 gluten-free baking flour blend that contains xanthan gum. Results may vary slightly, but many bakers have success with this substitution for similar cookie recipes.
Explore More Festive Chocolate Mint Recipes: