
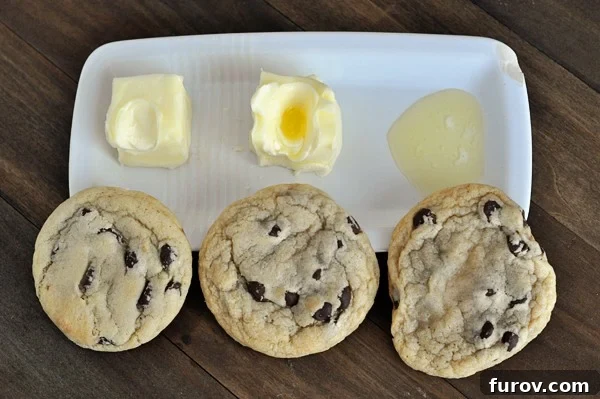
Have you ever embarked on a baking adventure, only to wonder if the humble stick of butter you’re using holds the secret to cookie perfection? This comprehensive guide dives deep into the art and science of butter temperature, revealing how this seemingly minor detail can dramatically impact your baking success.
Few things are more satisfying than biting into a perfectly baked cookie: crisp edges, a delightfully chewy center, and a rich, buttery flavor that dances on your palate. Yet, many home bakers frequently encounter a range of frustrating cookie conundrums. Have you ever wondered why your cookies sometimes spread too thin, turning out flat and greasy? Or perhaps they remain stubbornly puffy and cake-like, refusing to achieve that desired chewiness? What about the mystery of cookies that are overly browned on the bottom but still gooey and underbaked inside? These common baking dilemmas often lead us to question every step of the process, from the type of pan we use to the exact method of measuring ingredients.
If you’re among those who obsess over these culinary enigmas, rest assured, you’re not alone. The quest for the ultimate cookie is a journey many passionate bakers undertake. It’s precisely why we embarked on “The Great Cookie Experiment,” a systematic investigation into the factors that elevate a good cookie to a truly great one. Our initial focus, and arguably one of the most critical elements, was butter temperature. While it might seem like a small detail, the state of your butter can be a game-changer. Initially, after countless batches of chocolate chip cookies were baked for testing various theories, the immediate visual differences were subtle, leading to an early, albeit mistaken, conclusion that all the cookies looked the same.
However, upon closer inspection and a more meticulous evaluation, the evidence became clear: butter temperature indeed made a significant, undeniable difference in the final cookie outcome. The subtle variations in texture, appearance, and even flavor proved that precision in this area is paramount.
This post is dedicated to sharing those revealing results with you, providing insights that will transform your cookie baking. Join us over the coming weeks as we continue to unravel more scientific and utterly important cookie conundrums. Feel free to share your most persistent cookie problems in the comments below, and we’ll gladly add them to our ongoing testing list!
Laying the Groundwork for Our Scientific Cookie Report
Before diving into the fascinating results of our butter temperature tests, it’s essential to outline the consistent parameters and definitions used throughout our experiment to ensure accurate and reproducible findings. This “scientific report” operates under a few key givens:
- Recipe Type: Butter-Based Cookies Calling for Softened Butter. Our experiment specifically targets recipes that instruct the use of “room temperature” or “softened” butter. While some beloved cookie recipes, including one of our personal favorites, famously call for melted butter, those were excluded from this particular test. Recipes designed for melted butter are formulated differently, often relying on the butter’s liquid state to achieve a specific texture or chewiness. Our focus here is on the vast majority of cookie recipes where the creaming method with softened butter is fundamental.
- Precise Flour Measurement: The Scoop and Sweep Method. The way flour is measured can dramatically alter the density and moisture content of your cookie dough, profoundly impacting the final texture. For consistency, we strictly adhered to the “scoop and sweep” method, where flour is lightly spooned into a measuring cup and then leveled off with a straight edge. This prevents over-packing the flour, which can lead to dry, dense cookies. You can learn more about this crucial technique and its impact on baking here.
- A Simple Chocolate Chip Cookie Recipe. To isolate the effect of butter temperature, we utilized a basic yet reliable chocolate chip cookie recipe, which you’ll find detailed at the end of this post. This classic recipe provides an excellent baseline for observing how butter consistency influences the baking process.
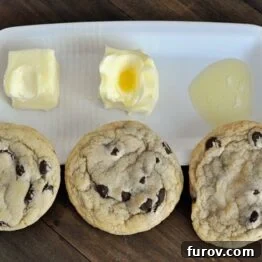
- Defined Butter Temperature Terminology. To avoid any ambiguity, we’ve established precise, albeit somewhat whimsical, terms for the butter temperatures used in our trials:
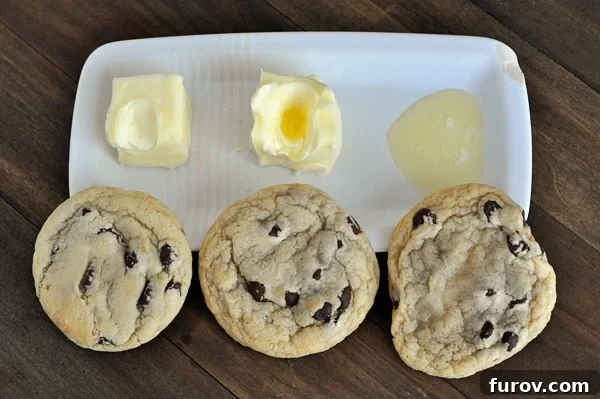
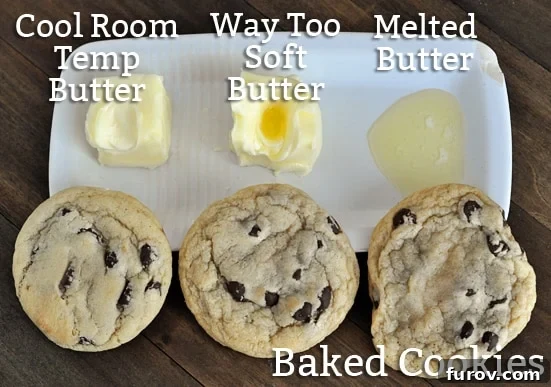
- Cool Room Temperature Butter: This is the ideal state. You should be able to gently press your finger into the stick of butter, leaving an indentation, but the butter should still offer some resistance and not feel greasy. Your finger won’t easily slide all the way through the stick. It’s cool to the touch but pliable.
- Way Too Soft Butter: As the name suggests, this butter has progressed beyond ideal softness. It might even show small areas of melting, especially if softened aggressively, such as in a microwave (a common, though often regrettable, shortcut!). Your finger will easily glide through the stick, and it will feel quite mushy or oily.
- Melted Butter: This simply means the butter is fully liquid. While straightforward, its implications for cookie texture are profound.
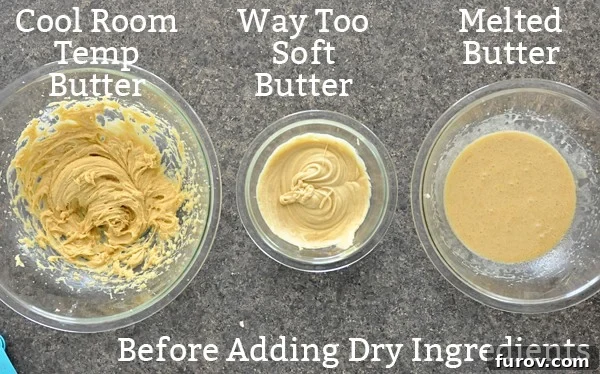
Understanding these parameters is key to appreciating the distinctions observed in our experiment. The visual differences in the cookie batters themselves, even before baking, were quite striking. Below, you can see how the batters varied significantly right after the eggs and vanilla were incorporated and beaten in. Please excuse the slight variation in bowl sizes; our kitchen, like many, has a finite collection of Pyrex!
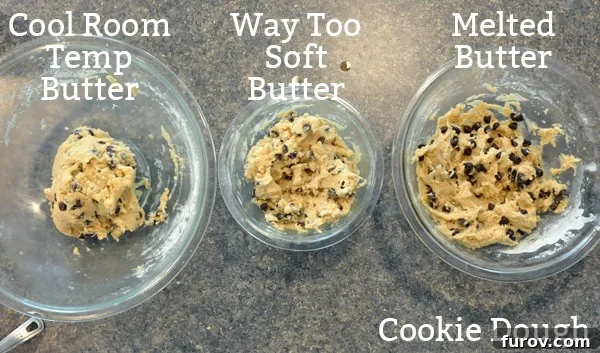
Moving further into the process, observe the bird’s-eye view of the batters after the dry ingredients and chocolate chips have been added. The textural differences in the dough, directly attributable to the initial butter temperature, are even more pronounced here, making it easy to predict varying outcomes even at this stage.
The Science Behind the Spread and Texture: Why Butter Temperature Matters
Before we reveal the final baked results, let’s briefly delve into the culinary science explaining *why* butter temperature plays such a crucial role in cookie dynamics. Butter, especially in its “cool room temperature” state, is a unique blend of water, milk solids, and fat. When you cream softened butter with sugar, the sharp edges of the sugar crystals create tiny air pockets within the butter. This aeration is critical; these trapped air bubbles expand during baking, contributing to a lighter, chewier texture and helping the cookies rise. If the butter is too cold, it won’t cream properly, leading to less aeration. If it’s too soft or melted, the fat can’t hold air effectively, resulting in a denser, greasier cookie.
Moreover, butter’s melting point impacts how quickly your cookies spread in the oven. Properly softened butter melts gradually, allowing the cookie structure to set around those trapped air pockets before fully collapsing. Conversely, overly soft or melted butter starts melting almost immediately upon hitting the hot oven, causing the cookie to spread out rapidly before its structure can firm up. This often leads to flat, thin, and sometimes crispy-edged, gooey-centered cookies.
The Unveiling of the Baked Results
Once the cookies emerged from the oven, the distinctions, though initially overlooked in a rush, became remarkably clear and undeniable. Each batch, corresponding to a specific butter temperature, presented a unique profile:
Cookie 1: The Champion (Cool Room Temperature Butter)
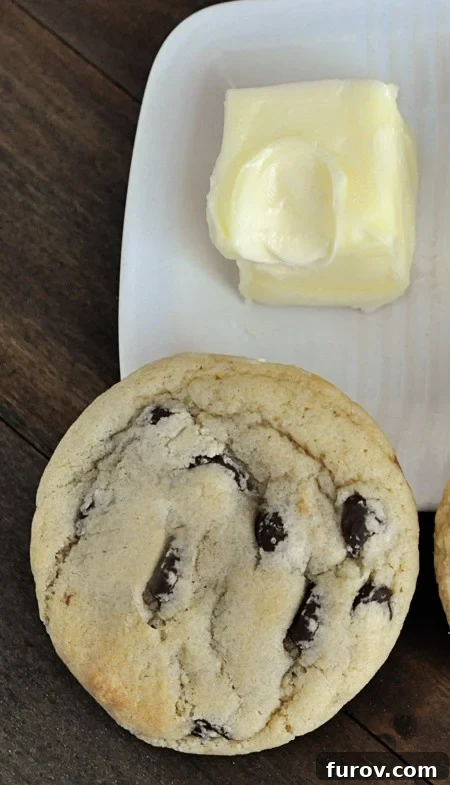
This cookie was, without a doubt, the epitome of cookie perfection. It baked incredibly evenly, demonstrating remarkable structural integrity. The shape was beautifully maintained, flattening just enough to create that classic cookie disc without overspreading into a greasy puddle. Its edges were perfectly golden, providing a satisfying slight crispness, while the center remained wonderfully soft and chewy. The internal texture was consistent, neither too dense nor too airy, and the chocolate chips were perfectly suspended throughout. This is the cookie that makes all the effort worthwhile – a true testament to the power of proper butter temperature.
Cookie 2: The Almost-There (Way Too Soft Butter)
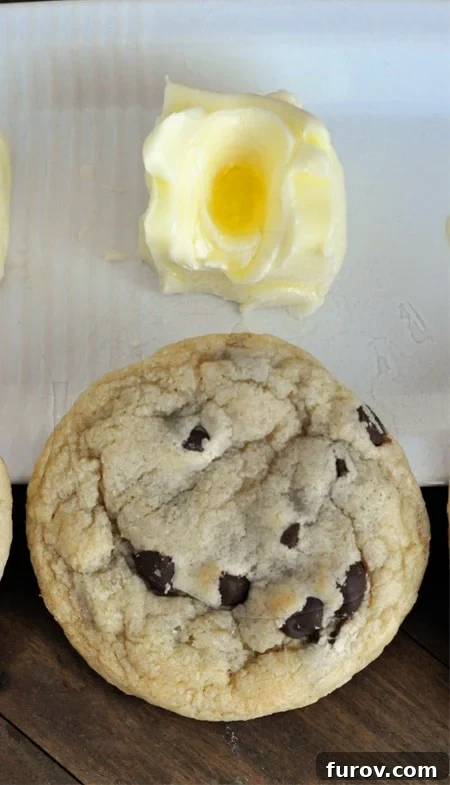
The cookie made with “way too soft” butter didn’t look terrible at first glance, but a closer examination revealed its imperfections. While it held its shape reasonably well, it was noticeably flatter than its “cool room temperature” counterpart. More significantly, its texture was a bit doughier and felt slightly greasier to the touch and on the palate. The rapid melting of the overly soft butter led to a quicker spread, preventing the cookie from developing the same delicate internal structure. It lacked the nuanced chewiness of the ideal cookie, tasting somewhat heavier and less balanced.
Cookie 3: The Underachiever (Melted Butter)
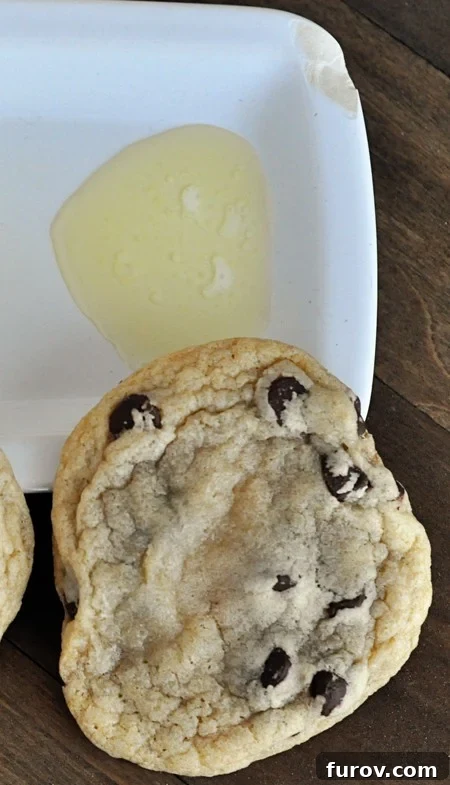
The melted butter cookie was the clear underperformer in terms of aesthetics and texture. It was misshapen, lacking the appealing roundness and uniform thickness of the others. Visually, it simply wasn’t up to par. Flavor-wise, it wasn’t drastically different, but the textural issues were prominent. Like the “way too soft” butter cookie, it exhibited a greasier mouthfeel. Crucially, despite its edges and bottom browning significantly, the center remained notably underdone and excessively gooey. This uneven bake is a classic sign of butter that melts too quickly, causing the edges to cook and set before the heat can properly penetrate and cook the middle. (And for the record, all cookies were equally enjoyed; no cookie was discarded due to superficial imperfections! Every crumb was a valuable data point.)
Here’s a more intimate look at the cookie produced with melted butter. Notice its irregular shape and much flatter profile, a clear deviation from the desired standard.
And now, a closer view of the “way too soft butter” cookie. While decent, its slightly greasy taste and undercooked middle prevented it from achieving true greatness.
Finally, the star of our experiment: the cookie born from cool, room temperature butter. This cookie exemplifies visual appeal and an absolutely stellar texture, a true baking triumph.
How to Achieve the Perfect Butter Temperature
Given the dramatic difference, you might wonder how to consistently hit that “cool room temperature” sweet spot. Here are a few reliable methods:
- The Patient Method: Simply leave your butter out on the counter. Depending on your kitchen’s temperature, this can take anywhere from 30 minutes to a few hours. A good rule of thumb is to take it out an hour before you plan to bake.
- The Water Bath Method: Cut your butter into smaller pieces (about 1-inch cubes) and place them in a bowl. Fill a larger bowl with lukewarm (not hot!) water and place the bowl with butter inside. Let it sit for 10-15 minutes, gently stirring the butter occasionally.
- The Rolling Method: Place a stick of butter between two sheets of parchment paper. Using a rolling pin, gently roll the butter until it flattens and becomes more pliable. This increases its surface area, warming it up faster.
- Avoid the Microwave Trap: While tempting for speed, the microwave is notoriously difficult for softening butter evenly. It often creates pockets of melted butter while leaving other parts cold, leading to inconsistent results. If you must use it, microwave in 5-second bursts, flipping the butter after each, and stop when it’s still slightly firm.
There you have it: the insightful results from the first installment of “The Great Cookie Experiment”! The impact of butter temperature on your chocolate chip cookies is undeniable, proving that this seemingly minor detail is, in fact, foundational to achieving superior results. We’ll soon be sharing more crucial baking insights, such as the best pan liners (parchment, Silpat, or lightly greased) and other expert tips to further elevate your baking game. In the meantime, put your newfound knowledge to the test with the basic chocolate chip cookie recipe we used. Please feel free to leave any questions or feedback in the comments section below – happy baking!
Happy Cookie Baking!
Basic Chocolate Chip Cookie Recipe {For The Great Cookie Experiment}
24
Cookies
20 minutes
12 minutes
32 minutes
Pin
Rate
Ingredients
-
1 cup
(227 g)
butter, cool room temperature -
1 cup
(212 g)
granulated sugar -
1 cup
(212 g)
packed light brown sugar -
3
large eggs -
1 teaspoon
salt -
1 teaspoon
vanilla extract -
1 ½ teaspoons
baking soda -
3 ½ cups
(497 g)
all-purpose flour -
2 cups
(340 g)
chocolate chips
Instructions
-
Preheat oven to 350 degrees F (175 C). In a large bowl, cream together the softened butter, granulated sugar, and light brown sugar until the mixture is well combined and light and fluffy.
-
Add the eggs one at a time, beating well after each addition. Mix for 2-3 minutes until the batter appears light in color and airy. Stir in the salt, vanilla extract, and baking soda. Gradually add the flour, mixing until just combined. Fold in the chocolate chips until evenly distributed.
-
Drop rounded tablespoons of cookie dough onto baking sheets lined with parchment paper or a Silpat mat. Bake for 10-12 minutes, or until the edges are lightly golden but the centers still appear soft. Let cool on the baking sheet for a few minutes before transferring to a wire rack to cool completely.
Mel
Recipe Source: adapted from this recipe