Unlock Culinary Magic: The Ultimate Guide to Browning Butter
Ah, browned butter. The very mention of it conjures images of rich, nutty aromas and a depth of flavor that can transform even the simplest dish into a gourmet delight. For years, I approached the idea with a mix of curiosity and apprehension. The thought of potentially burning precious butter and creating a sad, wasted mess seemed too great a risk. After all, who wants to ruin a perfectly good stick of butter?
Yet, the whispers of its unparalleled taste lingered, hinting at a culinary secret I might be missing. Driven by the promise of enhanced flavors and a touch of gastronomic magic, I finally donned my apron and ventured into the world of browned butter. That first batch was a revelation, and I can confidently say that discovering the art of browning butter has profoundly elevated my cooking and baking.
Many of my recipes include notes suggesting the use of browned butter, often with the caveat that it might change your culinary life forever. Given the frequent questions about this incredible technique, I decided it was time to share a comprehensive guide. It’s surprisingly easy, incredibly fast, and truly transformative. Prepare to elevate your kitchen creations to a whole new level of deliciousness.
What Exactly is Browned Butter? The Science of Flavor
At its core, browning butter is a simple yet profound culinary technique. It involves gently heating butter until its milk solids separate, caramelize, and toast. This process, known as the Maillard reaction, is responsible for creating a complex array of new flavors and aromas. As butter melts and simmers, the water evaporates, leaving behind butterfat and milk solids.
These tiny milk solids are the stars of the show. As they toast, they transform from pale white to a beautiful golden-brown, infusing the liquid butterfat with an extraordinary nutty, toasty, and subtly caramel-like flavor. The resulting browned butter is more than just melted butter; it’s a fragrant, deep, and sophisticated ingredient that adds unparalleled richness and complexity to both sweet and savory dishes. It’s this unique flavor profile that sets it apart and makes it such a coveted component in professional and home kitchens alike.
Why You Should Embrace Browned Butter
If you’re still on the fence, let me convince you. Browned butter isn’t just a trend; it’s a fundamental technique that unlocks a new dimension of flavor. Here’s why it’s worth adding to your repertoire:
- Unforgettable Flavor: The nutty, toasty, almost caramel notes are simply divine. They add an incredible depth that plain butter cannot replicate.
- Elevated Aroma: The smell alone is enough to get your taste buds tingling. It fills your kitchen with a warm, inviting fragrance.
- Versatility: From cookies and cakes to roasted vegetables and pasta sauces, browned butter enhances an astonishing array of dishes.
- Gourmet Touch: It effortlessly elevates everyday recipes, making them feel more special and sophisticated with minimal effort.
- Surprisingly Easy: Despite its gourmet reputation, browning butter is incredibly straightforward once you know a few key tips.
Mastering the Art: Step-by-Step Guide to Browning Butter
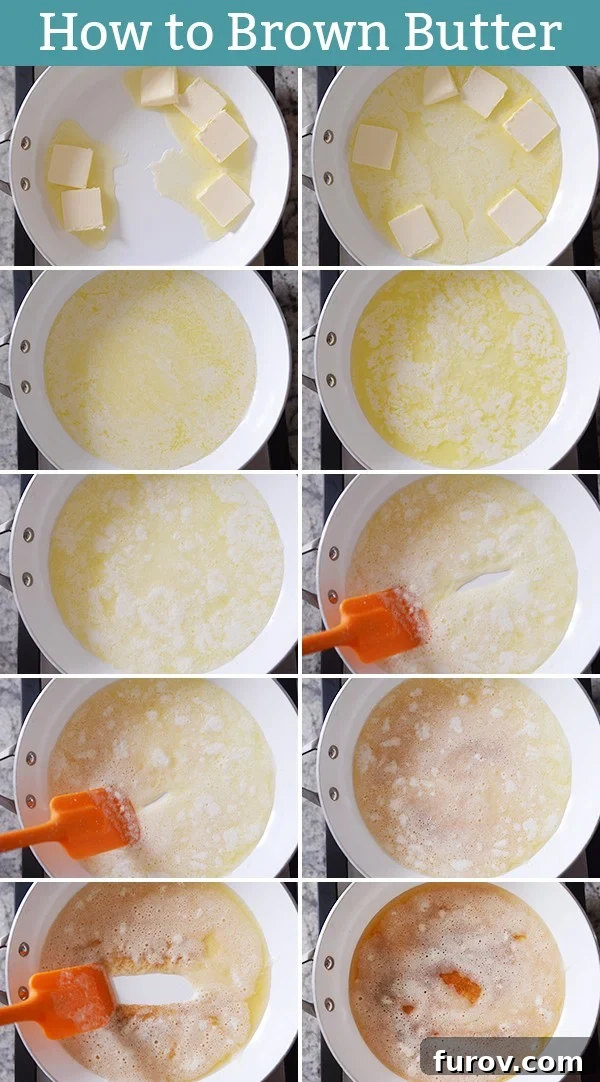
Let’s get down to business. Browning butter is a quick process, typically taking only 5-8 minutes, but it requires your full attention. Here’s how to achieve perfectly browned butter every time:
1. Choose the Right Pan
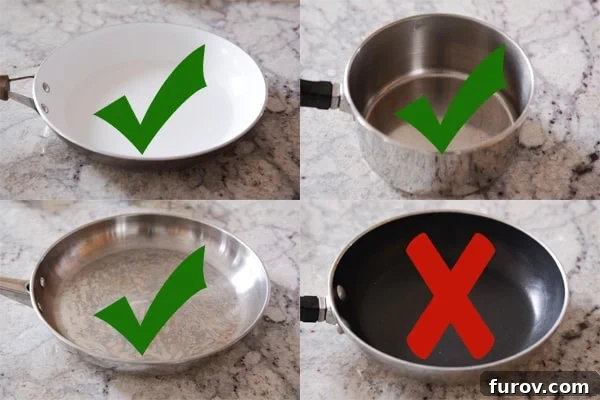
This is a crucial first step! Avoid using dark-coated or nonstick pans if possible. The dark color makes it incredibly difficult to see the subtle changes in the butter solids, leading to a higher risk of burning. Instead, opt for a light-colored, heavy-bottomed pan or skillet, preferably stainless steel. This allows you to clearly monitor the color of the milk solids as they brown, ensuring you pull the butter off the heat at just the right moment.
2. Melt the Butter
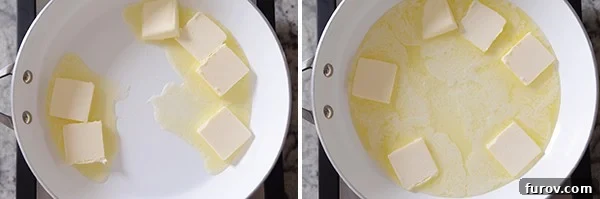
Add your desired amount of butter (unsalted is generally preferred for more control over saltiness, but salted works – just be mindful of seasoning in your final dish) to your chosen skillet. Place it over medium-low to medium heat. The goal here is to melt the butter slowly and evenly. Resist the urge to crank up the heat, as this can cause the butter to burn before it properly browns.
3. Simmer and Foam
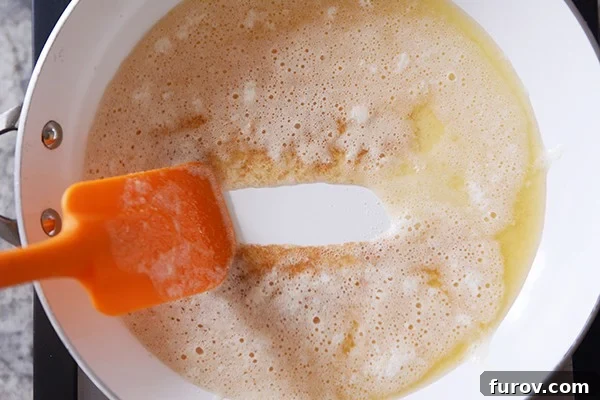
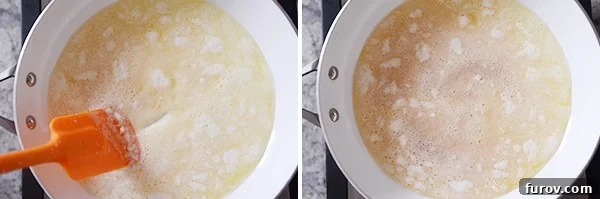
As the butter melts, it will begin to bubble and simmer. You’ll notice a foamy layer forming on top. This is the water content in the butter evaporating. Continue to moderate the heat; low and slow is always better than high and rushed when browning butter. Consistency is key here to prevent scorching.
4. Watch for Color Change and Stir
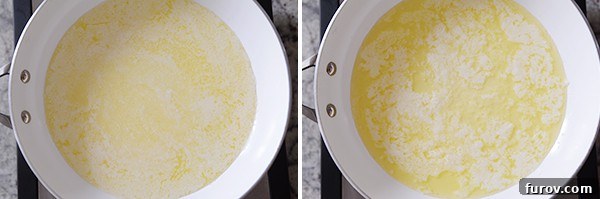
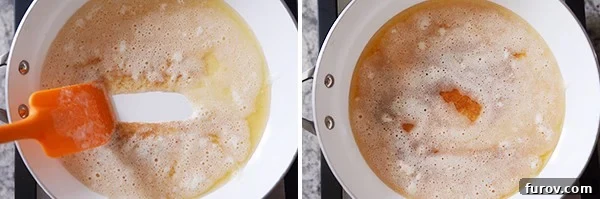
Beneath the foam, you’ll start to see the milk solids accumulating at the bottom of the pan. These will gradually begin to change color, transitioning from white to a pale yellow, then golden, and finally, a beautiful nutty brown. Use a heatproof spatula or wooden spoon to gently and continuously scrape the bottom of the skillet. This ensures that the milk solids brown evenly and prevents them from sticking and burning in one spot. Stirring also helps you monitor the color more effectively.
5. The Critical Moment: Golden Brown Perfection
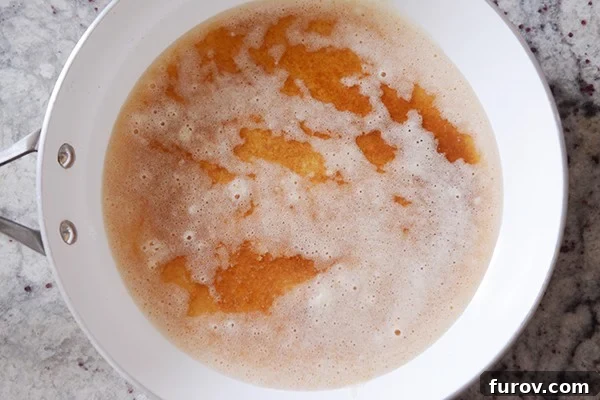
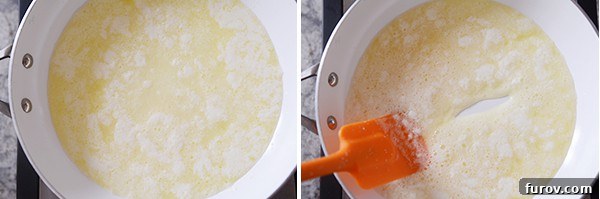
As the butter progresses, it will take on a rich, amber hue, and the milk solids at the bottom will turn a deep golden-brown. You’ll also notice a distinct nutty, fragrant aroma filling your kitchen. This is the critical stage where browning can turn to burning very rapidly. Do not walk away! Stay vigilant, watching the color intently. The moment those little bits at the bottom turn perfectly golden-brown and the aroma is robust, it’s time to act.
6. Remove from Heat Immediately
As soon as the butter solids reach that ideal golden-brown color and you detect the distinct nutty aroma, pull the pan off the heat. Immediately transfer the browned butter (including all those delicious browned bits!) into a separate, heatproof bowl. This stops the cooking process instantly. Leaving it in the hot pan, even off the burner, risks carryover cooking and can quickly turn your beautiful browned butter into a bitter, burnt mess. Remember: brown butter is divine; black butter is a definite discard.
Top Tips for Perfectly Browned Butter
- Use a Light-Colored Pan: This cannot be stressed enough. Visual cues are everything.
- Keep Heat Moderate: Medium-low to medium heat provides the best control and prevents burning. Patience is a virtue here.
- Stir Continuously: Regular stirring ensures even browning of the milk solids and helps prevent sticking.
- Watch Like a Hawk: The transformation from perfectly browned to burnt happens in seconds. Do not multitask.
- Transfer Immediately: As soon as it’s done, pour it into a separate, cool bowl to halt the cooking process.
- Don’t Overcrowd: If browning a large quantity of butter, consider doing it in batches to ensure even cooking.
- Taste Test: Once cooled slightly, give it a taste. It should be nutty and rich, not bitter.
How to Use Browned Butter: A Culinary Game-Changer
Now that you’ve mastered the technique, it’s time to unleash the full potential of browned butter in your kitchen. Its distinctive flavor shines brightest in dishes where butter is a prominent component and isn’t overshadowed by overly strong ingredients. For instance, while delicious, I typically don’t use browned butter in deeply chocolatey brownies or cakes, as the chocolate tends to dominate its nuanced flavor. However, in a classic chocolate chip cookie, a fluffy banana bread, a creamy frosting, or a delicate sauce, it’s absolutely tremendous!
Integrating Browned Butter into Recipes:
- For recipes calling for softened, unmelted butter: Brown the butter as directed, then pour it into a bowl or jar. Pop it into the refrigerator (or even the freezer for quicker results, stirring occasionally) until it cools and firms up to a consistency similar to softened butter – pliable but not liquid. This solidified browned butter can then be creamed with sugar or mixed into other ingredients as usual.
- For recipes calling for melted butter: This is the easiest application! Simply use the browned butter immediately after making it, following the recipe’s instructions. If you’ve made a batch ahead of time and stored it, gently melt it again over low heat before incorporating it into your dish.
Storage:
Browned butter can be stored in an airtight container in the refrigerator for up to two weeks, or frozen for several months. I often keep a tub of browned butter in my fridge, ready to use whenever the craving strikes – which, surprisingly, is quite often!
Inspired Recipes & Culinary Ideas with Browned Butter
The applications for browned butter are truly endless, extending far beyond the realm of baked goods. Here are just a few ideas to get you started, including some beloved recipes that are unequivocally happier with browned butter:
- Baked Goods: Browned butter adds incredible depth to cookies, cakes, muffins, and scones. Try it in your next batch of perfect chocolate chip cookies for an unbelievable upgrade.
- Frostings & Glazes: Transform a simple buttercream or glaze into something extraordinary. The “Magical Layered Brownies with Browned Butter Frosting” are a testament to this!
- Pancakes & Waffles: Substitute regular melted butter in your favorite pancake or waffle batter for a richer, more complex breakfast.
- Banana Bread & Muffins: Buttermilk Banana Bread reaches new heights of flavor with the addition of browned butter.
- Savory Dishes: Don’t limit yourself to sweets! Drizzle browned butter over roasted vegetables (like asparagus or broccoli), use it to finish pasta dishes, or incorporate it into sauces for fish or chicken. Think about a simple pasta with “Butternut Squash Stuffed Shells with Sage Browned Butter.” It’s phenomenal!
- Soups & Stews: A swirl of browned butter can elevate hearty soups, such as the “Green Lentil Soup with Curried Browned Butter.”
- Bars & Crisps: For a delightful treat, try “Oatmeal Butterscotch Bars” with browned butter; the nutty notes complement the oats beautifully.
- Rice Krispie Treats (A Gourmet Reinvention): This is a must-try! Use browned butter instead of regular butter in your next batch of Rice Krispie treats, along with a splash of vanilla extract. It takes this childhood classic from humble to gourmet in an instant.
- Sour Cream Muffins: Replace the coconut oil with browned butter in recipes like “Sour Cream Muffins” for a moist, flavorful result.
Prepare yourself, because once you experience the profound impact of browned butter, there’s no going back. I’ll be sharing more recipes in the coming weeks that showcase this incredible ingredient, and I promise you, with {minimal} exaggeration, your culinary life will be changed for the better!