

Irresistible Savory Spiral Stuffed Rolls: Your New Favorite Ham and Broccoli Delight
Prepare to fall in love with these utterly delightful savory spiral rolls! Packed with a rich, creamy filling of ham, broccoli, and a medley of cheeses, these golden-baked pinwheels are more than just a meal – they’re an experience. Whether served as a comforting dinner with a fresh green salad and fruit or as a standout appetizer, these rolls are guaranteed to become a household favorite. And fair warning: they’re incredibly addictive, so don’t be surprised if you find yourself making (and devouring) them regularly!

There are some recipes that just capture your heart (and your taste buds), and these Savory Spiral Stuffed Rolls are undoubtedly one of them. Imagine soft, fluffy roll dough encasing a vibrant, savory mixture that’s both creamy and cheesy, with tender pieces of ham and crisp-tender broccoli. Each bite is a harmonious blend of textures and flavors that will leave you craving more. This recipe elevates the humble dinner roll into a sophisticated, satisfying meal or an unforgettable appetizer.

More Culinary Inspiration:
A Year Ago: Sausage and Spinach Penne Skillet Supper
Two Years Ago: Classic Cinnamon Rolls

Savory Spiral Stuffed Rolls
Yield: 12-16 rolls
Prep Time: 1 hr
Cook Time: 20 mins
Total Time: 1 hr 20 mins
4.91 stars (11 ratings)
Pin Recipe
Rate This Recipe
Ingredients
- 1 recipe roll dough (yields about 12-16 rolls)
- 12 ounces cream cheese, softened
- ¼ cup butter, softened
- 2 cups chopped ham (leftover ham or quality deli ham works wonderfully)
- 1 ½ cups finely chopped broccoli florets
- 2 cups shredded cheese (Swiss, Cheddar, Gruyere, or a blend – the options are limitless!)
- 1 cup freshly grated Parmesan cheese
- 1 cup finely chopped green onions (scallions)
Instructions
- Prepare the Dough: Follow your chosen roll dough recipe until the dough has completed its first rise. Once risen, gently punch down the dough to release the air. On a lightly floured surface or a silicone baking mat (like a Roul’pat, if you have one), roll the dough out into a large rectangle, aiming for about ½-inch thickness. For a typical French bread roll recipe, this might be around 13 inches by 17 inches.
- Prepare the Filling: In a small bowl, cream together the softened butter and softened cream cheese until smooth and well combined. This creamy base will be spread over the dough.
- Assemble the Rolls: Evenly spread the butter and cream cheese mixture over the entire surface of the rolled-out dough. Next, generously sprinkle the chopped ham, finely chopped broccoli, shredded cheese, grated Parmesan cheese, and green onions over the cream cheese layer. Ensure an even distribution for consistent flavor in every roll.
- Roll and Slice: Starting from one of the longer edges, carefully roll the dough up into a tight log, just as you would for cinnamon rolls. Pinch the seam firmly to seal it completely, preventing any filling from escaping during baking. Using a sharp knife, slice the roll into approximately 1 to 1 ½-inch segments. You should get about 12-16 rolls depending on thickness.
- Second Rise and Bake: Place the sliced rolls, cut-side up, on a lightly greased baking sheet or one lined with parchment paper. Cover the baking sheet loosely with plastic wrap and let the rolls rise in a warm spot until they have nearly doubled in size. This second rise typically takes about 30-45 minutes. Preheat your oven to 350°F (175°C). Once risen, bake the rolls for about 20 minutes, or until they are lightly golden brown on top and the filling is bubbly and heated through.
Recipe Notes
Flour Amount Guidance: When working with yeast doughs, the precise amount of flour can vary significantly due to factors like humidity, temperature, and even altitude. Rather than strictly adhering to a given flour quantity (unless a weight measure is provided, in which case a kitchen scale is your best friend), always observe the dough’s texture. Stop adding flour when the dough is soft, pliable, and slightly tacky but no longer sticky. It should pull away cleanly from the sides of the bowl. For further assistance, a detailed tutorial on yeast dough characteristics can be invaluable in identifying a perfectly floured dough.
Dough Choice: While any good, soft roll dough will work, a French bread roll recipe often provides an excellent sturdy yet tender base for these savory fillings.
Filling Variations: Feel free to customize your rolls! Try different combinations like cooked sausage and bell peppers, spinach and feta, or even a blend of roasted vegetables. The cream cheese base is incredibly versatile.
Nutrition Information
Serving: 1 Roll, Calories: 342 kcal, Carbohydrates: 21g, Protein: 15g, Fat: 22g, Saturated Fat: 12g, Cholesterol: 72mg, Sodium: 804mg, Fiber: 1g, Sugar: 2g
Recommended Kitchen Tools
Recipe Source: Expanded upon from Marisa at What’s For Dinner
A Step-by-Step Visual Guide to Perfect Spiral Rolls
To ensure your savory spiral stuffed rolls turn out perfectly every time, here’s a detailed visual walkthrough of the process, from rolling the dough to achieving those beautiful pinwheel shapes.
Rolling Out the Dough
For best results, aim for a consistent thickness. My trusty silicone baking mat (roul’pat) makes this a breeze. I typically roll my dough to approximately 17 inches by 13 inches, providing ample surface for the delicious filling. A uniform rectangle ensures even spirals.
Spreading the Creamy Base
Once your dough is rolled, the next step is to generously spread the creamy mixture of softened butter and cream cheese. This not only adds incredible flavor and moisture but also acts as a binder for the subsequent layers of filling. Ensure an edge-to-edge spread for maximum flavor in every bite.
Layering the Savory Toppings
Now for the good stuff! Pile on your chopped ham, finely minced broccoli, shredded cheeses, and green onions. It might seem like a lot, but trust the process – this generous layering is what makes these rolls so incredibly satisfying. The vibrant colors of the broccoli and green onions add visual appeal and freshness to the rich, savory ham and cheese.
The Art of Rolling
Begin rolling the dough from one of the longer edges. Aim to keep the roll as tight as possible from the very start. This technique, similar to how you would roll classic cinnamon rolls, ensures that each spiral segment holds together beautifully and that the filling remains evenly distributed throughout. A tight roll will also give you those characteristic, appealing pinwheel swirls.
Continuing the Roll
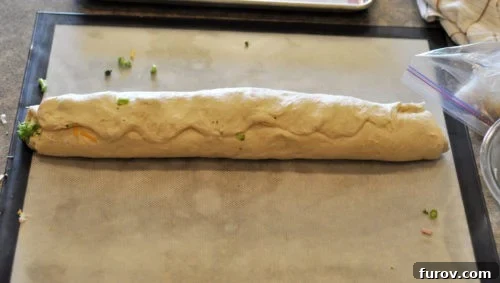
Keep rolling steadily and evenly until the entire rectangle of dough is transformed into a neat, cylindrical log. Maintaining consistent pressure will help avoid any air pockets and ensure a uniform appearance for your finished rolls. This step is crucial for achieving that picturesque spiral effect.
Sealing the Seam
Once fully rolled, gently but firmly pinch the seam along the entire length of the dough log. This sealing step is vital to keep all that delicious filling securely inside during the second rise and baking process. A well-sealed seam prevents any unraveling, ensuring your pinwheels stay intact and beautiful.
Slicing for Uniformity
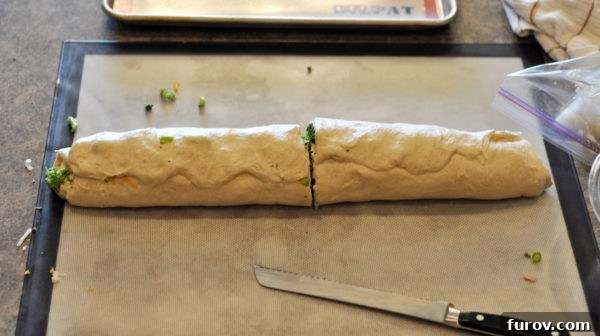
For even-sized rolls, I find it easiest to first cut the log exactly in half. Then, slice each half into roughly 1 to 1 ½-inch thick segments. Using a sharp knife and a gentle sawing motion will help you achieve clean cuts without squishing the spirals. This methodical slicing ensures that each roll bakes consistently and looks appealing.
The Final Rise Before Baking
Arrange your neatly sliced pinwheel rolls on a lightly greased baking sheet, leaving a little space between each for expansion. Cover them loosely with plastic wrap and allow them to undergo their final rise until they are nearly doubled in size. This crucial step develops the rolls’ soft, airy texture, making them incredibly tender after baking. Once risen, they are ready to bake to a golden, bubbly perfection!

Serving Suggestions and Customization
These Savory Spiral Stuffed Rolls are incredibly versatile. They shine as the star of a light dinner, accompanied by a crisp green salad and some fresh fruit for a balanced meal. But their appeal doesn’t stop there!
- Appetizer Extravaganza: Cut them a bit smaller before baking for perfect bite-sized appetizers at your next gathering. They’re excellent alongside a dipping sauce like a light ranch or a honey mustard.
- Brunch Delight: Serve them as part of a lavish brunch spread. The ham and cheese filling makes them a wonderful savory complement to sweet pastries and fresh juices.
- Lunchbox Hero: These rolls pack wonderfully for lunch. Enjoy them cold or briefly reheat them for a warm, comforting midday meal.
- Make-Ahead Magic: You can prepare the dough and assemble the rolls the night before, then cover and refrigerate. Let them come to room temperature and rise for about an hour before baking in the morning. This makes them perfect for busy mornings or entertaining.
Creative Filling Variations:
While the ham and broccoli combination is a classic for a reason, don’t hesitate to get creative with your fillings:
- Spinach & Artichoke: Replace ham and broccoli with blanched, squeezed dry spinach and chopped artichoke hearts. Add a pinch of garlic powder.
- Sausage & Pepper: Cooked crumbled sausage (breakfast or Italian), sautéed bell peppers, and onions make a robust filling.
- Mushroom & Swiss: Sautéed mushrooms and Swiss cheese offer an earthy, sophisticated flavor.
- Pulled Pork/Chicken: Leftover pulled pork or shredded chicken mixed with a touch of BBQ sauce or buffalo sauce, then combined with cheese, creates a fantastic twist.
- Pizza Rolls: Use marinara sauce instead of cream cheese, then add pepperoni, mozzarella, and a sprinkle of Italian seasoning.
Storage and Reheating Tips
Got leftovers? You’re in luck! These savory rolls store and reheat beautifully, making them perfect for meal prep or quick snacks.
- Storing Cooked Rolls: Once cooled, place the rolls in an airtight container. They will keep fresh at room temperature for up to 2 days, or in the refrigerator for up to 4-5 days.
- Freezing Cooked Rolls: For longer storage, cooked and cooled rolls can be frozen for up to 2-3 months. Wrap them individually in plastic wrap, then place them in a freezer-safe bag or container.
- Reheating:
- From Refrigerator: Reheat in a preheated oven at 300°F (150°C) for 10-15 minutes, or until warmed through and lightly re-crisped. You can also microwave them for 30-60 seconds, but the crust won’t be as crisp.
- From Freezer: Thaw frozen rolls overnight in the refrigerator, then reheat as above. Alternatively, you can reheat them directly from frozen in a 300°F (150°C) oven for 20-25 minutes, covering loosely with foil if they start to brown too quickly.
Explore More Savory Roll & Snack Recipes: