
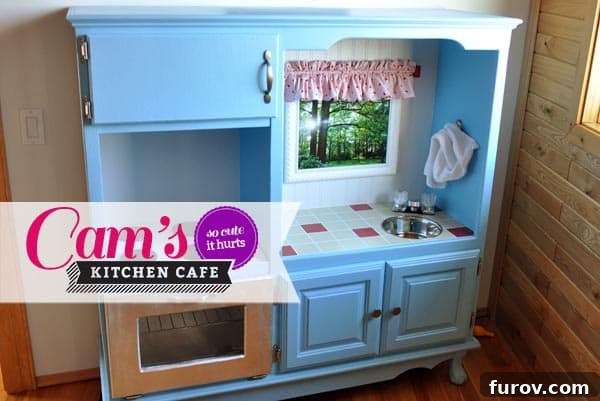
Crafting Dreams: Our DIY Upcycled Entertainment Center Play Kitchen for Christmas
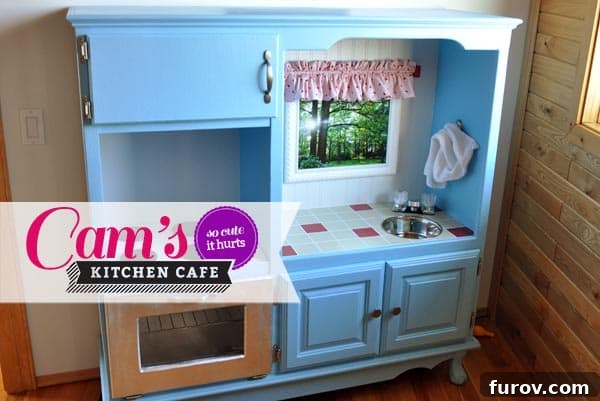
About a month before the festive sparkle of Christmas began to truly settle in, a brilliant idea sparked: to build a custom play kitchen for our daughter, Cam. This wasn’t just any idea; it was a grand vision that immediately translated into a directive for Brian: “Time to unleash your power tools, because Cam is getting an extraordinary play kitchen this Christmas!” The inspiration for this ambitious DIY play kitchen project came from admiring the ingenious creations of old high school friends, Rocky and Jolyn, whose resourceful builds I eagerly shared with Brian. A quick dive into the digital realm, specifically Pinterest, soon revealed an entire universe of enthusiasts dedicated to transforming old entertainment centers into charming, functional play kitchens. This discovery not only validated my seemingly ambitious plan but also provided a treasure trove of ideas and encouragement for embarking on our own upcycled furniture adventure.
The Genesis of a Grand Christmas Gift Idea
The concept of a homemade play kitchen wasn’t just about saving money; it was about creating something truly unique and personal, imbued with love and effort, that a store-bought toy simply couldn’t replicate. We envisioned a space where Cam could mimic our daily routines, fostering imaginative play and creativity. A custom-built kitchen meant we could tailor every detail, from the color scheme to the functional elements, to perfectly suit her little world and our home’s aesthetic. The thought of repurposing an old entertainment center particularly appealed to us, embracing sustainability while also providing a sturdy and complex structure as a starting point. This foundation offered existing shelves, doors, and a general shape that was ripe for transformation, promising a richer, more engaging result than starting from scratch.
The Hunt for the Perfect Base: An Entertainment Center’s Second Act
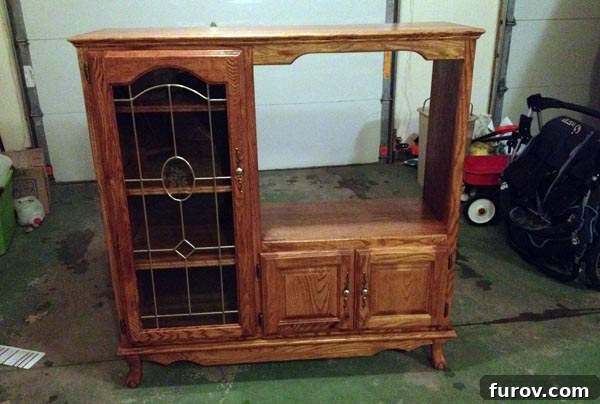
Brian, ever the lovable procrastinator with a knack for making things happen under pressure, initiated the search for our raw material just five days before Christmas. His sweet talk and persuasive charm worked wonders, securing an old entertainment center for a mere $25 from a willing owner. This bargain find was the perfect canvas for our vision, embodying the spirit of repurposed wood crafts and resourceful building.
The project immediately took over our garage, which quickly transformed into a bustling, clandestine workshop. To maintain the element of surprise for Cam, we strategically placed our piano bench as a blockade in front of the house door leading to the garage. During the day, the entire setup was shrouded under a tarp, ensuring no little prying eyes could catch a glimpse of her impending Christmas surprise. The garage, for all its utilitarian atmosphere, became the birthplace of magic, a testament to dedication and the joy of creating something truly special.
The Intense Christmas Countdown: A Whirlwind of Craftsmanship
To merely state that the subsequent five days involved near all-nighters, fueled by feverish woodworking and intensive painting, to complete this monumental task before Christmas morning would be a monumental understatement. It was a race against time, a test of skill, and a true labor of love. My initial assignment was painting, a role that quickly evolved into a specialized mission: the countertop. Brian, a perfectionist of epic proportions as anyone who knows him can attest, swiftly realized my painting style leaned more towards “enthusiastic” than “flawless.” Thus, the countertop became my personal DIY Everest.
The Countertop Conundrum: A Test of Patience and Precision
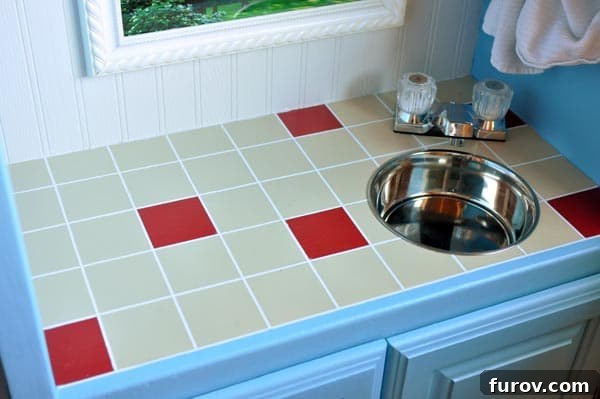
Ah, the countertop. It became the bane of my existence, the reason for three days of bloodshot eyes, and a true lesson in the realities of DIY painting techniques. My initial plan, inspired by yet another alluring Pinterest idea, involved using detailing tape to create crisp, clean lines for a faux tile effect. In theory, it was brilliant. In practice, the paint bled mercilessly, turning my meticulous efforts into a blurry mess. What followed was a painstaking process of touching up every single bled-through imperfection. The real breakthrough came when I harnessed the power of my Silhouette machine to precisely cut out thin vinyl strips, which finally served as the perfect “grout” lines. While perhaps not a story for the ages, the end result, resembling an actual kitchen counter, was all that truly mattered after such an ordeal. It was a small victory, but a deeply satisfying one, proving that persistence pays off in creative craft ideas.
Brian’s Masterpiece: Engineering the Play Kitchen
While I was grappling with paint and vinyl, shedding tears over my countertop tribulations, Brian was undertaking a monumental effort, easily 300 times the work I was doing. His craftsmanship transformed a bulky entertainment unit into a charming wooden play kitchen. He meticulously built new cabinet doors from scratch, ensuring perfect alignment and smooth operation. He ingeniously installed a sink complete with handles that actually turned, adding a delightful touch of realism for little hands. Figuring out the proper hinges for the doors, priming every surface, and then enduring multiple rounds of painting and repainting to achieve a flawless finish were all part of his dedicated process.
One of the standout features was the oven space. Brian reconfigured it entirely, crafting a metallic-painted oven door (a task that, by the way, produced quite a pungent odor!) and installing a clear plexiglass front. This clever addition allowed for a peek inside, making the play oven even more engaging. His attention to detail and unwavering commitment to quality ensured that every component was not only functional but also beautifully integrated into the overall design, truly showcasing the potential of creative woodworking projects.
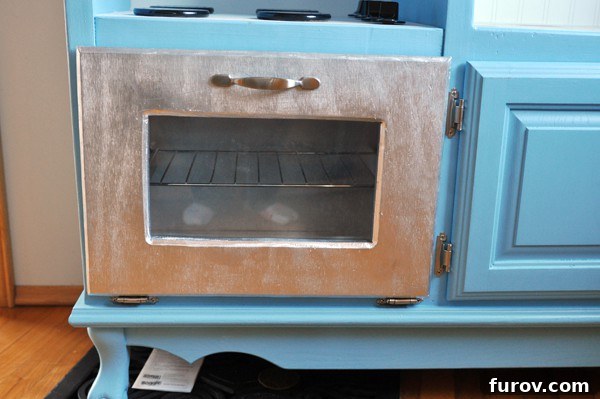
Resourceful Repurposing: The Oven Rack and Beyond
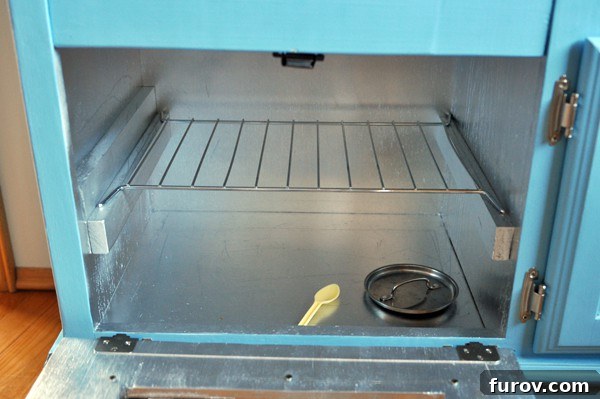
Our commitment to repurposing extended to the oven rack itself. We creatively repurposed an old shelf-rack from our microwave, which had long sat unused. It was the perfect size and shape, seamlessly integrating into the new play oven. This choice not only saved us from purchasing new materials but also added a touch of homely authenticity to the kitchen.
It’s safe to say that Cam, being delightfully young, is still discovering the true function of an oven, even a miniature play one. On any given day, you might peer inside and find her beloved dollies nestled comfortably within, perhaps a yellow spoon or a toy pot lid keeping them company. It’s a charming reminder that the ultimate purpose of a play kitchen is not to perfectly simulate reality, but to ignite imagination and provide a cozy space for cherished toys and endless scenarios of make-believe. This highlights the beauty of toddler imaginative play ideas and how children adapt toys to their unique narratives.
A Stitch in Time: My Contribution to the Curtains
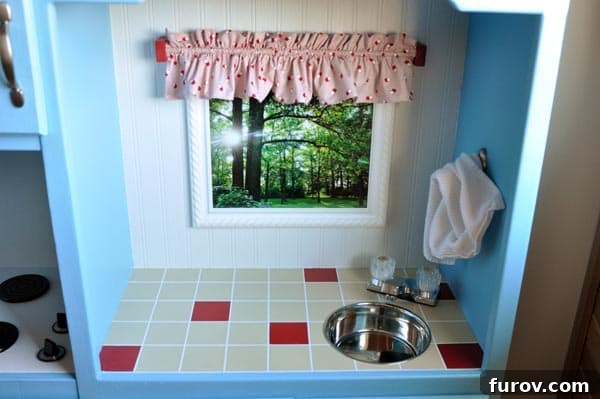
Beyond the countertop saga, my only other significant contribution was sewing the tiny curtains for the “window” of the play kitchen. This seemingly simple task proved to be another personal challenge. Despite my enthusiasm, I confess to being seriously the worst seamstress ever. The project, which should have been straightforward, required no less than four alterations, involved tearing out 129 stitches, and finally, a moment of enlightenment when I realized I actually needed to measure the “stinking diameter” of the dowel. A quick learner, indeed!
The picture adorning the play kitchen’s “window” holds special sentimental value. It was taken months prior, when we first moved into our current home. I remember being so incredibly happy to have a real picture from our real yard to hang in Cam’s not-so-real kitchen, symbolizing new beginnings and the joy of creating a home. It’s these small, personal touches that elevate a toy into a cherished family heirloom, making this sentimental Christmas gift truly one of a kind.
The Stovetop: Simple Solutions for Playful Functionality
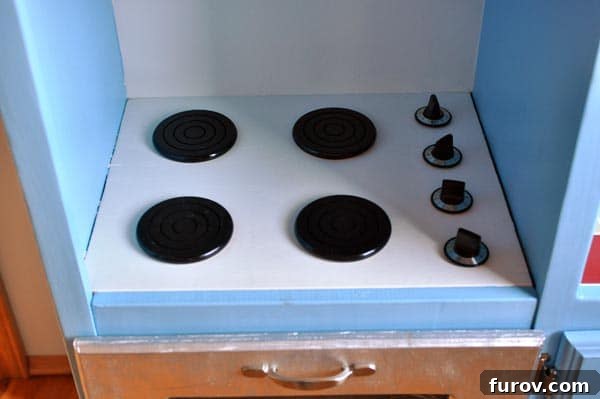
For the stovetop, we opted for a wonderfully simple yet effective solution: painted coasters serving as burners. They provided the perfect circular shape and could be easily affixed. Complementing these, we used super cheap knobs that ingeniously turn on a small screw, giving the satisfying tactile experience of turning a burner on and off.
I recently discovered that some commercially available play kitchens, like those sold by IKEA, feature burners that actually glow red when activated. For clarification purposes, yes, Cam’s kitchen doesn’t have this high-tech feature, and no, Brian and I are definitely not at the IKEA toy production level. This humorous comparison simply highlights the charming imperfections and unique character that come with a homemade toddler play kitchen. It’s a reminder that sometimes, simplicity and imagination trump elaborate electronics, especially when the hands that crafted it are filled with love.
The Ultimate Reward: Hours of Imaginative Play
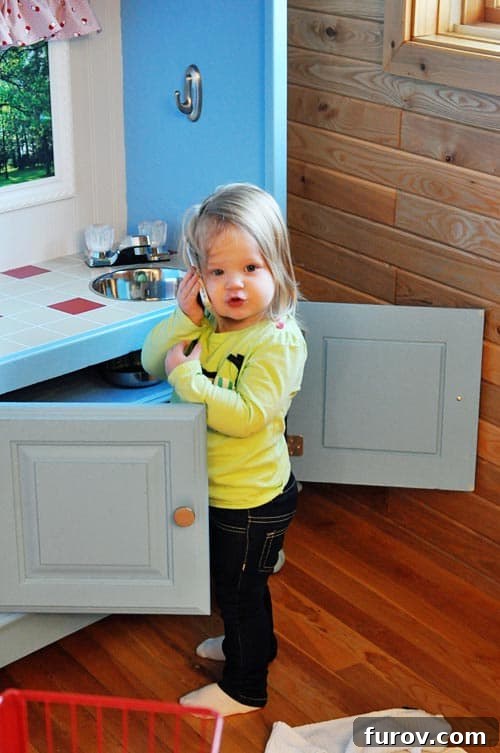
Ultimately, the true test of any play kitchen is whether it genuinely captures the imagination of its little owner and gets played with. And thankfully, oh thankfully, I can joyfully report that this wonderful creation has already provided hours and hours of delightful use and imaginative play. It has found its perfect home in a cozy nook right next to our big kitchen, creating a seamless extension of our family’s culinary hub.
Cam, in her current stage of creative exploration, often fills her plastic mugs with her toy bead necklaces, transforming them into exotic concoctions, and playfully shoves her stuffed animals into the sink for a pretend bath. Meanwhile, her older brothers have embraced the kitchen, crafting endless variations of plastic meals and serving up imaginative feasts. Yum! This diverse range of play underscores the versatility and enduring appeal of a well-made play kitchen, serving as a hub for all kinds of kids’ creative play benefits. It’s not just a toy; it’s a stage for budding chefs, caregivers, and storytellers.
Reflections on a Project of Love
Overall, I am incredibly glad we (and by “we,” I primarily mean Brian, with my enthusiastic but less-than-perfect assistance) took on this ambitious project, even though those intense days leading up to Christmas remain a delightful blur. For the record, Brian would like to state that given December saw high temperatures not even reaching above zero, he is everlastingly grateful for having a heated garage to work in. And to that, I give a resounding “Amen!”
I am profoundly grateful that he was a willing participant in my sometimes-crazy ideas and, more importantly, that he possesses the remarkable talent and dedication to bring such visions to life. Frankly, you wouldn’t be reading a post about this magnificent creation had I been the one solely responsible for the real woodworking and intricate construction. This DIY family project became a symbol of teamwork, love, and perseverance.
This project wasn’t just about building a play kitchen; it was about building memories, fostering creativity, and celebrating the joy of giving a deeply personal gift. It stands as a testament to the magic that can happen when a wild idea meets skill and determination. Love you, babe, for making this dream a reality. Love you, our sweet ragamuffin-Cam, for inspiring such wonderful adventures. And love you, little kitchen, for becoming such a cherished centerpiece of our home and our children’s imaginative world. For anyone considering their own homemade toy ideas, I wholeheartedly encourage you to embark on the journey – the challenges are worth the immeasurable rewards.