
Indulge in the sweet, refreshing taste of the holidays with these irresistibly cute and delicious homemade peppermint patties. Surprisingly easy to make, they are the perfect treat for festive gatherings or thoughtful homemade gifts.
For years, crafting homemade peppermint patties has been a cherished item on my culinary bucket list. It’s a nostalgic treat, especially dear to my mom, who has a delightful habit of stashing them in the freezer. Apparently, frozen peppermint patties possess a magical quality that makes them even more enjoyable, not to mention harder for “unassuming treat-seeking souls” to discover!

The Joy of Crafting Homemade Peppermint Patties
You might imagine that making these iconic minty confections from scratch is a complex endeavor, but I’m here to tell you it’s remarkably simple. The process of creating the creamy peppermint filling is incredibly straightforward, resulting in a dough that is a dream to work with. Even the chocolate-dipping stage, which often intimidates home bakers, becomes a breeze with just a fork and a butter knife at your disposal.
There’s a unique satisfaction that comes from making candies at home. Beyond the incredible flavor, it’s about the control you have over ingredients, ensuring freshness, and tailoring the taste to your exact preference. For anyone looking for a fun, rewarding kitchen project, especially during the festive season, these homemade peppermint patties are an absolute must-try. They elevate a classic candy into a personalized, gourmet experience.
Why Homemade Peppermint Patties? The Ultimate Festive Treat
Beyond the simple pleasure of creation, there are several compelling reasons to choose homemade over store-bought. Firstly, the freshness is unparalleled. You’ll notice a significant difference in the vibrancy of the mint flavor and the smooth, creamy texture of the filling, setting them miles apart from commercial versions. Each bite offers a burst of cool peppermint perfectly balanced with rich chocolate, a sensation hard to find elsewhere.
Secondly, you control the quality of your ingredients. This recipe allows you to opt for high-quality chocolate – whether bittersweet or semi-sweet – and pure food-grade peppermint essential oil for a truly superior and natural taste. This attention to detail means a healthier and more delicious treat for you and your loved ones.
Thirdly, customization is key. Want more mint? Add an extra drop of oil. Prefer dark chocolate over semi-sweet? The choice is yours. You can even experiment with different toppings like colorful sprinkles, finely chopped nuts, or a drizzle of white chocolate for added flair. These patties are also wonderfully cost-effective, allowing you to produce a generous batch perfect for sharing without breaking the bank. And let’s not forget the pure delight of sharing something you’ve crafted with love. They make exceptional gifts, bringing a personal touch that store-bought items simply can’t replicate, making any occasion feel extra special.
I typically keep these delightful treats refrigerated, as the recipe suggests. And despite yielding a generous “bazillion” patties, they never last long in our household! After sharing a portion with neighbors and friends, my family has absolutely no trouble devouring the rest. The luscious white center offers a perfect balance of creamy sweetness, while the rich, dark chocolate coating provides a wonderful contrast, cutting through the minty freshness with sophisticated ease. Personally, I lean towards the ones without the crushed candy cane topping, appreciating the pure chocolate-mint experience. However, the sprinkle of candy canes undeniably adds a beautiful, festive touch, making them visually stunning and perfect for holiday presentations.

How to Package Homemade Peppermint Patties for Gifting
These homemade peppermint patties are not just a joy to eat; they’re also a delight to give. Thoughtful packaging transforms them into charming, personal gifts perfect for the holidays, hostess tokens, or just a sweet gesture for a friend. Here’s my favorite way to present them, along with other creative ideas:
I begin by lining a small, cute tin bucket with a square of parchment paper, ensuring it extends up the sides. This not only protects the patties but also adds a touch of rustic charm and prevents them from sticking to the container. Then, I carefully arrange the finished peppermint patties inside, stacking them gently to create an appealing display. To complete the look, I tie a simple piece of natural twine or a festive ribbon around the handle of the bucket. This minimalist approach highlights the homemade quality and creates a truly appealing package that conveys warmth and effort.
Finding these adorable tin buckets is easier than you might think. Craft stores like Hobby Lobby often carry them in various sizes and colors, especially during holiday seasons. Online retailers such as Oriental Trading offer them in bulk for around $9 a dozen, making them a cost-effective option for larger batches of gifts. Amazon also provides a wide variety of sizes and colors to suit any occasion or recipient’s taste.
If tin buckets aren’t your preference, don’t worry! These little peppermint patties look equally lovely in simple treat bags. Clear cellophane bags tied with a festive ribbon, similar to those used for caramel popcorn, work wonderfully. You can also layer them in small, decorative gift boxes with wax paper between layers to prevent sticking and ensure they arrive in perfect condition. For an extra touch, attach a handwritten tag with the recipe name and a little note. The key is to present them in a way that shows off their delightful appearance and the care you put into making them, turning a simple candy into a memorable gift.

Homemade Peppermint Patty FAQs
For optimal freshness and flavor, store your homemade peppermint patties in an airtight container in the refrigerator for about a week. While they might last a bit longer, their peak taste and texture are enjoyed within this timeframe. The cold temperature also enhances the refreshing mint flavor. For extended storage, these delightful treats freeze exceptionally well, maintaining their quality for approximately one month. Just ensure they are properly wrapped or placed in a freezer-safe container to prevent freezer burn and preserve their delicious taste.
If coconut oil isn’t readily available or you prefer an alternative, a solid shortening (like Crisco) or another mild-flavored, creamy solid oil can be used as a substitute. The key is to use an oil that is solid at room temperature to help the patties hold their shape and provide the desired smooth and creamy texture for the filling. Liquid oils will not yield the same results.
While homemade peppermint patties can tolerate cool room temperature for a short period, refrigeration is highly recommended for several reasons. Storing them in the fridge extends their shelf life significantly, helps them maintain their firm, appealing texture, and enhances their refreshing taste, especially when enjoyed chilled. The chocolate coating will also be less prone to melting or becoming sticky.
Yes, the amount of powdered sugar is indeed correct! However, precise measurement is absolutely crucial for the perfect consistency of your peppermint filling. Always measure powdered sugar with a light hand; fluff it in the bag or container before gently scooping into your measuring cup, then level it off with a straight edge. Avoid packing it down, as this can lead to an excess amount. If you prefer weighing ingredients for accuracy, it should amount to approximately 30 ounces (about 855 grams). Too much powdered sugar from dense packing can result in a dry, crumbly, or overly stiff dough that is difficult to work with.
While the recipe suggests cutting rounds with a cutter, many enthusiastic home bakers in the comments have successfully tried rolling the peppermint patty dough into a log. After forming the log and chilling it until firm (this is important for clean slices), they slice it with a serrated knife or even dental floss before dipping in chocolate. This method can save time and create uniform patties, offering a convenient alternative, especially if you don’t have a round cutter handy.
I haven’t personally experimented with substitutions for corn syrup or evaporated milk in this particular recipe, so I cannot guarantee the same results. However, creative experimentation is always welcome! For corn syrup, you could try honey or another light-colored sweet syrup, keeping in mind that darker syrups might slightly alter the bright white color of the peppermint patties. For evaporated milk, half-and-half or heavy cream could potentially work as alternatives, though the final texture, richness, and shelf-life may vary. Always proceed with caution when making substitutions in baking and be prepared to adjust other ingredients if the consistency is off.
Expert Tips for Flawless Homemade Peppermint Patties
Achieving bakery-worthy peppermint patties at home is entirely possible with a few insider tips to guide you through the process:
- Powdered Sugar Measurement: As noted in the FAQ, this is critical. Fluff, scoop, and level the powdered sugar – do not pack it! This ensures your peppermint dough isn’t too dry, crumbly, or stiff, making it easier to handle and yielding a smooth filling.
- Chilling is Key: Do not skip the refrigeration and freezing steps for the peppermint dough. A well-chilled, firm dough is much easier to roll, cut into precise shapes, and most importantly, dip without falling apart in the warm chocolate. This firmness is your secret weapon for success.
- Peppermint Flavor Power: Food-grade peppermint essential oil is incredibly potent. Start with the recommended amount (1/4 teaspoon) and taste a tiny piece of the dough (before freezing) to adjust the flavor. A little goes a long way, but you want that distinct, refreshing minty kick. If using peppermint extract, you’ll typically need more, often 3-4 times the amount of oil, so start with 1 teaspoon and add more to taste.
- Melting Chocolate Properly: Overheated chocolate can seize, become dull, or develop bloom (white streaks). Use a double boiler or the controlled microwave method described in the recipe. Melt until the chocolate is mostly smooth but still contains a few small lumps, then remove from heat and stir until fully melted. This helps to gently temper the chocolate, resulting in a shiny, professional-looking coating with a satisfying snap.
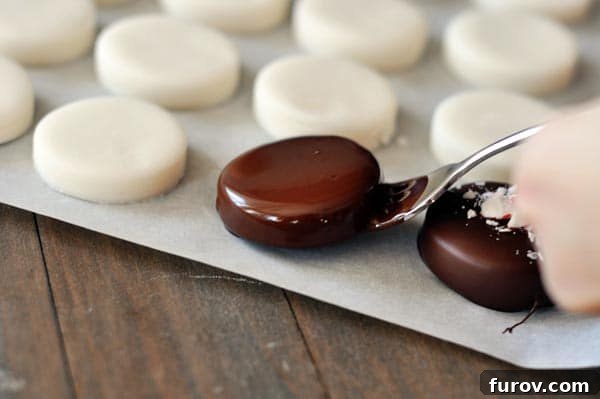
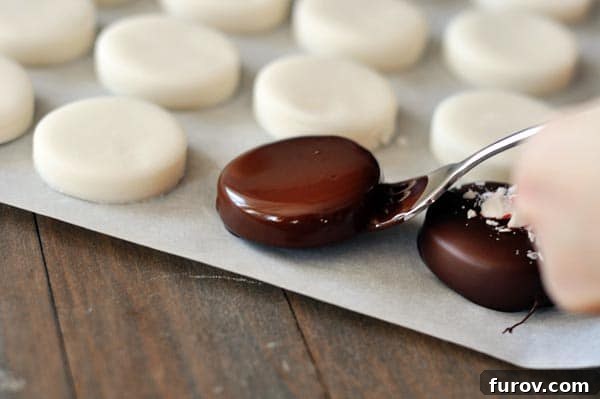
- Efficient Dipping Technique: A simple kitchen fork is your best friend for dipping. Gently lower the frozen patty into the melted chocolate, ensuring it’s fully coated. Lift the patty with the fork and gently tap the handle against the side of the bowl to allow any excess chocolate to drip off. Lightly scrape the bottom of the fork on the bowl’s edge to remove any remaining drips, then carefully place the chocolate-covered patty onto a fresh parchment-lined baking sheet. If needed, use a butter knife to gently slide the patty off the fork without smudging the chocolate. Work quickly, as the cold patties will set the chocolate almost instantly.
- Creative Toppings: While crushed candy canes are a festive and classic topping, consider other embellishments. A delicate drizzle of contrasting white chocolate, finely chopped toasted nuts (like pecans or almonds), or even a sprinkle of flaky sea salt can add a gourmet touch and exciting flavor combinations. Apply toppings immediately after dipping before the chocolate sets.
- Optimal Storage: Always keep your finished peppermint patties refrigerated in an airtight container. The creamy filling is best enjoyed chilled, and refrigeration also significantly extends their shelf life and prevents the chocolate from softening or melting.
Following these comprehensive tips will help ensure your homemade peppermint patties are not only incredibly delicious but also visually stunning, making them a true highlight of any dessert spread or thoughtful gift basket.
One Year Ago: Chocolate Shortbread Fingers
Two Years Ago: Chile Lime Popcorn
Three Years Ago: Root Beer Float Fudge
Homemade Peppermint Patties
Pin
Rate
SaveSaved!
Ingredients
- 7 ½ cups (855 g) powdered sugar, sifted
- ⅓ cup evaporated milk
- ⅓ cup light corn syrup
- 3 tablespoons extra-virgin or refined coconut oil, softened or melted
- ¼ teaspoon food-grade peppermint essential oil or 1 teaspoon peppermint extract (see note)
- 1 ½ pounds (680 g) bittersweet or semisweet baking chocolate, chopped
- Crushed peppermint candies for sprinkling, optional
Instructions
-
In a large mixing bowl, combine the powdered sugar, evaporated milk, light corn syrup, softened or melted coconut oil, and peppermint essential oil (or extract). Beat on low speed until all ingredients are thoroughly combined and form a cohesive, smooth dough. Divide the dough into two equal round disks, wrap each tightly in plastic wrap, and refrigerate for at least 30 minutes to firm up. This chilling step is crucial for making the dough easier to handle.
-
Generously dust a clean countertop or a large piece of parchment paper with powdered sugar. Unwrap one chilled dough disk and place it on the prepared surface, dusting the top with more powdered sugar. Using a rolling pin, roll the peppermint dough evenly to approximately 1/4-inch thickness. With a 1 7/8-inch round cookie or biscuit cutter (or a similar size), cut out individual patties.
-
Gather any dough scraps, gently re-roll them, and cut out additional patties until all the dough from the first disk is used. Repeat this process with the second chilled dough disk. Arrange the cut peppermint rounds in a single layer on a baking sheet lined with parchment paper. Freeze the patties until they are completely firm, which usually takes about 30 minutes, or you can leave them in the freezer overnight for convenience. This freezing step is crucial for easy dipping and preventing the patties from softening in the warm chocolate.
-
Prepare the chocolate coating. In a microwave-safe bowl, melt the chopped bittersweet or semisweet baking chocolate. I recommend using the microwave at 50% power, heating in 1-minute increments and stirring thoroughly after each interval. Continue until the chocolate is mostly melted but still contains a few small lumps. Remove from the microwave and stir continuously until these last lumps dissolve, resulting in a smooth, glossy chocolate. This technique helps to prevent chocolate bloom, ensuring a beautiful, shiny finish on your patties.
-
Using a fork, carefully dip each frozen peppermint patty into the melted chocolate, ensuring it’s fully coated. Lift the patty with the fork and gently tap the handle against the side of the bowl to allow any excess chocolate to drip off. Lightly scrape the bottom of the fork on the bowl’s edge to remove any remaining drips. Carefully place the chocolate-covered patty onto a fresh parchment-lined baking sheet. If needed, use a butter knife to gently slide the patty off the fork, avoiding touching the wet chocolate.
-
Immediately after dipping each patty, if you choose to use them, sprinkle crushed peppermint candies over the wet chocolate. This ensures they adhere properly before the chocolate sets. Allow the chocolate-dipped patties to set completely, which typically takes about an hour at cool room temperature or faster in the refrigerator. Once set, store the finished homemade peppermint patties in an airtight container in the refrigerator to maintain their freshness, firm texture, and prevent the chocolate from blooming.
Notes
Chocolate: Achieving a smooth, shiny chocolate coating is simpler than it seems. For advanced tips on tempering and melting chocolate to avoid bloom and ensure a perfect snap, consider watching a quick tutorial. Additionally, another helpful resource on dipping items in chocolate like a professional can elevate your confectionery skills and ensure your patties look as good as they taste.
Brand Recommendation: For consistent, high-quality results, my preferred brand of baking chocolate is Ghirardelli. Their chocolate melts smoothly and provides a rich, balanced flavor that complements the vibrant peppermint perfectly, giving your homemade patties a premium taste.
Recommended Products
Recipe Source: This recipe has been thoughtfully adapted from Cuisine at Home (December 2013 issue), with a notable modification of using coconut oil in place of shortening for a slightly different flavor profile and texture.