

If you adore the comforting warmth of cinnamon rolls but yearn for a bright, refreshing twist, these irresistible Orange Sweet Rolls are destined to become your new culinary obsession. Each perfectly baked roll is generously drizzled with a lightly sweet and tangy orange glaze, delivering a burst of sun-kissed citrus flavor in every tender bite. Prepare for pure bliss!
The Ultimate Homemade Orange Sweet Rolls Recipe: A Citrusy Morning Delight
Embark on a delightful baking journey with my recently perfected version of the classic sweet roll, now infused with the vibrant, aromatic essence of fresh oranges. This exceptional recipe is built upon a beloved buttermilk sweet roll base, a foundation celebrated for its consistent ability to produce incredibly tender, fluffy, and rich dough. We’re elevating this already divine base with a luxuriously sweet, buttery, and intensely orange-flavored filling, carefully adapted from a cherished recipe I’ve shared in the past.
Beyond the exquisite flavor profile, these orange rolls offer a unique “how-to-twist” shaping method, which I’ve detailed extensively below the main recipe. While these pastries are undoubtedly delicious prepared in the traditional spiral shape reminiscent of cinnamon rolls, I’m a firm believer that the twisted technique significantly enhances both their texture and visual appeal. The twisting creates more delightful nooks and crannies, allowing the luscious orange glaze to permeate every layer, resulting in an even more flavorful and satisfying experience. Whether it’s my personal bias or a genuine improvement, I invite you to try the twist and discover a new dimension of sweet roll perfection. Either way, prepare for seriously delectable results that will impress everyone at your breakfast or brunch table.

Why These Homemade Orange Sweet Rolls Will Steal Your Heart (and Taste Buds)
From the moment they emerge golden brown from the oven to the very last lingering taste, these homemade orange sweet rolls are a dream come true for any pastry connoisseur. The meticulously crafted dough is exquisitely tender and soft, providing the perfect pillowy base that beautifully complements the dreamy, light, and intensely citrus-infused filling. Every element of this recipe works in perfect harmony, creating a symphony of flavors and textures that results in a truly unforgettable culinary experience. They are truly an irresistible sweet breakfast pastry.
And here’s a confession that might spark a friendly debate: given the choice, I’d happily pick one of these vibrant orange rolls any day over a traditional cinnamon roll. Of course, in an ideal world, I’d eagerly devour one of each! But if I absolutely had to choose a single sweet roll, the refreshing zest and comforting sweetness of these orange beauties would win every single time. Their unique bright flavor profile truly sets them apart, offering a sophisticated yet utterly comforting taste that makes them a standout.

Crafting Perfection: A Step-by-Step Visual Guide to Your Orange Sweet Rolls
Creating these homemade orange sweet rolls is a deeply rewarding culinary adventure. To ensure your success and to make the process as enjoyable as possible, I’ve put together a comprehensive visual guide that walks you through each critical step. Pay special attention to the unique twisting technique – it’s a game-changer! Let’s dive into the details and make some magic happen in your kitchen.
1. Preparing the Dough: The Foundation of Fluffiness
The journey to perfect orange sweet rolls begins with a well-prepared dough. This buttermilk-based recipe ensures a rich and tender crumb. Accurate measurement of ingredients, especially the flour (as explained in the notes), and proper kneading are paramount for developing the gluten structure needed for soft, airy rolls. Don’t rush the rising process; patience is key to letting the yeast work its magic and create a truly voluminous dough.
2. The Heart of the Roll: Zesty Orange Filling Preparation
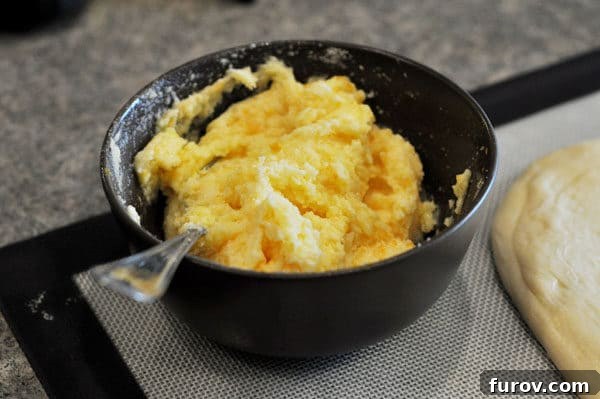
Our next step involves preparing the incredibly aromatic butter and fresh orange zest mixture. This vibrant, fragrant concoction isn’t just a filling; it’s the very soul of our sweet rolls, ensuring that every luscious layer is bursting with invigorating, fresh citrus flavor. Combining softened butter with bright orange zest and a touch of orange juice creates a spread that melts into the dough during baking, infusing it with unparalleled taste.
3. Rolling Out the Tender Dough to Perfection
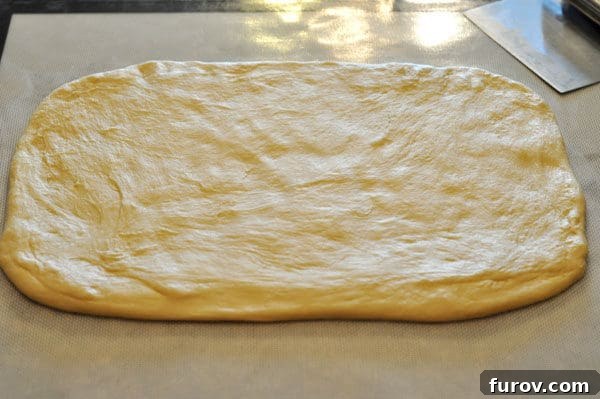
Once your buttermilk dough has completed its initial rise and has become wonderfully soft, supple, and pliable to the touch, it’s time for the crucial rolling step. Turn the dough out onto a lightly floured surface – a trusty roul’pat, if you have one, makes this step incredibly easy. The goal is to roll the dough into a large, even rectangle, approximately 16 by 12 inches. This generous surface area is essential for adequately distributing our delicious, zesty orange filling, ensuring every part of the roll receives ample flavor.
4. Spreading the Citrusy Goodness: The Filling Application
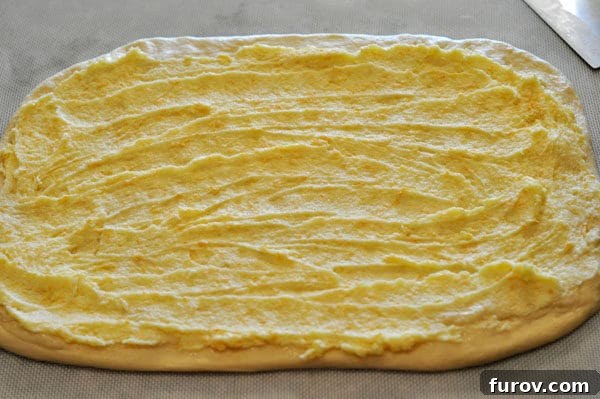
With the dough perfectly rolled, it’s time for the truly indulgent part: spreading the delectable orange-butter mixture. Using an offset spatula or a rubber spatula, carefully and evenly coat the entire surface of the rectangular dough with the fragrant filling. Ensure every inch is covered right up to the edges; this meticulous spreading guarantees that each and every bite of your finished orange sweet roll will burst with maximum, vibrant citrus flavor and buttery richness. This step is key to a uniformly delicious roll.
5. Forming the Perfect Log: Rolling and Sealing
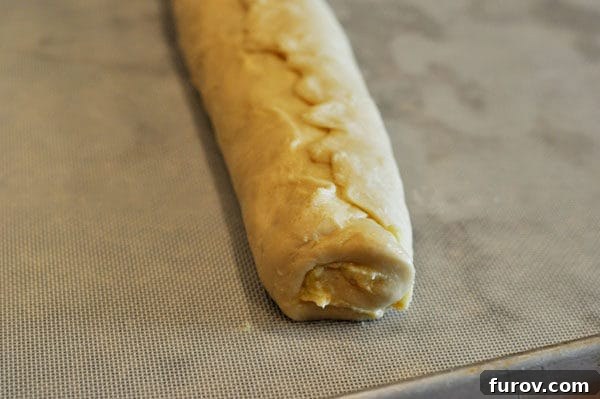
Now, with the filling perfectly spread, carefully lift the longest edge of the dough closest to you and begin rolling it up tightly into a uniform log. This tight roll is absolutely crucial for achieving those beautifully defined spirals, or for ensuring the integrity of our unique twisted shape later on. Once you’ve rolled it completely, firmly pinch the seam closed along the entire length of the log. This prevents any of that delicious filling from escaping during the subsequent rising and baking processes. Then, gently roll the log so it rests seam-side down.
6. Slicing the Log into Individual Rolls
Using a sharp serrated knife, carefully slice the rolled log into individual rolls. For a standard batch yielding 12-14 rolls, aim for slices that are roughly 1 to 1.5 inches thick. Consistency in thickness is important here, as it ensures that all your rolls bake evenly. You have the flexibility to slice them thinner for more delicate rolls or thicker for a heartier treat. At this stage, you can choose to arrange them as traditional spirals on your baking sheet or prepare them for our signature twisting technique.
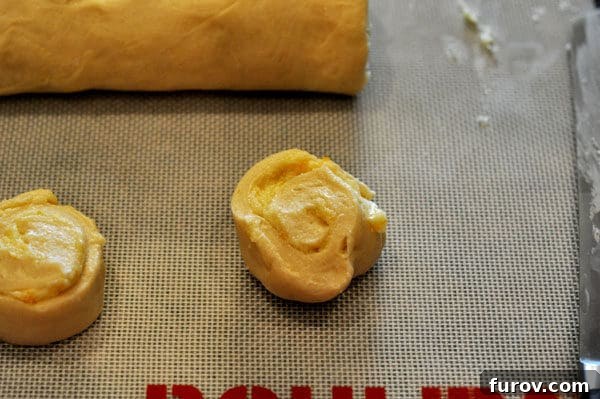
7. The Unique Twist Method: Elevating Texture and Presentation
This is where the true magic of these orange sweet rolls unfolds! To achieve the beautiful twisted look and a wonderfully varied texture, pick up each sliced roll one at a time. Gently grasp both sides of the roll and, simultaneously, pull and stretch the dough slightly. This action elongates the roll and strategically exposes more of the delicious, zesty filling, creating more surface area for the glaze to cling to.
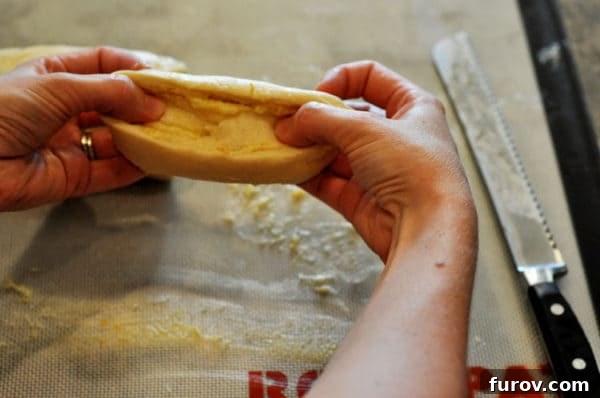
Once stretched to your desired length, carefully twist the roll into an elegant figure-eight shape or a simple, charming knot. This innovative method does more than just enhance visual appeal; it creates additional nooks and crannies, allowing the luscious glaze to seep deeper into the roll after baking, resulting in an even more flavorful and moist sweet roll. Place these unique twisted sweet rolls on your prepared baking sheet, ensuring they have ample space – approximately one to two inches apart – to rise beautifully and expand without crowding during their second proofing and baking. This thoughtful spacing is crucial for achieving light, airy, and perfectly golden-brown rolls.
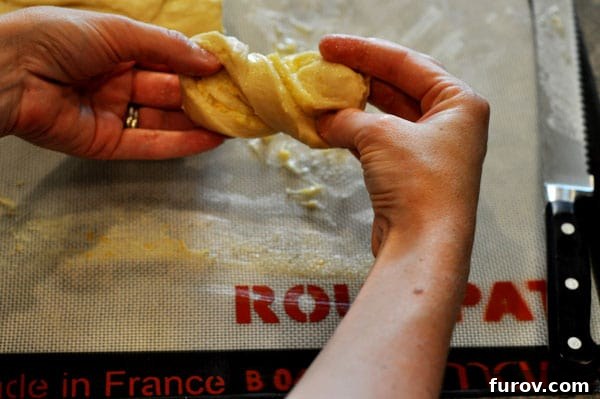
Arrange your beautifully twisted (or traditionally spiraled) rolls about an inch to two inches apart on your prepared baking sheet. This generous spacing is vital, allowing each roll sufficient room to expand beautifully during its final rise and in the heat of the oven without merging into one another. Now, they’re perfectly poised for their final proofing before baking to achieve that irresistible golden perfection!

Recipe Source: Mel’s Kitchen Cafe

Orange Sweet Rolls
Pin
Rate
Ingredients
Dough:
- ¾ cup warm buttermilk, (I pour the buttermilk in a glass liquid measuring cup and microwave for 1 minute on 50% power).
- 6 tablespoons (85 g) butter, melted and cooled
- 3 large eggs
- 4 ¼ cups (604 g) flour
- ¼ cup (53 g) sugar
- 2 ¼ teaspoons instant yeast
- 1 ¼ teaspoons salt
Orange Filling:
- ½ cup (113 g) softened butter
- 1 cup (212 g) sugar
- 2 tablespoons freshly squeezed orange juice
- Grated orange rind/zest from two large oranges, reserving 1/2 teaspoon grated rind for the glaze below
Orange Glaze:
- 1 ½ cups (171 g) powdered sugar
- 3 tablespoons freshly squeezed orange juice from about 1 orange
- ½ teaspoon grated orange rind/zest reserved from the filling above
Instructions
-
For the dough, whisk the warmed buttermilk and melted, cooled butter together in a large liquid measuring cup. In a standing mixer fitted with a dough hook (or a large bowl for hand mixing), combine 4 cups of flour, sugar, instant yeast, and salt. With the mixer on low speed, gradually add the buttermilk mixture and eggs, mixing until the dough just comes together, typically about 2 minutes. Increase the mixer speed to medium and knead the dough until it becomes smooth and elastic, approximately 10 minutes (allow 15-18 minutes for hand kneading). If, after 5 minutes of kneading, the dough remains excessively sticky, incorporate the remaining 1/4 cup flour one tablespoon at a time until the dough pulls away from the sides of the bowl but retains a slight tacky feel when gently pressed between your fingertips. (For a visual guide to dough consistency, refer to this helpful tutorial.)
-
Transfer the prepared dough to a large, lightly greased bowl. Cover the top of the bowl tightly with plastic wrap to prevent a skin from forming. Place the bowl in a warm, draft-free location and allow the dough to rise until it has visibly doubled in size. This process typically takes around 2 to 2 ½ hours, though the exact timing can vary depending on the ambient warmth and humidity of your kitchen environment.
-
To prepare the vibrant orange filling, combine all the designated filling ingredients in a small mixing bowl. Ensure you reserve 1/2 teaspoon of the grated orange zest for the glaze that will be made later. Mix the ingredients thoroughly until well combined and a spreadable consistency is achieved. Set this aromatic filling aside while you prepare the dough for its next stage.
-
Once the dough has completed its first rise and is beautifully doubled, gently turn it out onto a lightly floured countertop (a silicone baking mat like a roul’pat is ideal for this step). Using your hands or a rolling pin, press and roll the dough into an approximate 16 by 12-inch rectangle. If you are doubling the recipe, divide the dough in half and roll out one half at a time to manageability. Gently and evenly brush the prepared orange filling mixture over the entire surface of the rectangle, using an offset spatula or a rubber spatula to ensure full coverage.
-
Carefully lift the longest edge of the dough closest to you and begin to roll the dough into a tight, even log. Once rolled, pinch the seam firmly to ensure it is completely sealed, then gently roll the log so the seam side is facing down. Using a sharp serrated knife, slice the log into 12 to 14 evenly sized rolls; you can adjust the thickness to your preference. For a traditional cinnamon-roll aesthetic, arrange the sliced rolls cut-side down on a parchment-lined or lightly greased baking pan. If you wish to try the distinctive twist method (illustrated in the pictures above), take each sliced roll one at a time, grasp it gently by both ends, and simultaneously pull and twist the roll into a figure-eight or knot shape before placing it on the prepared pan. Cover the shaped rolls with lightly greased plastic wrap. Allow the rolls to rise in a warm place until they have doubled in size, which typically takes 1 to 1 ½ hours for the second rise.
-
Preheat your oven to 350 degrees Fahrenheit (175°C). Bake the rolls for 22-25 minutes, or until they are beautifully lightly golden on top and fully cooked through in the center. While the rolls are baking, prepare the glaze by whisking together the powdered sugar, freshly squeezed orange juice, and the reserved 1/2 teaspoon of grated orange zest until smooth. Once the rolls are out of the oven, allow them to cool for a few minutes until they are warm to the touch (not piping hot), then generously drizzle the prepared orange glaze over the warm rolls. Serve immediately and devour!
Notes for Perfect Baking
Flour Amount: It is crucial to remember that with all yeast doughs, the exact flour amount specified in a recipe should rarely be treated as an absolute, rigid rule (unless a precise weight measure is provided, in which case I highly recommend using a kitchen scale). Environmental factors such as humidity, temperature, altitude, and even the type of flour can significantly impact how much flour your dough will actually need. Therefore, rather than strictly adhering to a cup measurement, I always judge when to stop adding flour by carefully observing the dough’s texture, its appearance, and how it feels to the touch. The ideal dough should clear the sides of your mixing bowl but still possess a slight tackiness when pressed between your fingertips. This slight tackiness is the secret to achieving a wonderfully tender and moist sweet roll. Trust your intuition and the feel of the dough over strict measurements for the best results.
Yeast Guidance: If you’re new to working with yeast or would like to refine your technique, this comprehensive tutorial on working with yeast offers invaluable visual guidance. It will help you identify the characteristics of a perfectly floured dough and ensure proper yeast activation, both of which are fundamental for consistently creating beautifully fluffy and airy orange sweet rolls.
Recommended Products for Effortless Baking
Explore More Delightful Sweet Roll Recipes:
Tips for Success: Achieving Bakery-Quality Orange Sweet Rolls at Home
Crafting the perfect batch of homemade orange sweet rolls is a joyous and rewarding baking adventure. To ensure your rolls turn out beautifully fluffy, bursting with flavor, and utterly irresistible, consider these expert tips:
- Don’t Rush the Rise: Patience is truly a virtue when working with yeast doughs. Providing the dough with ample time to rise in a warm, draft-free environment is absolutely critical for achieving that characteristic light, airy, and tender texture. If your kitchen tends to be cool, you can create an ideal proofing environment by using a proofing drawer or by placing the covered bowl in a slightly warmed (but turned off) oven.
- Butter Quality Matters: Since high-quality butter is a key component in both the dough and the vibrant filling, using the best butter you can find will significantly enhance the overall flavor and richness of your finished rolls. Ensure your butter for the filling is properly softened; this makes it much easier to spread evenly across the dough.
- Fresh Orange Zest is Non-Negotiable: The majority of the vibrant orange flavor and delightful aroma in this recipe comes directly from the zest. Always use fresh oranges for both zesting and juicing to achieve the most intense and authentic citrus notes. A microplane zester is an excellent tool for grating fine zest without inadvertently including any of the bitter white pith.
- Mastering the Knead: Whether you choose to knead your dough by hand or utilize a powerful stand mixer, proper kneading is fundamental. This process develops the gluten in the dough, which in turn creates its essential elasticity and contributes to that wonderfully soft, chewy texture. The tutorial linked in the recipe notes is an excellent visual resource for understanding correct kneading techniques. A well-kneaded dough should feel smooth, be elastic, and ideally pass the “windowpane test,” indicating optimal gluten development.
- Achieve Even Slicing: When you’re ready to slice the rolled dough log, strive for as much consistency as possible in your cuts. Evenly thick slices ensure that all your rolls bake at approximately the same rate, preventing some from being undercooked while others become too dark. A sharp serrated knife will make this task much easier and more precise.
- The Glaze is the Grand Finale: The timing for applying the glaze is crucial. Drizzle the delightful orange glaze over the rolls while they are still warm, but not scorching hot. This allows the glaze to melt slightly, beautifully coat the rolls, and seep into all the wonderful nooks and crannies created during shaping. This process adds a critical layer of moisture and a final, irresistible boost of citrus sweetness, making each bite truly decadent.
Serving Suggestions & Storage Solutions for Your Delicious Orange Sweet Rolls
These magnificent homemade orange sweet rolls are versatile enough to grace a multitude of occasions, making them an instant crowd-pleaser:
- Breakfast or Brunch Extravaganza: Serve them warm, straight from the oven, alongside a freshly brewed cup of coffee or a comforting tea for a truly luxurious and indulgent start to your day. They are guaranteed to be the absolute showstopper at any brunch gathering or special morning celebration.
- Festive Holiday Treat: Their bright, cheerful, and inherently festive citrus flavor makes these rolls an ideal addition to holiday breakfast spreads, celebratory brunches, or even as a unique dessert option during special occasions, especially when citrus fruits are in their peak season.
- Afternoon Pick-Me-Up: Treat yourself to one as a delightful and energizing sweet snack to combat that midday slump, pairing perfectly with a gentle cup of herbal tea or a refreshing glass of water.
Storage Recommendations:
To maintain their exquisite freshness and tender texture, store any leftover orange sweet rolls in an airtight container. At room temperature, they will remain delicious for up to 2-3 days. For extended enjoyment, you can refrigerate them for up to a week. When you’re ready to savor them again, gently reheat the rolls in the microwave for a few seconds until soft and warm, or place them in a warm oven (covered loosely with foil to prevent drying) until heated through.
Convenient Make-Ahead Option:
For effortless morning indulgence, you can prepare these delightful rolls the night before! After you have shaped and arranged them on your baking sheet (but crucially, *before* their second rise), cover them tightly with a layer of lightly greased plastic wrap. Then, transfer the entire baking sheet to your refrigerator and let them cold proof overnight. The following morning, remove the rolls from the refrigerator and allow them to come to room temperature and complete their second rise. This might take approximately 1-2 hours, depending on your kitchen’s temperature. Once doubled, proceed with baking as directed in the recipe for fresh, warm rolls without the morning rush.
Conclusion: A Citrusy Delight Worth Every Moment of Baking
These homemade Orange Sweet Rolls are far more than just a simple pastry; they represent a true celebration of fresh, vibrant flavors harmoniously blended with comforting, tender textures. With their exquisitely soft buttermilk dough, aromatic and zesty orange filling, and an irresistible, glossy citrus glaze, they collectively promise a delightful culinary experience that far surpasses any store-bought alternative. Whether you are a seasoned baker confidently navigating yeast doughs or just embarking on your baking journey, this carefully crafted recipe is designed for resounding success and pure, unadulterated enjoyment. So, gather your fresh ingredients, diligently follow these comprehensive steps, and prepare to fill your home with the most incredible, uplifting aroma. Most importantly, treat your taste buds to a truly special homemade delight that will leave a lasting impression. Happy baking!