
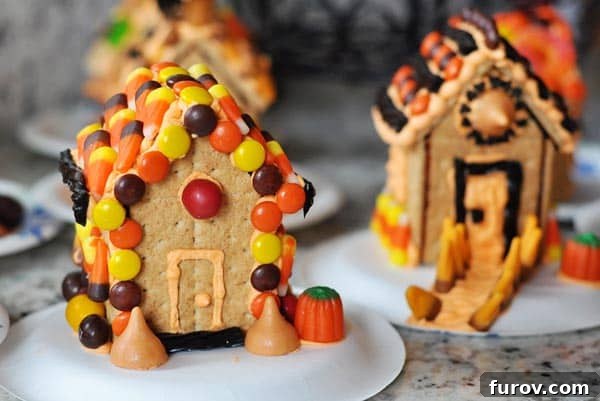
Simple Homemade Haunted Halloween Houses: The Revolutionary Burnt Sugar Method
Discover the secret to perfectly sturdy, edible graham cracker houses that won’t fall apart!
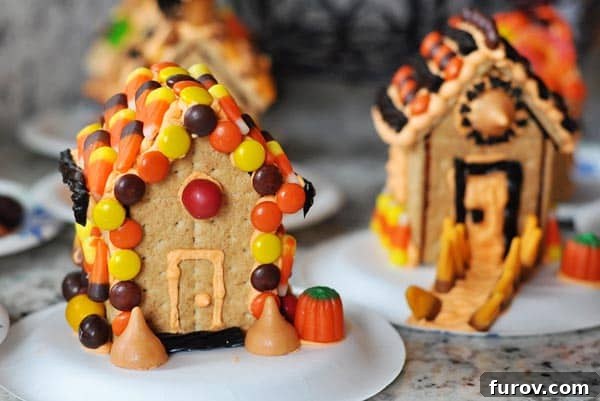
As the air turns crisp and autumn leaves begin their vibrant dance, a familiar excitement settles in: Halloween! It’s a time for spooky costumes, trick-or-treating, and, of course, delightful treats and crafts. If you’re looking for a fun, engaging, and delightfully messy activity to get your family into the Halloween spirit, look no further than these DIY haunted Halloween houses. Not only are they incredibly charming, but they also introduce a game-changing assembly technique that will revolutionize your holiday crafting, ensuring your edible creations stand tall and proud.
Many of us have fond memories of assembling gingerbread or graham cracker houses, whether for Christmas or Halloween. However, these memories are often accompanied by the frustration of collapsing walls, sticky icing that never quite dries, or the sad realization that “edible” often involves non-edible reinforcements like hot glue. For years, I struggled with runny royal icing, wishing for a faster, sturdier, and genuinely edible adhesive. That’s when a friend, Kate, shared a brilliant tip from her childhood: her mom always used burnt sugar instead of icing to assemble their festive houses. Intrigued and tired of flimsy structures, I decided to give this “burnt sugar method” a try. The results were nothing short of revolutionary!
Forget the sticky mess and the endless waiting for icing to dry. This innovative technique offers an instant, rock-solid bond that ensures your spooky little dwellings are ready for decoration within minutes, not hours. It’s safe, entirely edible, and creates a durable structure that can withstand enthusiastic decorating by even the wiliest little hands. Whether you’re planning a Halloween party craft session, a cozy family afternoon project, or simply want a festive centerpiece, these graham cracker haunted houses, assembled with the magic of caramelized sugar, are your perfect solution. Get ready to embark on a fun, creative, and deliciously edible adventure!
The Sweet Secret: Why Burnt Sugar Changes Everything for Edible House Construction
Before diving into the how-to, let’s talk about why burnt sugar is the superior choice for assembling edible houses. Traditionally, many crafters resort to royal icing, which, while ultimately drying hard, requires significant drying time – often hours – and can be prone to collapsing under its own weight or during the assembly process. The alternative, hot glue, provides instant adhesion but makes the house entirely inedible, defeating much of the purpose of a sweet craft project.
My own experiences with royal icing often involved propping walls with cans, waiting impatiently, and still finding my carefully constructed walls leaning or completely falling apart before the decorating even began. The idea of an instant, sturdy, and edible bond sounded too good to be true. But after trying Kate’s mom’s method, I can confidently say it’s a total game-changer.
Burnt sugar (or more accurately, caramelized sugar) hardens almost instantly, creating a bond as tough as cement. This means no more frustrating collapses, no need for rubber bands or other temporary supports, and houses that are robust enough to handle generous amounts of candy, sprinkles, and icing. While this technique is fantastic for gingerbread houses during the Christmas season (which I absolutely plan to do for our annual tradition!), it’s particularly perfect for impromptu Halloween crafts. For this project, where I was making 15 houses for 15 excited children, the speed and simplicity of graham crackers combined with the burnt sugar method was an absolute lifesaver. It allowed for quick assembly, minimal fuss, and maximum fun. Let’s explore how to create this magical “glue” and build your own sturdy haunted houses.
Step-by-Step Guide: Crafting Your Graham Cracker Haunted Houses
1. Preparing Your Revolutionary Burnt Sugar “Glue”
This is where the magic begins. You’ll need just one ingredient: sugar. The process is simple, but requires a little patience and careful attention.
Ingredients:
- 1-2 cups granulated sugar
Equipment:
- Large skillet (preferably NOT non-stick, as it allows you to better observe the sugar’s color change)
Instructions:
- Pour 1-2 cups of granulated sugar into your large skillet.
- Place the skillet over medium-low heat.
- The Golden Rule: Do NOT stir the sugar. Do NOT move the pan. Just let the heat work its magic.
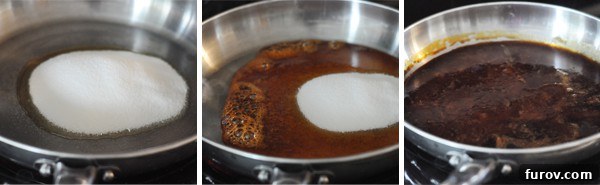
- Over approximately 15 minutes, you will observe the sugar gradually melting and caramelizing. It will begin to bubble around the edges first, slowly turning into a beautiful amber liquid.
- Troubleshooting Tip: If, at any point, the sugar starts to smell burnt or begins to smoke, immediately reduce the heat. While it’s called “burnt sugar,” we’re aiming for caramelization, not actual burning that sets off smoke alarms! The image above shows a perfect stage where the edges are bubbling, but there’s still granular sugar in the center; this is when you might consider lowering the heat slightly to ensure even melting.
- Once all the sugar has completely melted into a smooth, liquid caramel, keep the skillet over very, very low heat. This prevents the sugar from hardening too quickly, giving you ample time to assemble your houses.
Crucial Safety Warning: This molten sugar is incredibly hot and can cause severe burns if it comes into contact with your skin. Please exercise extreme caution during this step and throughout the assembly process. Keep children a safe distance away while handling the hot sugar. Adults should always supervise and handle the sugar directly.
2. Expert Graham Cracker Trimming Techniques
While your sugar is slowly caramelizing, it’s the perfect time to prepare your building blocks: the graham crackers. Each house requires four rectangular graham crackers.
For each house:
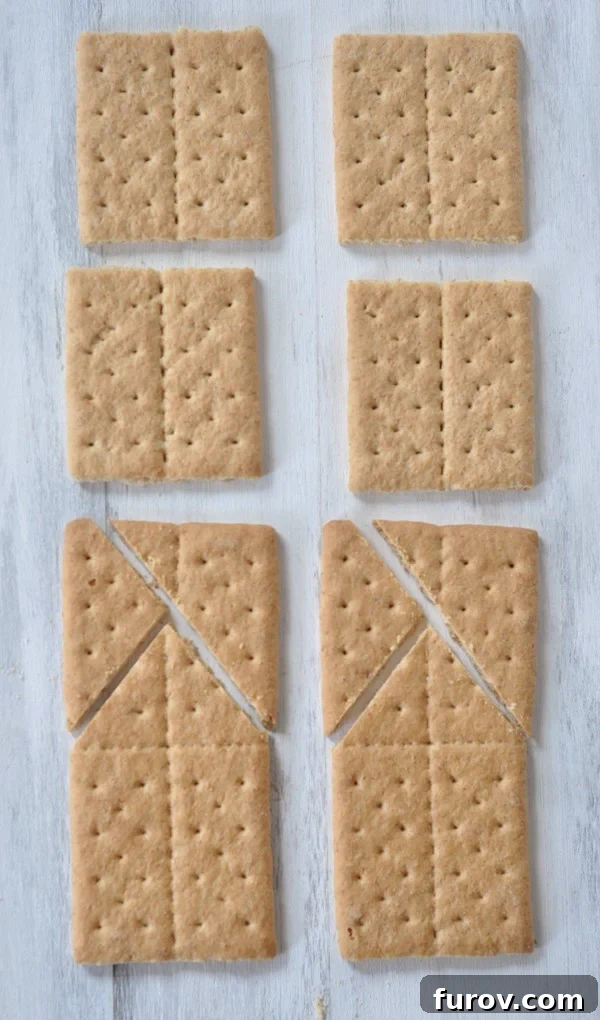
- Side Walls: Take two of the rectangular graham crackers and carefully break them along their center seam. This will give you four square pieces, which will form the side walls of your house.
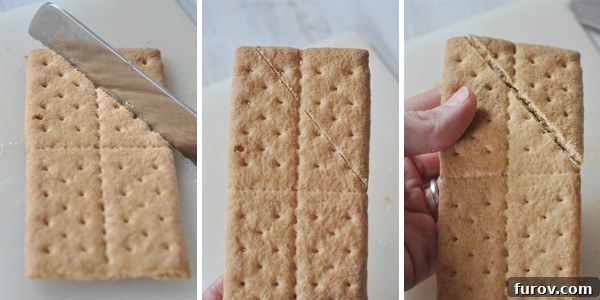
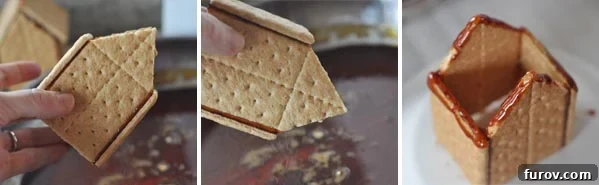
- Front & Back Walls (with Roof Peak): The other two rectangular graham crackers will become your front and back walls, complete with a triangular peak for the roof. You’ll need to trim these as shown in the picture above.
To ensure clean cuts and minimize crumbling, follow these essential graham cracker trimming techniques:
- Tip 1: Use a Sharp Serrated Knife. A serrated knife is your best friend here. Its saw-like edge glides through the delicate graham cracker more effectively than a straight blade, preventing excessive crumbling and creating a cleaner break.
- Tip 2: Employ a Gentle Sawing Motion. Think precision, not brute force. Instead of a forceful chopping or hacking motion, use a careful, gentle sawing action back and forth. This controls the cut and reduces the likelihood of the cracker shattering.
- Tip 3: Score, Then Break. For the cleanest edges, don’t attempt to cut all the way through the graham cracker in one go. Instead, gently score a line about halfway through the cracker where you want your cut to be. Once scored, gently press on the cut pieces from either side. The cracker will snap cleanly along your score mark, resulting in perfectly shaped components with minimal breakage.
3. Assembling Your Haunted House with Burnt Sugar
Now for the exciting part: bringing your house to life! Have all your trimmed graham cracker pieces ready and your skillet of perfectly melted, hot sugar on a very low heat setting. Remember, safety first!
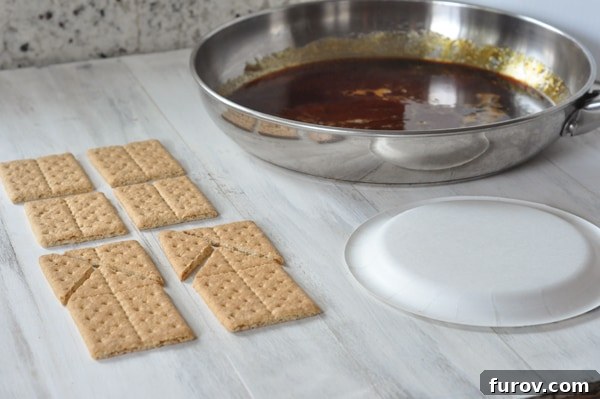
Important Reminder: Keep that skillet of sugar over very low heat during assembly. If it cools too much, it will harden and become unworkable. Also, continually remind yourself and anyone helping that this sugar is extremely hot. Use caution to avoid burns to fingers!
- Start the Base: Take one of your trimmed pieces (the front or back wall with the roof peak). Carefully dip both of its bottom edges into the hot, melted sugar.
- Attach the Sides: Working quickly, attach a square graham cracker piece (a side wall) to each sugared edge of the base piece. Press gently but firmly to adhere. The sugar will harden almost instantly, creating a strong bond. Don’t worry if a little sugar sticks to your plate; it will easily snap off once cool.
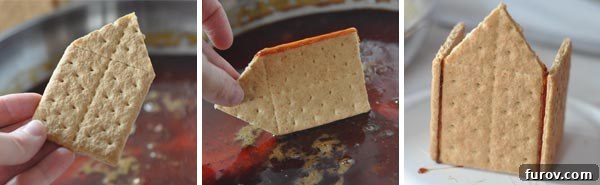
- Complete the Walls: Now, take your second trimmed piece (the remaining front or back wall). Dip both of its bottom edges into the hot sugar. Quickly position it to complete the rectangular base of your house, setting it between the two open ends of the attached square sides. Press the square sides gently towards the newly added wall to secure everything together.
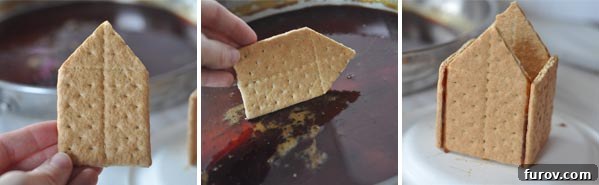
- Reinforce and Prepare for Roof: At this stage, let the partially assembled house sit for 1-2 minutes to ensure the sugar is completely set. You can use this brief moment to start assembling another house! Once slightly set, carefully pick up the entire house. Dip the top triangular edges and any remaining open seams of the walls into the hot sugar. You don’t need to completely coat every inch; a quick dip on each side will suffice to create a strong anchor for the roof.
- Add the Roof: Finally, working quickly so the sugar doesn’t harden, attach your two remaining square graham cracker pieces (the roof panels) to the sugared triangular peaks and upper edges of your house. Press lightly to adhere them. The sugar will bond them almost instantly.
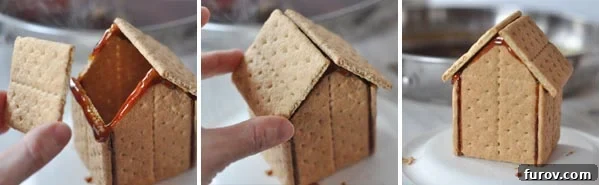
And just like that, within approximately 5 minutes, your sturdy graham cracker haunted house is assembled and ready for decoration! One of the greatest advantages of this method is its speed; these houses can be decorated almost immediately, or you can assemble them days in advance, storing them in an airtight container until your decorating party. This flexibility makes them perfect for busy Halloween schedules.
4. Decorating Your Spooky Masterpieces
With your robust graham cracker houses ready, it’s time for the most creative and enjoyable part: decorating! For decorating, I always recommend royal icing. Made from meringue powder (follow the recipe on the can!), royal icing dries hard and provides an excellent adhesive for candies, sprinkles, and other edible decorations, giving your haunted houses that polished, professional look.
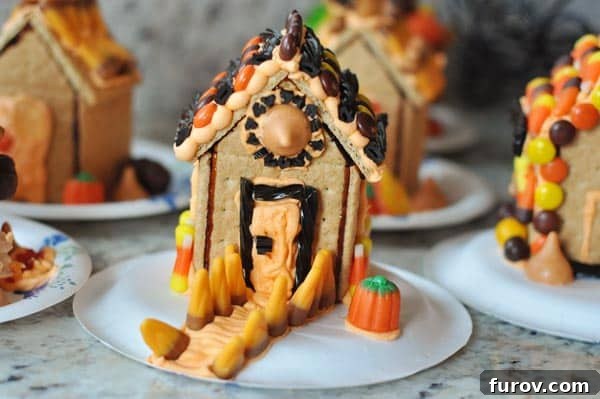
Gather an assortment of Halloween-themed candies: gummy worms, candy corn, mini chocolate chips, sprinkles in autumnal or spooky colors, edible glitter, licorice whips for vines, and perhaps even some pretzel sticks for fencing. The possibilities are endless! Set out bowls of various treats, provide piping bags or Ziploc bags with a corner snipped off for the royal icing, and let imaginations run wild.
We recently hosted a decorating party with eight boys and two girls, and everyone had an absolute blast transforming their simple graham cracker structures into whimsical, scary, or downright cute haunted houses. The best part? Not a single house collapsed under the weight of enthusiastic decorating! And, of course, the ultimate reward for their hard work was the joyful (and often messy) eating of their creations.
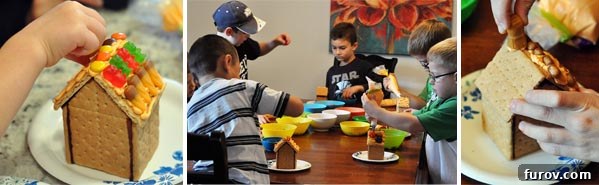
While these are perfectly themed for Halloween, it goes without saying that this exact same method can be used for beautiful Christmas gingerbread houses. Imagine the joy of assembling a festive village without the usual frustration!
The Undeniable Advantages of the Burnt Sugar Method
Having experienced the ease and efficacy of the burnt sugar method, I can confidently say I will never assemble any type of gingerbread or graham cracker contraption using anything else. The benefits are simply too compelling to ignore:
- Instant Hardening: The sugar hardens almost immediately upon cooling, meaning your houses are structurally sound within seconds.
- Unparalleled Sturdiness: This bond is incredibly tough, far more durable than any icing. It creates a robust structure that can withstand the weight of decorations and eager little hands.
- No Props Needed: Forget rubber bands, clothespins, or cans for support. The instant adhesion means the houses hold their shape perfectly on their own.
- 100% Edible: Unlike hot glue, burnt sugar is entirely edible, making your craft project a delicious treat from start to finish.
- Speed and Efficiency: Assemble multiple houses in a fraction of the time it would take with traditional icing, making it ideal for parties or large groups.
- Clean Assembly: While you need to be careful with the hot sugar, the hardening process is very clean, minimizing sticky messes compared to wet icing.
This truly brilliant technique takes the stress out of edible house construction and brings back the pure joy of creating and decorating. It empowers crafters of all ages to build sturdy, beautiful, and delicious haunted houses (or gingerbread chalets!) with confidence and ease.
Explore More Spooky & Sweet Halloween Food Ideas!
Are you looking for even more delightful inspiration to make your Halloween celebrations extra special? From ghoulishly good desserts to fun and festive snacks, there’s a world of spooky creativity waiting for you. Dive into our collection of Halloween food ideas to discover new recipes and crafts that will charm your guests and thrill your family. Whether you need a treat for a classroom party, a dish for a potluck, or just something fun to make at home, you’ll find plenty of cute and creepy options to choose from. Simply click on the links below or explore our sidebar for a treasure trove of Halloween culinary adventures!
This “burnt sugar” method is not just for houses; it’s a fundamental trick that opens up a world of possibilities for edible construction. Happy crafting, and have a wonderfully spooky and delicious Halloween!