
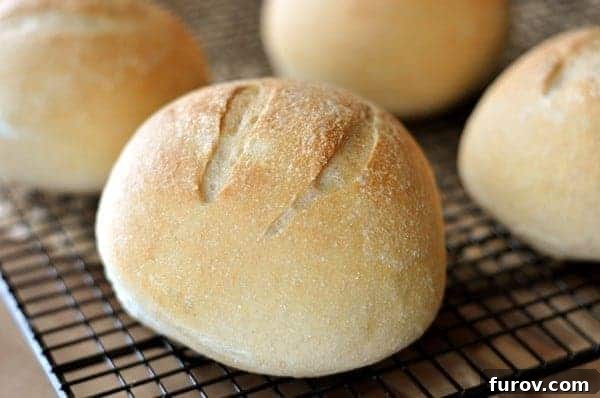
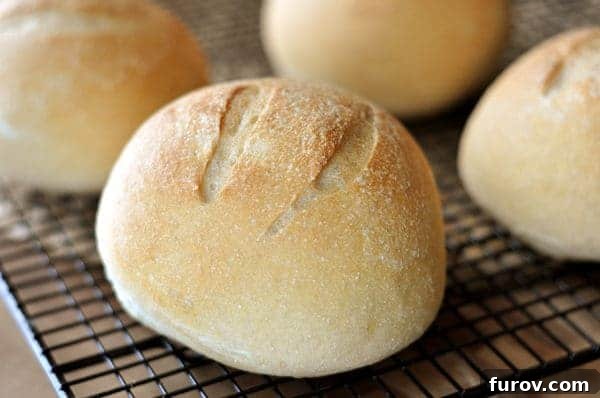
These homemade Italian bread bowls are hearty, dense, and absolutely perfect for filling up with your favorite delicious, comforting soup. They are truly my go-to bread bowls for any occasion!
Mastering Homemade Italian Bread Bowls for the Ultimate Soup Experience
There’s nothing quite like a warm, comforting bowl of soup on a chilly day, especially when that bowl is edible! Homemade bread bowls elevate any soup into a truly special meal, turning a simple dish into an unforgettable culinary experience. While many might opt for store-bought versions, crafting your own Italian bread bowls from scratch offers a level of freshness, flavor, and satisfaction that simply can’t be matched.
I’ve received numerous requests for my go-to bread bowl recipe, particularly after featuring them with my Chicken and Wild Rice Soup a while back. For years, I’ve relied on a couple of trusty recipes, each yielding wonderfully dense and hearty bowls ideal for holding rich stews and creamy soups. However, if pressed to choose a definitive favorite, it would undoubtedly be this robust Italian Bread Bowl recipe. Its distinct flavor and perfect texture make it a standout.
If you’re also fond of a lighter, airier bread bowl, I also have an excellent Artisan Bread Bowl recipe. It used to be part of this post, but for clarity and ease of navigation, it now resides in its own dedicated article.
Why Homemade Italian Bread Bowls Are a Game Changer
Opting for homemade bread bowls isn’t just about the novelty; it’s about superior taste, texture, and the sheer joy of baking. Here’s why these Italian bread bowls will transform your soup nights:
- Unmatched Flavor and Freshness: Store-bought bread bowls often lack the depth of flavor and tender crumb of a freshly baked loaf. Our homemade Italian bread bowls boast a slightly tangy, rich flavor that complements a wide array of soups beautifully. The aroma of fresh bread filling your kitchen is an added bonus!
- Perfect Texture: The beauty of an Italian bread bowl lies in its contrast – a wonderfully crusty exterior gives way to a soft, yet dense and sturdy interior. This robust structure is crucial; it prevents the bowl from collapsing or becoming soggy too quickly, ensuring your soup stays contained and delicious until the very last spoonful.
- Customizable Size and Shape: When you make bread bowls at home, you have complete control. Want smaller bowls for appetizers? Larger ones for a main course? You can tailor the size to fit your needs, something difficult to achieve with pre-made options.
- A Satisfying Project: There’s immense satisfaction in creating something delicious from scratch. The process of kneading dough, watching it rise, and then seeing your golden, perfectly shaped bread bowls emerge from the oven is incredibly rewarding. It’s a wonderful activity for bakers of all skill levels.
- Economic and Healthy: Making your own bread bowls is often more cost-effective than buying specialty bread. Plus, you control the ingredients, avoiding unwanted preservatives or additives, making it a healthier choice for your family.
Choosing the Perfect Soup for Your Bread Bowls
While these Italian bread bowls are versatile, certain soups truly shine when served in them. The key is to pick soups that are thick and hearty enough to stand up to the bread, rather than thin, watery broths that might seep through too quickly. Here are some fantastic options:
- Creamy Soups: Think Broccoli Cheddar, Creamy Tomato, or Mushroom Bisque. The rich, velvety texture of these soups pairs wonderfully with the rustic bread.
- Hearty Stews and Chilis: Beef Stew, White Chicken Chili, or even a classic Bean Chili are excellent choices. Their thick consistency and chunky ingredients are perfect for scooping up with pieces of the edible bowl.
- Classic Chowders: New England Clam Chowder or Corn Chowder are traditional favorites that taste incredible in a bread bowl, evoking a cozy, seaside feel.
- Thick Vegetable Soups: A hearty Lentil Soup or a thick Minestrone with plenty of vegetables and pasta will hold up well and offer a fulfilling meal.
Remember to spoon your soup into the bowls just before serving to maintain the bread’s integrity and crispness. The scooped-out bread can be toasted into croutons or served alongside for dipping!
The Art and Science of Yeast Bread: Key to Perfect Bread Bowls
Baking with yeast can seem intimidating, but it’s a straightforward process once you understand a few fundamental principles. This Italian bread bowl recipe uses active dry yeast, which typically requires activation. If you’re using instant yeast, you can often skip the initial proofing step, but it’s always good practice to check its viability. Look for a foamy, creamy layer on top of the water after about 10 minutes – that’s your yeast telling you it’s alive and ready to work!
The type and amount of flour are also crucial. While the recipe calls for all-purpose flour, understanding how flour behaves is essential for success. Factors like humidity, temperature, and even altitude can affect how much flour your dough needs. Instead of adhering rigidly to a specific measurement, learn to judge the dough by its texture. For bread bowls, the dough needs to be a bit firmer than a typical dinner roll dough. This firmness encourages the bowls to rise upwards, maintaining their shape, rather than spreading out too much.
Kneading is where the magic happens, developing the gluten that gives bread its structure and chewiness. Whether by hand or with an electric mixer, knead until the dough is smooth and elastic. A well-kneaded dough will spring back when gently poked.
Finally, patience during the rising process is paramount. A warm, draft-free environment helps the yeast do its job, allowing the dough to double in volume. This crucial step contributes to the bread’s light texture and good rise in the oven. Slashing the tops of your shaped dough balls isn’t just for aesthetics; it allows steam to escape during baking, contributing to that desirable crusty exterior.
Recipe: Classic Homemade Italian Bread Bowls
Italian Bread Bowls
These rustic Italian bread bowls are thick, hearty, and the perfect edible vessel for any comforting soup or chili. Easy to make and incredibly satisfying!
- Yield: 6-8 bread bowls
- Prep Time: 1 hr 30 mins
- Cook Time: 18 mins
- Total Time: 1 hr 48 mins
Rating: 4.66 stars (66 ratings)
Print Recipe
Pin Recipe
Ingredients
- 1 ½ tablespoons active dry yeast (use 1 tablespoon instant yeast if preferred)
- 2 ½ cups warm water (approximately 105-115°F or 40-46°C)
- 2 teaspoons salt
- 2 tablespoons vegetable oil
- 7 cups all-purpose flour (see notes on flour amount below)
- 1 tablespoon cornmeal (for dusting baking sheets)
Instructions
- In a large mixing bowl (or the bowl of a stand mixer fitted with a dough hook), combine the active dry yeast with the warm water. Stir gently and let it stand for about 10 minutes, or until the mixture becomes creamy and foamy. This indicates the yeast is active. (If using instant yeast, you can skip this proofing step and proceed directly to adding other ingredients).
- To the yeast mixture, add the salt, vegetable oil, and 4 cups of the all-purpose flour. Beat well with an electric mixer on medium speed until thoroughly combined.
- Gradually add the remaining flour, about ½ cup at a time, beating well after each addition. Continue adding flour until a soft, pliable dough forms that is no longer sticky to the touch. You may not need all 7 cups of flour, as dough consistency can vary based on humidity and other factors. The goal is a slightly firmer dough than you might use for rolls, which helps the bread bowls maintain their upright shape during baking.
- Once the dough comes together, turn it out onto a lightly floured surface. Knead the dough until it is smooth and elastic, which typically takes about 6 minutes by hand, or let your stand mixer do the work for you.
- Lightly oil a clean large bowl. Place the kneaded dough in the bowl, turning it once to coat the entire surface with oil. Cover the bowl with a damp cloth or plastic wrap and place it in a warm, draft-free spot. Let the dough rise until it has doubled in volume, usually around 40 minutes.
- Gently punch the risen dough down to release the air. Divide the dough into 6 to 8 equal portions, depending on your desired bread bowl size. Shape each portion into a tight, round ball.
- Prepare your baking sheets by lightly greasing them and sprinkling them with cornmeal. Alternatively, use Silpat liners or parchment paper for non-stick baking. Place the shaped dough balls onto the prepared baking sheets, leaving ample space between them.
- If desired, use a sharp knife or razor blade to make a few shallow slashes on the top surface of each dough ball. This allows for controlled expansion and adds a rustic touch.
- Cover the shaped dough balls again with a damp cloth and let them rise in a warm, draft-free place for a second time, until they have doubled in bulk, about 35 minutes.
- While the bread bowls are rising for the second time, preheat your oven to 400°F (200°C).
- Bake the bread bowls in the preheated oven for 15-18 minutes, or until they are beautifully golden brown and sound hollow when tapped on the bottom.
- Remove from the oven and let them cool slightly on a wire rack before hollowing them out and filling with your favorite soup.
Notes
- Flour Amount: As with all yeast doughs, consider the 7 cups of flour a guideline rather than a strict rule. Factors like humidity, temperature, and even the brand of flour can affect how much is needed. Always judge by the texture: the dough should be soft, supple, and just barely sticky, but not wet. For more detailed guidance on working with yeast and achieving the perfect dough consistency, refer to helpful yeast tutorials.
- Whole Wheat Flour: For a heartier, more nutritious bread bowl, you can substitute a portion of the all-purpose flour with finely ground white whole wheat flour. I often use half to three-quarters whole wheat with excellent results. For 100% whole wheat, the bread bowls will be a bit denser, but still delicious. If incorporating whole wheat flour, you may need to add a few extra minutes to the kneading time to fully develop the gluten.
Nutrition Information (per 1 bowl serving)
- Serving: 1 Bowl
- Calories: 581kcal
- Carbohydrates: 113g
- Protein: 16g
- Fat: 6g
- Saturated Fat: 1g
- Sodium: 784mg
- Fiber: 4g
- Sugar: 1g
Recommended Products
Recipe Source: Adapted from allrecipes.com
Tips for Success: Achieving Bakery-Quality Bread Bowls at Home
Making homemade bread bowls is a rewarding process, and a few key tips can help ensure your success:
- Don’t Rush the Rise: Yeast doughs thrive on patience. While the recipe provides approximate rising times, always go by visual cues – the dough should genuinely look doubled in size, not just slightly puffed. A slower rise often leads to better flavor and texture.
- Measure Accurately, Especially Flour: If you have one, a kitchen scale is invaluable for measuring flour by weight rather than volume. This provides the most consistent results, as a cup of flour can vary significantly in weight depending on how it’s scooped.
- Check Your Oven Temperature: An inexpensive oven thermometer can be a game-changer. Ovens often run hotter or colder than their display indicates, and accurate temperature is vital for even baking and a beautiful crust.
- Use Non-Stick Surfaces: Parchment paper or silicone baking mats (like Silpat) are your best friends for preventing sticky situations and ensuring your bread bowls release easily from the baking sheet without losing their shape.
- Hollowing Out the Bowls: Once cooled, use a serrated knife to carefully cut a circle or square around the top of each bread bowl, leaving a border of about ¾ to 1 inch. Then, gently hollow out the soft interior bread, leaving a sturdy shell. Be careful not to cut or tear through the bottom or sides!
- Don’t Waste the Innards: The scooped-out bread is delicious! You can cube it and toast it to make homemade croutons for your soup, turn it into breadcrumbs, or simply serve it alongside the bread bowls for dipping.
Serving and Storage Suggestions
For the best experience, hollow out and fill your homemade Italian bread bowls with soup just before serving. This prevents the bread from becoming overly saturated and maintains its delightful texture. Serve them warm, allowing your guests to tear off pieces of the crusty exterior to dip into their soup.
If you have leftover bread bowls or want to prepare them in advance, you can store the empty, cooled bread bowls at room temperature in an airtight container for up to 2-3 days. For longer storage, they freeze beautifully. Wrap individual cooled bread bowls tightly in plastic wrap, then place them in a freezer-safe bag for up to 1-2 months. To reheat, thaw at room temperature, then refresh in a preheated 350°F (175°C) oven for about 5-10 minutes until warmed through and crusty again.
Other Delicious Bread Recipes to Explore
If you’ve enjoyed making these Italian bread bowls, you might be interested in exploring other homemade bread recipes that offer similar comfort and satisfaction. Baking bread at home is a rewarding hobby, and there are many wonderful variations to try:
Other Recipes Like This:
Making homemade Italian bread bowls is more than just baking; it’s creating an experience. The rich aroma, the satisfying chew, and the joy of serving a meal in such a unique way make all the effort worthwhile. Dive into this recipe and discover the magic of homemade bread bowls – your soup nights will never be the same!
Happy Baking!