
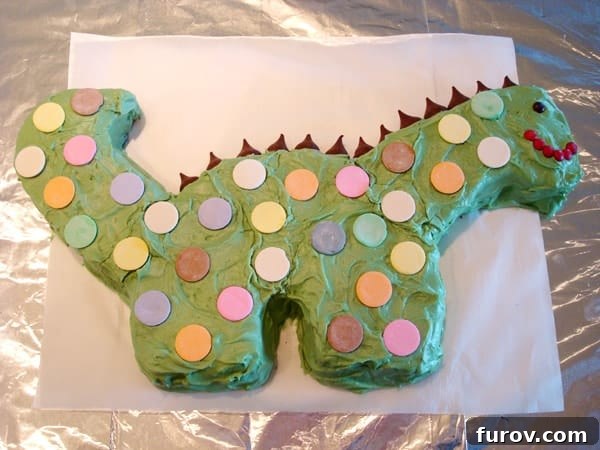
Creating a memorable birthday cake for your child is a joyous occasion, and nothing quite captures the imagination like a spectacular dinosaur birthday cake. This guide will walk you through crafting a truly exceptional from-scratch Devil’s Food Cake – renowned for its incredible richness and unparalleled moistness – and transforming it into a prehistoric masterpiece that will delight every little paleontologist at the party.
Gone are the days when homemade cakes were synonymous with dry, crumbly textures. We’re about to unveil a secret recipe that will forever change your perception of baking from scratch, ensuring your dinosaur creation is not only visually stunning but also irresistibly delicious. Get ready to bake a cake that’s rich, deeply flavorful, and so moist it practically melts in your mouth.
The Roar-some Request: A Dinosaur Birthday Cake Adventure
Every parent knows the unique challenge and immense satisfaction of bringing a child’s birthday vision to life. For my son’s third birthday, his request was clear and enthusiastic: a dinosaur cake! While I may not be a professional pastry artist, the desire to create something special for his big day fueled my ambition. After discovering a simple yet effective pattern online for shaping a dinosaur, the primary mission became finding a chocolate cake recipe that would truly stand out.
Baking for a child’s birthday is more than just combining ingredients; it’s about crafting memories, seeing their eyes light up, and making their wildest dreams come true – even if those dreams involve towering, frosted reptiles! This cake wasn’t just about celebrating another year; it was about celebrating his love for all things Jurassic and creating a center-piece that would spark pure, unadulterated joy.
From Box Mix Comfort to From-Scratch Excellence: My Baking Evolution
I have a confession to make, and it might surprise some avid bakers: for a long time, I actually appreciated cake mix cakes. Their consistent moistness and the sheer convenience they offered were undeniably appealing, especially when navigating the demands of a busy household. I grew up on them, and honestly, they always delivered a satisfying result. However, as my passion for baking grew, so did my desire to master the art of homemade cakes.
My initial attempts at scratch-baked chocolate cakes, sadly, often left me disappointed. They frequently turned out dry, lacking the depth of flavor I craved, and certainly not living up to the moist, tender crumb I remembered from the more convenient box mixes. It felt like a constant quest to find that elusive perfect balance – a cake that was both genuinely homemade and exceptionally delicious. I tried various recipes, hoping to stumble upon a winner, but many fell short of my high expectations. For my son’s birthday, I was initially considering a vanilla recipe, but when the birthday boy himself expressed a desire for chocolate, the search for the ultimate chocolate cake intensified.
I knew there had to be a homemade chocolate cake recipe that could rival, if not surpass, the qualities I admired in those convenient mixes. My goal was to find a recipe that promised rich chocolate flavor, a wonderfully moist texture, and a straightforward baking process. Little did I know, the solution was waiting in a trusted culinary companion.
Discovering the Ultimate Devil’s Food Cake: A Game Changer
And then I found it – the recipe that would change my baking perspective forever and become my go-to for truly exceptional chocolate cakes. It was nestled within the pages of my beloved King Arthur Flour Baker’s Companion, a resource I should have turned to sooner. This Devil’s Food Cake recipe proved to be an absolute revelation, delivering everything I had been searching for and more. It was the end of relying on chocolate cake mixes, ushering in a new era of from-scratch baking!
This cake is nothing short of magnificent. It’s incredibly rich, with a deep, satisfying chocolate flavor that isn’t overly sweet. But the true star of this recipe is its texture: it’s profoundly moist, almost impossibly so, creating a tender crumb that makes every bite a luxurious experience. The moistness isn’t just “good”; it’s exceptional, setting this recipe apart from countless others I had tried.
One of the practical advantages that makes this recipe a true winner for any home baker is its use of readily available all-purpose flour. Many gourmet cake recipes call for cake flour, which, while excellent for specific textures, isn’t always a pantry staple. The fact that this Devil’s Food Cake achieves such superior results with standard all-purpose flour is a testament to its brilliant formulation. I adored it, and most importantly, so did my son – though, to be fair, he probably would have devoured anything cleverly disguised as a vibrant green dinosaur, so his judgment might be slightly biased!
This recipe provides a fantastic foundation for any celebratory cake, especially one as creatively themed as a dinosaur. Its robust flavor and moist structure hold up beautifully to carving and decorating, making it the ideal choice for ambitious birthday projects.
Crafting Your Dinosaur Cake: Beyond the Recipe
Once your delectable Devil’s Food Cake layers are baked and cooled, the real fun begins: transforming them into a magnificent dinosaur! The online pattern I found provided a simple guide, usually involving two round cake layers and strategic cuts to create the body, head, and tail of a dinosaur. Here’s a general approach:
First, stack and frost two round cake layers. Then, using a clean, sharp knife, carefully cut the stacked cake. A common method involves cutting a large ‘S’ shape to form the main body, with the remaining pieces used for the head, neck, and tail. Don’t be intimidated; the beauty of a homemade dinosaur cake is its charming, slightly rustic appeal. Imperfections only add to its unique character!
Next, it’s all about the frosting and decoration. Green frosting is a must for a classic dinosaur look. Apply a thin “crumb coat” first to seal in any loose crumbs, then chill the cake before applying a final, thicker layer of frosting for a smooth finish. Get creative with textures – you can use a fork to create scale-like patterns in the frosting, or pipe on spikes for a more dramatic effect.
For additional details, chocolate chips, M&Ms, or even thinly sliced chocolate cookies can be used to create the iconic “chocolate spikes” along the dinosaur’s back. Colored candies or fruit leather can be cut into shapes for colorful spots or eyes, bringing your prehistoric friend to life. Don’t forget to give your dinosaur personality with expressive eyes – perhaps two large candies or piped frosting dots with smaller pupils. This is where your inner artist can truly shine, making the cake as unique as your child’s imagination!
Think about the overall presentation too. A sprinkle of crushed graham crackers around the base can mimic sand or dirt, completing the prehistoric scene. Small toy dinosaurs can be placed around the cake (not on it, unless they are food-safe and thoroughly cleaned) to enhance the theme for an unforgettable party display.
Dinosaur Birthday Cake
15
35
50
Pin
Ingredients
-
12 tablespoons
(172 g) unsalted butter, softened -
1 ¾ cups
(371 g) granulated sugar - ½ teaspoon salt
- 1 ½ teaspoons baking soda
- 2 teaspoons pure vanilla extract
-
2 cups
(284 g) all-purpose flour -
¾ cup
(64 g) unsweetened cocoa powder - 4 large eggs
- 1 ½ cups milk
Instructions
-
Preheat your oven to 350°F (175°C). Prepare your cake pans as described in step 4.
-
In a large mixing bowl, combine the softened butter, granulated sugar, salt, baking soda, and pure vanilla extract. Beat these ingredients together with an electric mixer on medium-high speed until the mixture is light, fluffy, and noticeably pale. This creaming process should take at least 5 minutes; do not rush this essential step, as it incorporates air and contributes significantly to the cake’s texture.
-
In a separate bowl, whisk together the all-purpose flour and unsweetened cocoa powder until thoroughly combined. If you notice any lumps in the cocoa, it’s advisable to sift the mixture to ensure a smooth batter.
-
Add the large eggs to the creamed butter mixture one at a time, beating well after each addition until fully incorporated. Continue by slowly blending in one-third of the flour-cocoa mixture, followed by half of the milk. Then, add another third of the flour mixture, the remaining milk, and finally, the remaining flour mixture. Make sure to scrape down the sides and bottom of the bowl frequently with a spatula throughout this process to ensure all ingredients are evenly mixed and no pockets of unmixed flour remain.
-
Prepare your cake pans by greasing and flouring them. You can use two 9-inch round cake pans, two or three 8-inch round pans, or a 9×13-inch sheet cake pan. For extra assurance against sticking and ease of removal, I highly recommend lining the bottom of your round pans with a circle of parchment paper after greasing.
-
Divide the prepared batter evenly among your chosen cake pans. Bake the cakes in the preheated oven for 30 to 35 minutes. Begin checking for doneness around the 28-minute mark. The cakes are ready when a wooden skewer or toothpick inserted into the center comes out clean or with only a few moist crumbs attached. Be careful not to overbake, as this can lead to a dry cake!
-
Once baked, remove the cakes from the oven and let them cool in their pans on a wire rack for 5 to 10 minutes. This allows the cake to set further before being handled. After this initial cooling, carefully invert the cakes onto the wire rack to cool completely before frosting.
Notes
Weigh the Ingredients for Precision: I cannot stress this enough – if you have a kitchen scale, always weigh your ingredients, especially flour. I conducted a small experiment with this very recipe, measuring flour by volume versus weight, and found that cup measurements can be wildly inaccurate. Going by volume alone, I would have added nearly 3/4 cup too much flour! Weighing ensures you use the precise amount, which is critical for the perfect cake texture and moistness. It’s a simple step that makes a huge difference in baking success.
Don’t Overmix: After adding the dry ingredients, mix just until combined. Overmixing can develop the gluten in the flour too much, leading to a tough, dry cake.
Room Temperature Ingredients: Ensure your butter, eggs, and milk are at room temperature. This allows them to emulsify properly, creating a smooth, uniform batter that traps air more effectively, resulting in a lighter and more tender cake.
Mel
Dessert, Birthday Cake
American
Bake
Recipe Source: Adapted from King Arthur Flour Baker’s Companion
Beyond the Dino: More Irresistible Cake Recipes to Explore
If you loved creating this fantastic dinosaur cake, or if you’re simply looking for more delightful cake recipes to add to your repertoire, here are some other crowd-pleasing options from my kitchen. Each one promises to deliver delicious results, perfect for any occasion, from everyday treats to special celebrations.